The Just a Few Stitches Crochet Group gets a big head start crocheting Sleepy Bears for kids in their community!
We all know that Sleepy Bear makes a great gift. I love seeing the way a child’s eyes light up when they hug this lovable and cuddly bear. As summer begins to wind down, I’m already thinking about the coming holidays and all those kids out there who really need a Sleepy Bear the most. I’m thinking of the kids who lost someone special to them this year. Those who have survived tragedies like fire or natural disaster. The kids who are afflicted with illness. Those who are struggling to be accepted at school. Those who are battling depression. While a teddy bear can’t be expected to solve all their problems, it can help them to feel loved and to let them know that someone cares.
That’s why I’d like to give you this call to action. Let’s each make one Sleepy Bear to give to a child in need this holiday season. Here’s what we can do to fulfill the need between now and December 25. Continue reading →
Sleepy Bear has long been one of my favorite patterns, and from the number of Sleepy Bears you all have made, I’d say he’s one of your favorites too! It always makes my day when someone shares a photo of a Sleepy Bear they’ve made. Each one has such a unique personality. I love it!
When fellow picnickers Nelle Helleur and Janette Vanzanen shared photos of their Sleepy Bears decked out in pajamas and nightcaps, I knew that I just had to create some accessories for my bears too. Any nap really wouldn’t be complete without a nightcap and a blanky, after all. Thank you both for the inspiration!
And finally I’m ready to share these patterns with you. Continue reading →
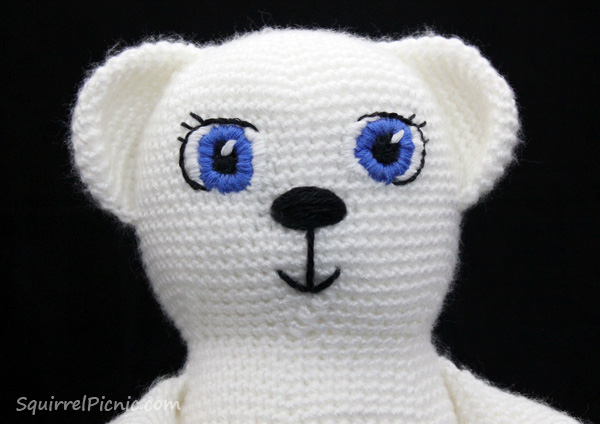
I love the look of satin stitch embroidery, but I don’t use it very often for my amigurumi because, I have to warn you, it does take longer to do than any of the methods I have shown you so far. It also takes a lot of focus, because you have to repeat the same stitch over and over again until an area is filled in. You will probably notice in this tutorial that by the time I got to the white part of the eyes, I had gotten a lot less picky about the straightness of my stitches. Looking back, I wish I would have taken a break halfway through or put the project aside for a day or so. Then I would have been able to come back to it fresh: fresh eyes, fresh mind. In the least, I hope you might learn from my mistake. If you find yourself growing frustrated or impatient, feel free to take a break. You certainly have my permission.
That aside, I think you will be pleased with the results you achieve by using satin stitch embroidery to add details to the faces on your amigurumi. I always think it looks very professional, as this is the technique most often used by large toy companies to manufacture stuffed animals for young kids. Satin stitch embroidery is a great choice for toys that will be used by children of all ages, because you don’t need to worry about any small parts that might present a choking hazard. While the big companies use machines to do all the work, I will show you how to do it by hand. After all, it’s the time and love that you put into it that makes a hand-embroidered stuffed animal so special.
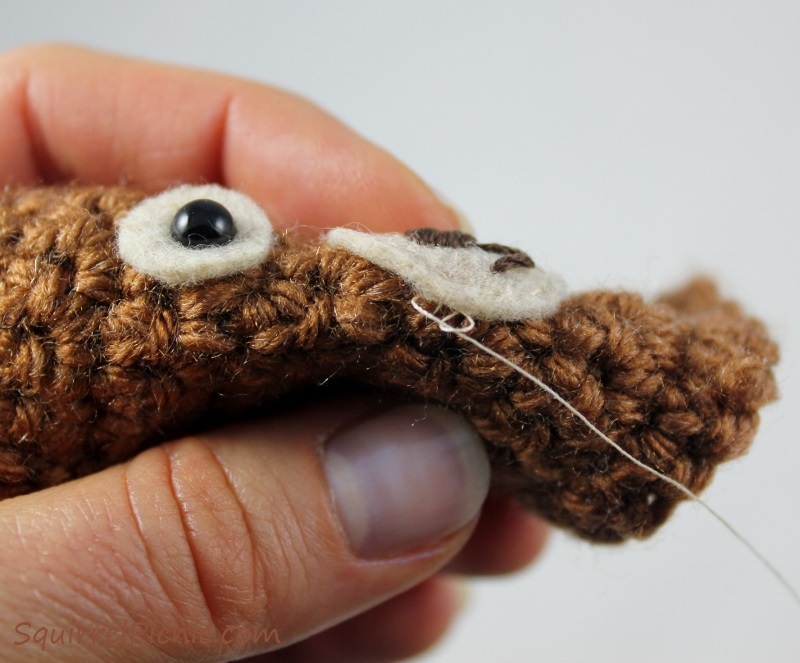
This is the technique I use to add faces to my crocheted squirrels. I find it is easier to embroider on felt than directly onto the crochet fabric and safety eyes pop on in a snap. With this method, your amigurumi will have a face in no time flat.
Materials
Beige felt
Scissors
A pair of 4.5 mm black safety eyes with lock washers
Thread to match the felt
Brown or black embroidery floss
Chenille needle
Sewing needle
Instructions
Eyes
Note: Safety eyes can really only be added before you close up the head of the amigurumi, usually when 12 to 18 stitches remain. Sometimes it helps to stuff the head in order to position the eyes, then take the stuffing out to put on the lock washers.
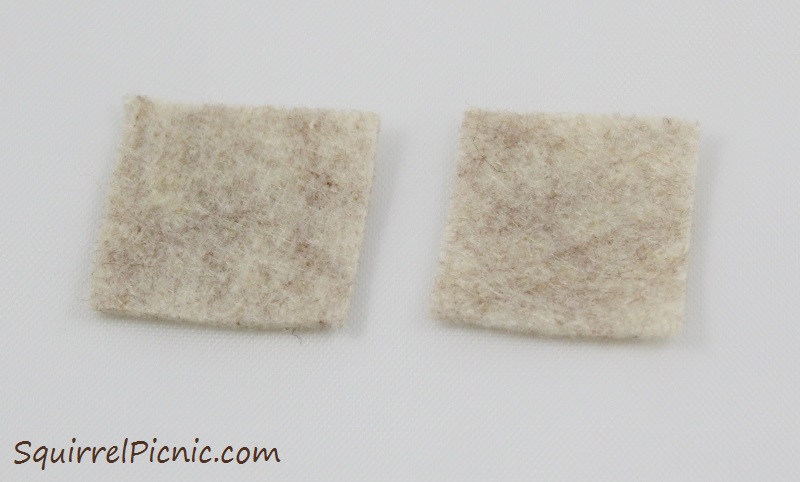
Step 1: Cut 2 squares out of beige felt approximately 1” by 1”.
Step 2: Fold a square in half and snip a hole into the center with a pair of scissors.
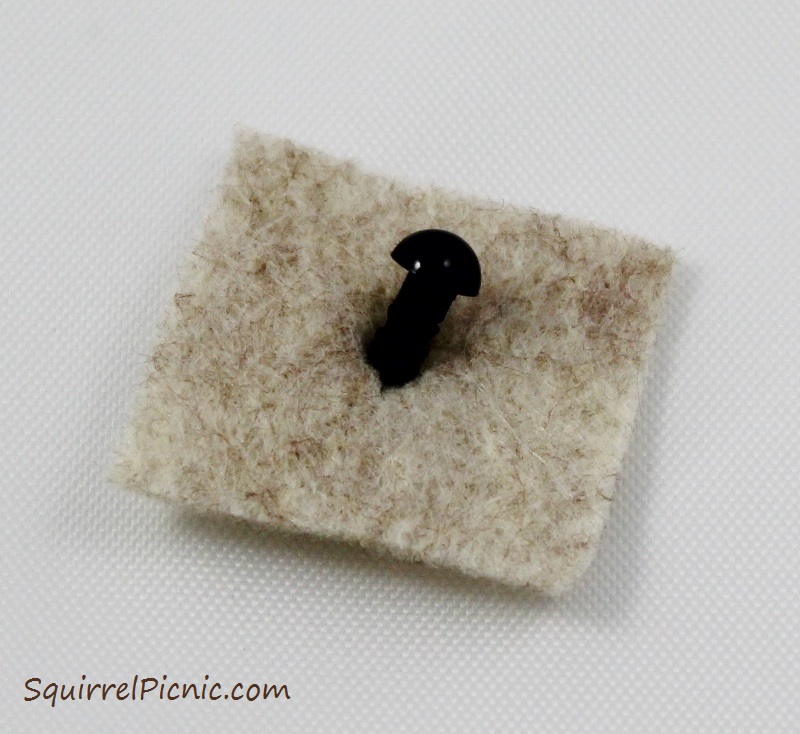
Step 3: Unfold and insert the shank of a safety eye into the hole.
Step 4: Using the eye as a guide, cut the felt into a circle, approximately 1/8” – 1/4” wider than the eye.
Step 5: Insert the shank of the eye into your amigurumi and press the washer onto the shank until it clicks to lock it in place. This can’t be undone, so it’s important to check the placement of your eyes before you pop on the back. For instance, check to see that the eyes are in the same row or round. The washers have 3-6 little points on one side, which grab the fabric. Make sure that these points are facing toward the fabric when you pop them on.
Repeat steps 2-5 for the other eye.
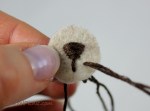
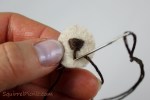
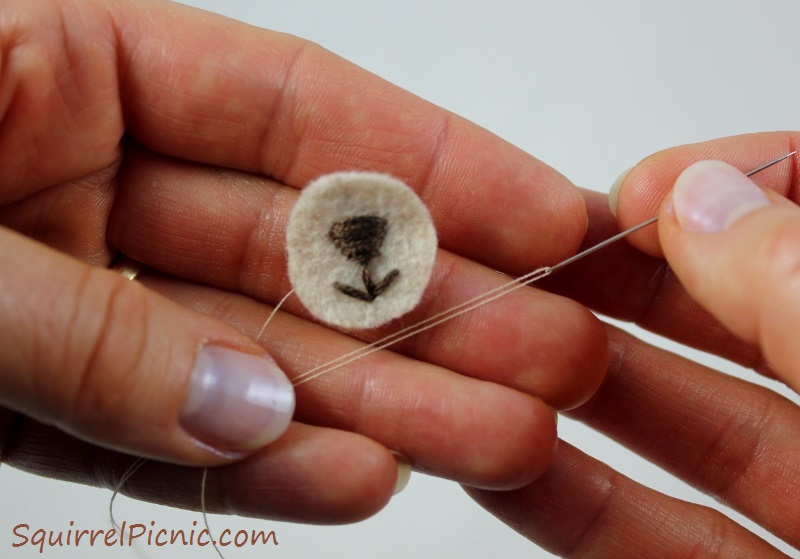
Nose and Mouth
Step 1: Cut a square out of felt approximately 3/4” by 3/4”.
Step 2: Cut this into a circle by rounding out the corners. Or use a fabric pencil to trace onto the felt around a US penny (or another coin that is 3/4” in diameter). Then cut along the line.
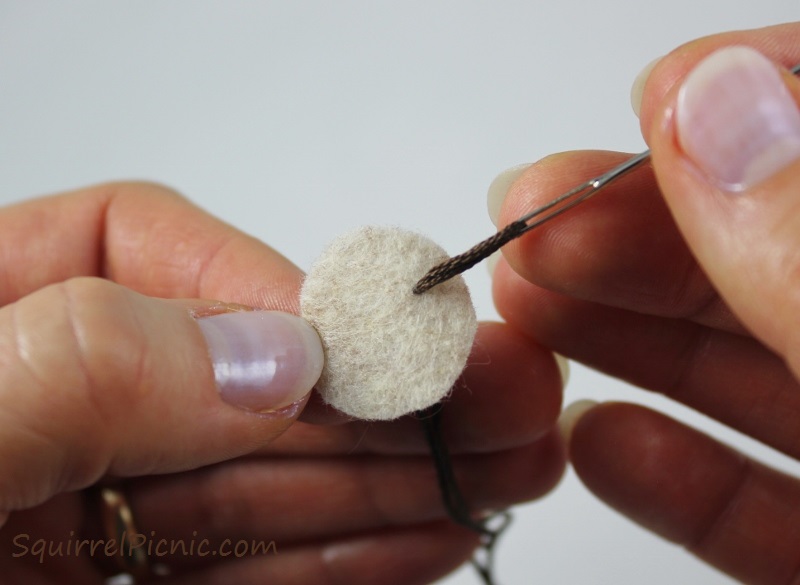
Step 3: Thread brown floss onto the chenille needle (or any needle that has a sharp point and an eyehole large enough to accommodate the floss).
Step 4: Tie a knot on the end.
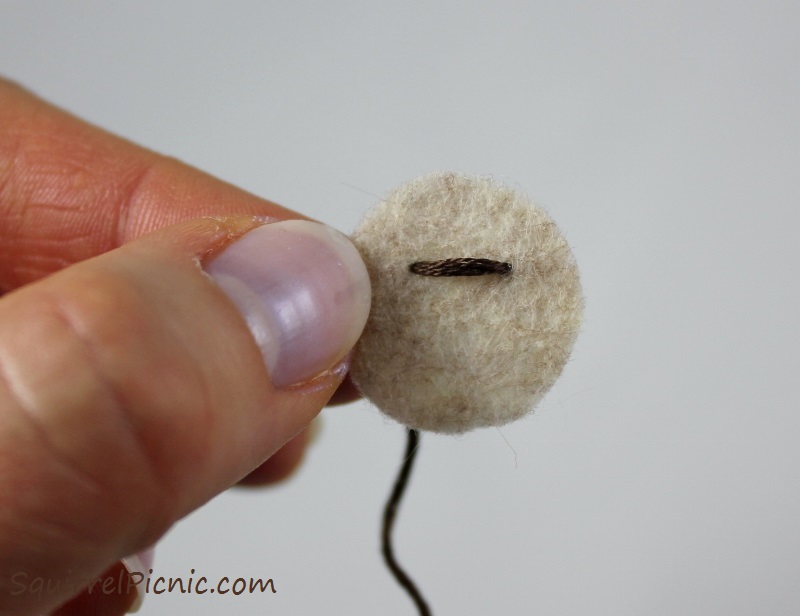
Step 5: Work the needle up through the felt from the back, just above the middle of the circle and about 1/4” from one edge.
Step 6: Push the needle back down about 1/4” from the other side.
Step 7: Come back up through the felt just below the stitch you made and push the needle back down on the other side ever so slightly below the last stitch.
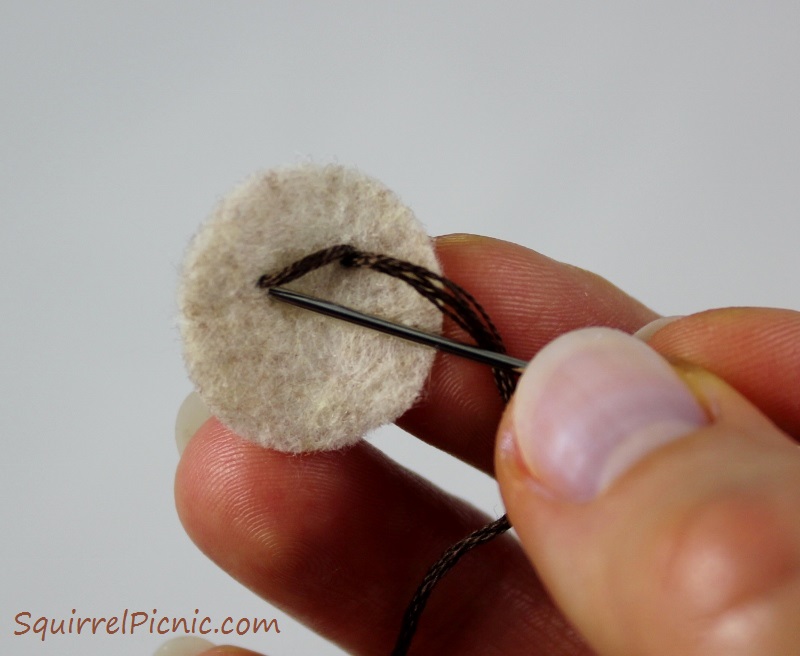
Step 8: Repeat Steps 6 and 7, each time coming in a tiny bit more from the edge to create an upside-down triangle shape to the nose. End with the needle at the back of the work.
Step 9: Come up from behind the last stitch, pulling the needle out from below the stitch.
Step 10: Go back down about 1/4” below.
Step 11: Come back up to the right of this. Go back down through the same entry point as in Step 10.
Step 12: Come back up to the left. Go back down through the same entry point as Step 10.
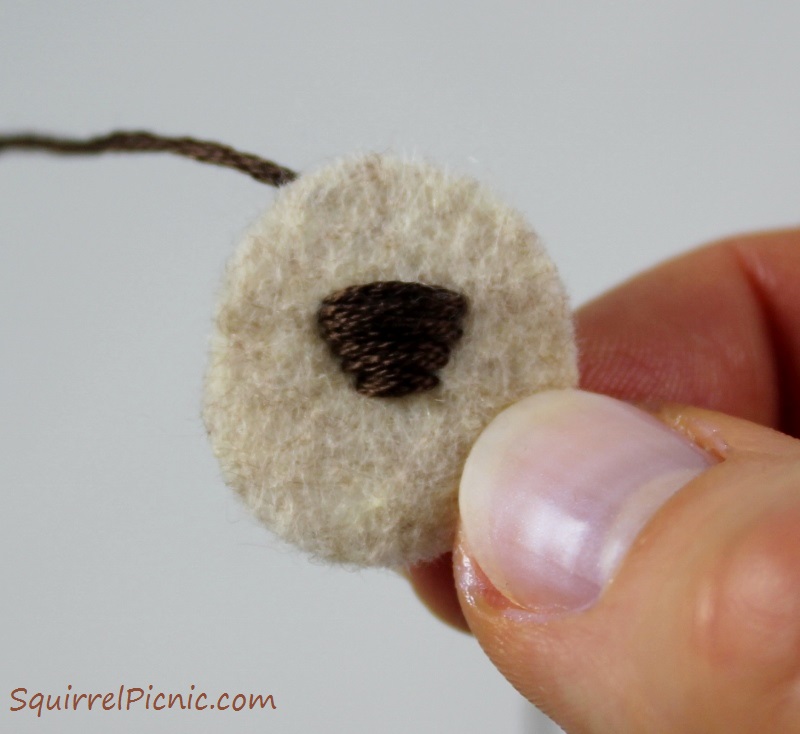
Step 13: Tie off your thread and trim the ends of the floss.
Sew on the Nose and Mouth
Note: Because the nose and mouth are sewn on, this can be done after you have stuffed and closed up the amigurumi’s head.
Step 1: Thread your standard sewing needle with thread to match the beige felt.
Step 2: To secure the thread, I like to tie it to the floss in the back, but you could use a knot if you prefer.
Step 3: Using a running stitch of about 1/8” per stitch, sew the felt nose and mouth to the amigurumi doll.
Step 4: End by coming out from under the felt and tie off your thread.
Step 5: Pass the needle and thread through the head of your amigurumi, coming out the back. Trim off your thread close to the back of the head and the thread should disappear into the head.
We had one of our customary spring snowfalls this past week in Colorado. It melted quickly, leaving behind greener grass, which the robins enjoy plucking through in their search for worms. I love to watch them hop about. There’s something very comforting about seeing the robins return. Perhaps it means that the snows have finally passed and we can look forward to warmer weather.
I want to share a favorite poem of mine with you, written by Louisa May Alcott when she was just 8 years old. Its welcoming of spring and the robin is so dear. I hope you enjoy it too.
To the First Robin
Welcome, welcome, little stranger,
Fear no harm, and fear no danger;
We are glad to see you here,
For you sing “Sweet Spring is near.”
Now the white snow melts away;
Now the flowers blossom gay:
Come dear bird and build your nest,
For we love our robin best.
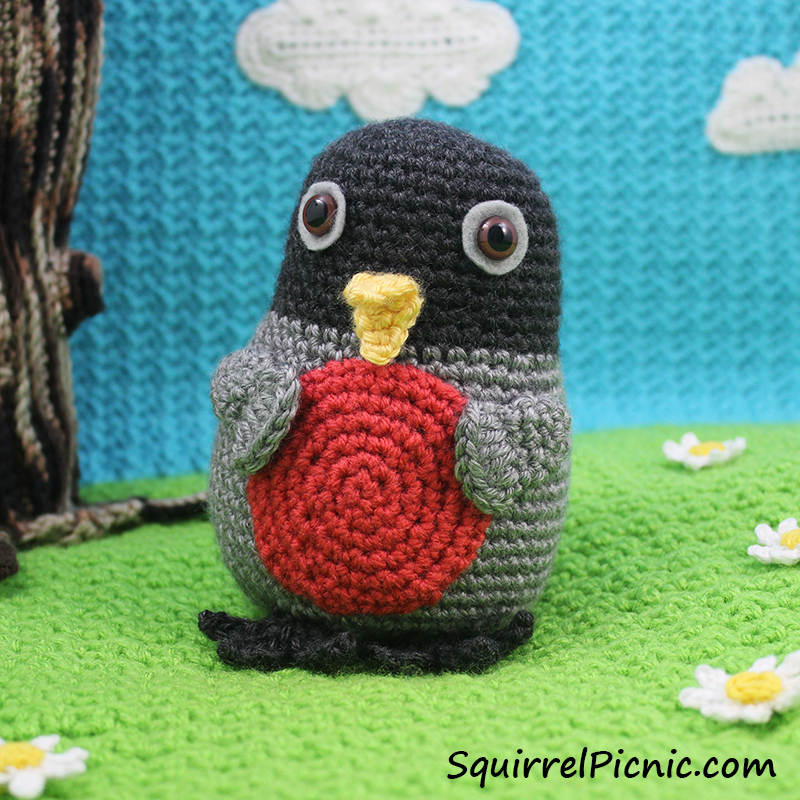
Celebrate spring with a robin of your own. Roly-Poly Rosa Robin is a dear little one with her charming expression and a plump belly (full of worms, I imagine). This easy crochet fatimal pattern will whip up quickly and delight the bird lover in your life.
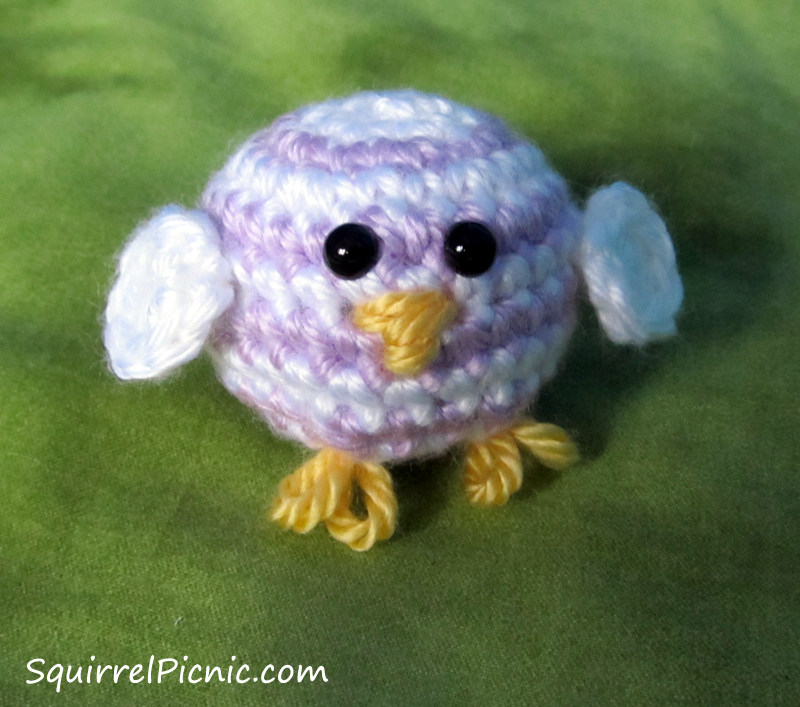
Baby rainbow chicks are just about the cutest creatures on the planet. Each spring, a rainbow chicken will lay between six and twelve pastel-colored eggs. These eggs are often mistaken for candy, so the female rainbow chicken must guard her nest very diligently against sweet-toothed woodland critters.
Baby rainbow chicks are very rambunctious. They hop around like bouncy balls on a sugar high. But they’re ridiculously adorable, so most everyone puts up with them.
They whip up super quick, so you can crochet a dozen in no time flat. They fit comfortably in plastic Easter eggs too.
I think we’ll call this one Pepito. Thanks to Sheena (NotAPunkRocker) for the name!
Baby Rainbow Chick Crochet Pattern
Finished size: 1 1/2″ tall and 5″ around at the widest point
Materials
small amount of worsted-weight yarn in white (Caron Simply Soft in White, 6 oz [170 g] / 315 yds [288 m])
small amount of worsted-weight yarn in purple (Caron Simply Soft in Orchid, 6 oz [170 g] / 315 yds [288 m])
small amount of worsted-weight yarn in yellow (Caron Simply Soft in Sunshine, 6 oz [170 g] / 315 yds [288 m])
F-5 (3.75 mm) crochet hook
1 set of size 6 mm safety eyes (if you are making this for a child, please embroider eyes)
Polyester Fiberfill
Tapestry needle
Gauge
5 sts = 1″
5 rows = 1″
Instructions
Body
Note for changing color: This chick is crocheted in joined rounds in order to create almost perfect jogless stripes. In other words, each round ends with “join with slst, ch 1.” On the rounds with a color change, join with slst as usual, but use the next color to ch 1.
Of course, you could always fasten off each color and reattach the new color. This will give you a more precise stripe, but you’ll have to weave in some ends (or just tie them on the inside), which could be annoying… unless it’s your favorite part, then by all means, knock yourself out!
With white, ch 2
Rnd 1: 6 sc in 2nd ch from hook. (6)
Rnd 2: 2 sc in ea sc around, join with slst, switch to purple, ch 1. (12)
Rnd 3: * Sc, inc, rep from * 5 more times, join with slst, switch to white, ch 1. (18)
Rnd 4: * 2 sc, inc, rep from * 5 more times, join with slst, switch to purple, ch 1. (24)
Rnd 5: Sc in ea sc around, join with slst, switch to white, ch 1.
Rnd 6: Sc in ea sc around, join with slst, switch to purple, ch 1.
Rnds 7-8: Rep rnds 5-6.
Rnd 9: * 2 sc, dec, rep from * 5 more times, join with slst, switch to white, ch 1. (18)
Insert posts of safety eyes between stitches in Rnds 5 and 6 and pop on the backs to secure. Stuff chick firmly.
Rnd 10: * Sc, dec, rep from * 5 more times, join with slst, switch to purple, ch 1. (12)
Rnd 11: Dec 6 times, join with slst. FO, leaving a long tail. Using tapestry needle, thread this tail through the remaining sts and pull tight to close the hole. Weave in end.
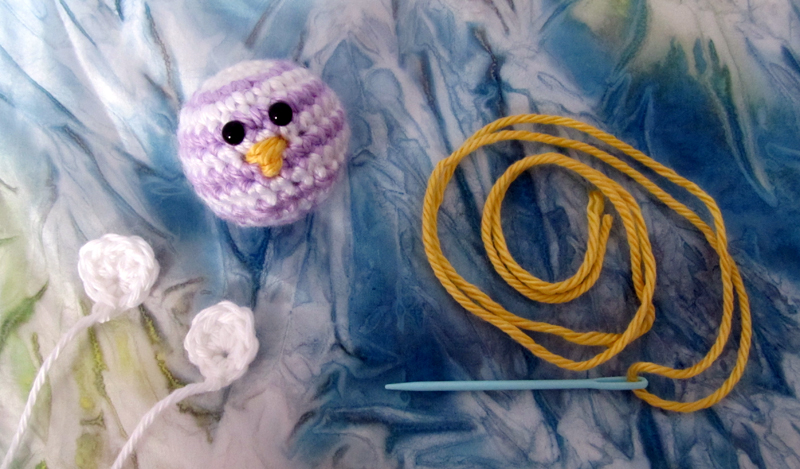
Wings (Make 2)
With white, ch 2.
Rnd 1: In 2nd ch from hook: sc, hdc, 4 dc, hdc, sc. Join with slst. FO, leaving a long tail for sewing.
Sew wings to sides of the body.
Beak
Using yellow yarn, embroider a beak.
I made my beak by embroidering the outline of a triangle that points down. Then I threaded through the two bottom sides of the triangle twice to fill it in and hid the end inside the bird.
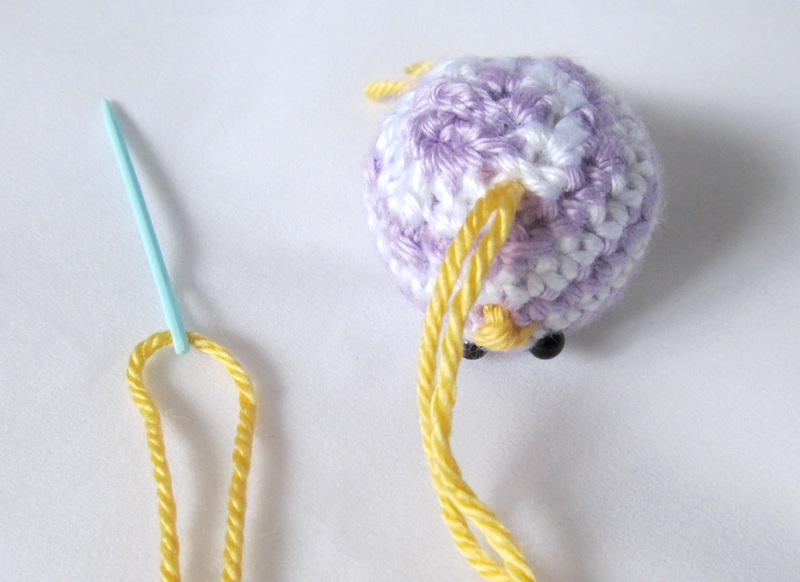
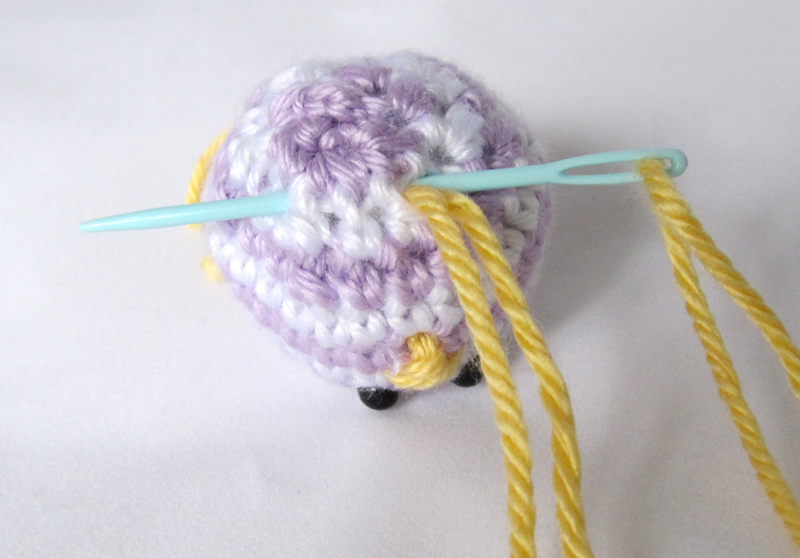
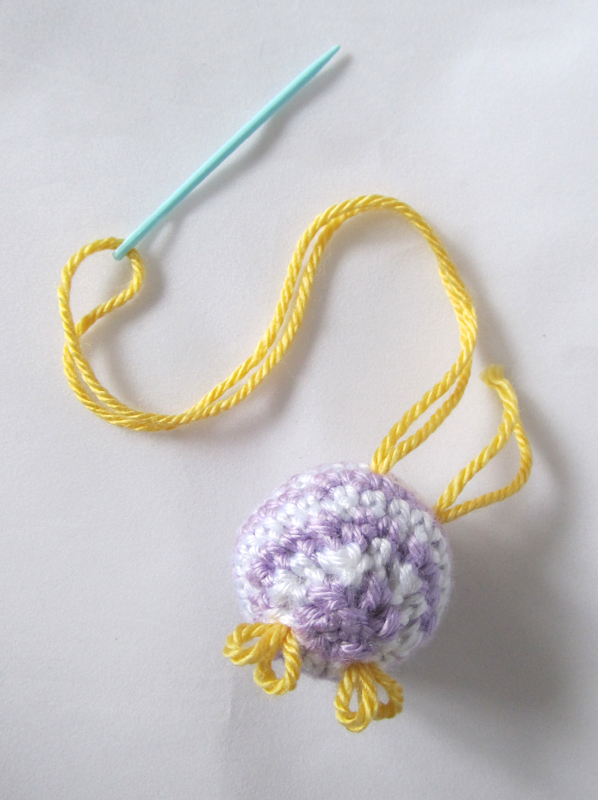
Feet
Thread tapestry needle with yellow yarn again and double it up. Insert the needle through the back of the bird (anywhere is fine) to a spot on the bottom (toward the front) where you want to position a foot. Pull the yarn so there’s only a few inches sticking out the back (we’ll take care of those in a bit).
Insert the needle back through this same hole in the bottom front of the bird and out through a corresponding hole on the other side at the bottom of the bird.
Pull through until the two loops are about a 1/4″ long.
Insert your needle back through the same hole you just came out of and thread it through to the back of the bird again (anywhere is fine). Pull through until the two loops on this side are about the same size as your first two loops.
Trim your yarn and push the ends inside the bird.
Every rainbow chick needs a mama.
Crochet a Mama Rainbow Chick with the free pattern here at the picnic.


You must be logged in to post a comment.