 Sleepy Bear has long been one of my favorite patterns, and from the number of Sleepy Bears you all have made, I’d say he’s one of your favorites too! It always makes my day when someone shares a photo of a Sleepy Bear they’ve made. Each one has such a unique personality. I love it!
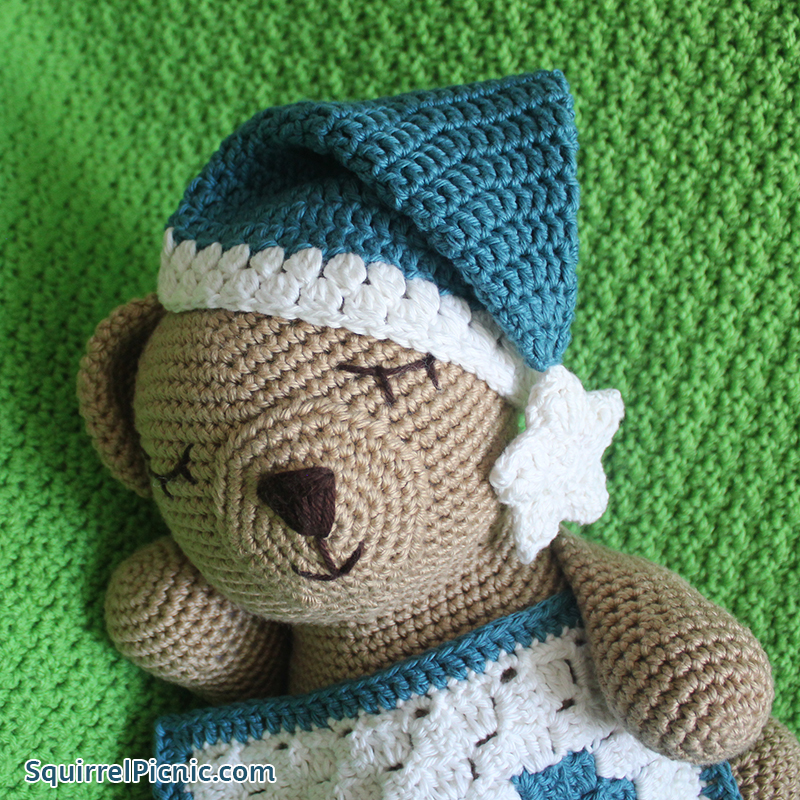
When fellow picnickers Nelle Helleur and Janette Vanzanen shared photos of their Sleepy Bears decked out in pajamas and nightcaps, I knew that I just had to create some accessories for my bears too. Any nap really wouldn’t be complete without a nightcap and a blanky, after all. Thank you both for the inspiration!
And finally I’m ready to share these patterns with you.
They contain some new and interesting techniques that I think you’ll really enjoy. With a difficulty rating of 2 acorns, these patterns are suitable to advanced beginner crocheters who are comfortable using the magic loop method of beginning, working in joined rounds, and trying new techniques like corner-to-corner construction. None of these is very hard, but will likely be new to beginners.
Sleepy Bear’s nightcap is crocheted using joined rounds. In crocheting the hat, which is shaped like a cone, you start off with very few stitches and increase gradually (by only 3 stitches) in each round. The brim of the cap is done with a bobble stitch. Some may know this as a cluster stitch. It’s basically double crocheting 3 together within one stitch, creating a slightly puffy texture. The star at the end is fun and fast to make. I think you’ll really enjoy it. Personally, I love how big the star turned out, but if you’d like it smaller, simply use a lighter weight yarn and smaller hook.
The blanket is done with a technique that has become very popular in the last few years. It’s called corner-to-corner crochet, though sometimes you might see it referred to as C2C for short. It’s kind of like crocheting a granny square blanket… except you’re obviously working from corner to corner. Our friend Kathryn Vercillo does a great job of showing how to use this method in her photo tutorial for Craftsy. I really recommend you check this out before beginning your first corner-to-corner blanket.
The funny thing I found about this method is that it’s really not hard to do once you get started, but it is rather hard to wrap your brain around what is happening as you are doing it. At least that’s how it was for my poor brain, which is so used to working in rounds and rows! Perhaps the hardest part is remembering where to change colors in order to make the heart in the center. Because of this, I created a handy graph for you to follow in addition to the pattern. The graph contains some important information about where you will need to attach your yarns, so be sure to check it out. Once you learn how to increase and decrease, you may even be able to follow the graph on its own.
Sleepy Bear’s Crochet Nightcap
Materials
 75 yds worsted-weight yarn in blue
35 yds worsted-weight yarn in white
For this cap I used Knit Picks Comfy™ Worsted (75% Pima Cotton, 25% Acrylic, 109 yds/50 g)
G-6 (4.00 mm) crochet hook
Yarn needle or tapestry needle
Abbreviations
ch = chain
ch-sp = chain space
dc = double crochet
dc3tog = double crochet 3 together (aka bobble stitch)
ea = each
FO = fasten off
hdc = half double crochet
picot = chain 3, slip stitch in 3rd chain from hook
rep = repeat
slst = slip stitch
st(s) = stitch(es)
Instructions
Cap
*Note: Initial ch-3 does not count as a dc.
With blue, make a magic loop.
Rnd 1: Ch 1, 3 sc into the magic loop. Close the loop. (3)
Rnd 2: 2 sc in ea sc around. Join with slst to 1st sc. (6)
Rnd 3: Ch 3, *dc in next dc, 2 dc in next dc, rep from * 2 more times. Join with slst to 1st dc. (9)
Rnd 4: Ch 3, *dc in next 2 dc, 2 dc in next dc, rep from * 2 more times. Join with slst to 1st dc. (12)
Rnd 5: Ch 3, *dc in next 3 dc, 2 dc in next dc, rep from * 2 more times. Join with slst to 1st dc. (15)
Rnd 6: Ch 3, *dc in next 4 dc, 2 dc in next dc, rep from * 2 more times. Join with slst to 1st dc. (18)
Rnd 7: Ch 3, *dc in next 5 dc, 2 dc in next dc, rep from * 2 more times. Join with slst to 1st dc. (21)
Rnd 8: Ch 3, *dc in next 6 dc, 2 dc in next dc, rep from * 2 more times. Join with slst to 1st dc. (24)
Rnd 9: Ch 3, *dc in next 7 dc, 2 dc in next dc, rep from * 2 more times. Join with slst to 1st dc. (27)
Rnd 10: Ch 3, *dc in next 8 dc, 2 dc in next dc, rep from * 2 more times. Join with slst to 1st dc. (30)
Rnd 11: Ch 3, *dc in next 9 dc, 2 dc in next dc, rep from * 2 more times. Join with slst to 1st dc. (33)
Rnd 12: Ch 3, *dc in next 10 dc, 2 dc in next dc, rep from * 2 more times. Join with slst to 1st dc. (36)
Rnd 13: Ch 3, *dc in next 11 dc, 2 dc in next dc, rep from * 2 more times. Join with slst to 1st dc. (39)
Rnd 14: Ch 3, *dc in next 12 dc, 2 dc in next dc, rep from * 2 more times. Join with slst to 1st dc. (42)
Rnd 15: Ch 3, *dc in next 13 dc, 2 dc in next dc, rep from * 2 more times. Join with slst to 1st dc. (45)
Rnd 16: Ch 3, *dc in next 14 dc, 2 dc in next dc, rep from * 2 more times. Join with slst to 1st dc. (48)
Rnd 17: Ch 3, *dc in next 15 dc, 2 dc in next dc, rep from * 2 more times. Join with slst to 1st dc. (51)
Rnd 18: Ch 3, *dc in next 16 dc, 2 dc in next dc, rep from * 2 more times. Join with slst to 1st dc. (54)
Rnd 19: Ch 3, * dc3tog in next st, ch 1, sk 1, rep from * around. Join with slst to 1st dc3tog.
Rnd 20: Ch 3, * sk 1st dc3tog, dc3tog in next ch-sp, rep from * around. Join with slst to 1st dc3tog.
FO and weave in ends.
Star (Make 2)
With white, make a magic loop.
Rnd 1: Ch 3, 10 dc into the magic loop. Close the loop. Join with slst to 1st dc. (10)
Rnd 2: Ch 1, *sc in next dc, (dc, tr, picot, tr, dc) in next dc, rep from * 4 more times. Join with slst or alternative (aka invisible) join to 1st sc. FO, leaving a long tail on one of the two stars you make.
With RS facing out, use the long tail and a tapestry or yarn needle to sew the two sides together along the outer edge. With remaining tail, sew the star to the end of the nightcap.
Sleepy Bear’s Crochet Blanky: A Corner-to-Corner Mini Graphgan

 Materials

70 yds worsted-weight yarn in white (divide into 2 balls of equal measure)
35 yds worsted-weight yarn in blue
For this blanket I used Knit Picks Comfy™ Worsted (75% Pima Cotton, 25% Acrylic, 109 yds/50 g)
G-6 (4.00 mm) crochet hook
Yarn needle or tapestry needle
Abbreviations
ch = chain
ch-sp = chain space
dc = double crochet
ea = each
FO = fasten off
hdc = half double crochet
rep = repeat
slst = slip stitch
st(s) = stitch(es)
Instructions
This blanket is worked from corner to corner. Although I have noted in the pattern where the first color change is located, please refer to the graph for color changes: Sleepy Bear’s Heart Blanket Corner-to-Corner Graph (PDF Download)

This blanket is worked from corner to corner. Although I have noted in the pattern where the first color change is located, please refer to the graph for color changes. (Click image for pdf of Sleepy Bear’s Heart Blanket Graph.)
Row 1: Ch 6. Dc in 4th ch from hook, dc in ea of next 2 chs. Turn. (ch-3 + 3 dc = 1 block)
Row 2: Ch 6. Dc in 4th ch from hook, dc in ea of next 2 chs. Into the ch-3 sp at beg of Row 1: slst, ch 3, 3 dc. Turn. (2 blocks)
Row 3: Ch 6. Dc in 4th ch from hook, dc in ea of next 2 chs. * Into the next ch-3 sp: slst, ch 3, 3 dc. Rep from * 1 more time. Turn. (3 blocks)
Row 4: Ch 6. Dc in 4th ch from hook, dc in ea of next 2 chs. * Into the next ch-3 sp: slst, ch 3, 3 dc. Rep from * 2 more times. Turn. (4 blocks)
Row 5: Ch 6. Dc in 4th ch from hook, dc in ea of next 2 chs. * Into the next ch-3 sp: slst, ch 3, 3 dc. Rep from * 3 more times. Turn. (5 blocks)
Row 6: Ch 6. Dc in 4th ch from hook, dc in ea of next 2 chs. * Into the next ch-3 sp: slst, ch 3, 3 dc. Rep from * 4 more times. Turn. (6 blocks)
Row 7: Ch 6. Dc in 4th ch from hook, dc in ea of next 2 chs. * Into the next ch-3 sp: slst, ch 3, 3 dc. Rep from * 5 more times. Turn. (7 blocks)
Row 8: Ch 6. Dc in 4th ch from hook, dc in ea of next 2 chs. * Into the next ch-3 sp: slst, ch 3, 3 dc. Rep from * 6 more times. Turn. (8 blocks)
Row 9: Note: Switch to blue on the last dc of 2nd block of this row (then refer to graph for future color changes). Ch 6. Dc in 4th ch from hook, dc in ea of next 2 chs. * Into the next ch-3 sp: slst, ch 3, 3 dc. Rep from * 7 more times. Turn. (9 blocks)
Row 10: Ch 6. Dc in 4th ch from hook, dc in ea of next 2 chs. * Into the next ch-3 sp: slst, ch 3, 3 dc. Rep from * 8 more times. Turn. (10 blocks)
Row 11: Ch 6. Dc in 4th ch from hook, dc in ea of next 2 chs. * Into the next ch-3 sp: slst, ch 3, 3 dc. Rep from * 9 more times. Turn. (11 blocks)
Row 12: Ch 6. Dc in 4th ch from hook, dc in ea of next 2 chs. * Into the next ch-3 sp: slst, ch 3, 3 dc. Rep from * 10 more times. Turn. (12 blocks)
Row 13: Ch 6. Dc in 4th ch from hook, dc in ea of next 2 chs. * Into the next ch-3 sp: slst, ch 3, 3 dc. Rep from * 11 more times. Turn. (13 blocks)
Now we will begin decreasing. After you have worked a slip stitch in each of the 1st 3 dc of the row, the next ch-3 will be immediately after the last slst. In fact, it will be right below your hook.
Row 14: Slst in ea of the next 3 dc. * Into the next ch-3 sp: slst, ch 3, 3 dc. Rep from * 11 more times, slst in next 3-ch sp. Turn. (12 blocks)
Row 15: Slst in ea of the next 3 dc. * Into the next ch-3 sp: slst, ch 3, 3 dc. Rep from * 10 more times, slst in next 3-ch sp. Turn. (11 blocks)
Row 16: Slst in ea of the next 3 ch. * Into the next ch-3 sp: slst, ch 3, 3 dc. Rep from * 9 more times, slst in next 3-ch sp. Turn. (10 blocks)
Row 17: Slst in ea of the next 3 dc. * Into the next ch-3 sp: slst, ch 3, 3 dc. Rep from * 8 more times, slst in next 3-ch sp. Turn. (9 blocks)
Row 18: Slst in ea of the next 3 dc. * Into the next ch-3 sp: slst, ch 3, 3 dc. Rep from * 7 more times, slst in next 3-ch sp. Turn. (8 blocks)
Row 19: Slst in ea of the next 3 dc. * Into the next ch-3 sp: slst, ch 3, 3 dc. Rep from * 6 more times, slst in next 3-ch sp. Turn. (7 blocks)
Row 20: Slst in ea of the next 3 dc. * Into the next ch-3 sp: slst, ch 3, 3 dc. Rep from * 5 more times, slst in next 3-ch sp. Turn. (6 blocks)
Row 21: Slst in ea of the next 3 dc. * Into the next ch-3 sp: slst, ch 3, 3 dc. Rep from * 4 more times, slst in next 3-ch sp. Turn. (5 blocks)
Row 22: Slst in ea of the next 3 dc. * Into the next ch-3 sp: slst, ch 3, 3 dc. Rep from * 3 more times, slst in next 3-ch sp. Turn. (4 blocks)
Row 23: Slst in ea of the next 3 dc. Into the next ch-3 sp: slst, ch 3, 3 dc. Rep from * 2 more times, slst in next 3-ch sp. Turn. (3 blocks)
Row 24: Slst in ea of the next 3 dc. * Into the next ch-3 sp: slst, ch 3, 3 dc. Rep from * 1 more time, slst in next 3-ch sp. Turn. (2 blocks)
Row 25: Slst in ea of the next 3 dc. * Into the next ch-3 sp: slst, ch 3, 3 dc, slst in next 3-ch sp. (1 block)
Do not FO. Do not turn.
Border
Rnd 1: Continuing with white, ch 1 and sc in same st. Evenly space about 120 scs around the blanket. Ch 4 in each corner. Join with slst to 1st sc.
Tip for placing sts: I found it easier (and better looking) to place a sc into ea slst and work 1 or 2 stitches into the ch-3 sps (as opposed to working into the ch sts themselves).
Rnd 2: With blue, ch 2, *hdc in ea sc to the next corner, (2 dc, ch 2, 2 dc) into the corner st of the blanket (working over the ch-4 sp of Rnd 1), rep from * around. Join with slst or alternative (invisible) join to 1st hdc. FO and weave in all ends.


August 4, 2016 at 12:11 pm
These are wonderful accessories for Sleepy Bear, and I really love the C2C blanket – especially as I recently learned how to do this 🙂
I’d love to print and save a copy, but the button that should be there, isn’t, at least for me 😦
I think it must have something to do with my adblocker, but I don’t know how to fix it 😦
Anyway, I’ll be saving this page, just so I can make the accessories – right after I’ve made Sleepy Bear, that is!
My WIP list is getting longer and longer! Lol
August 4, 2016 at 6:25 pm
Hi Katy! I’m so glad you want to make a blanket and nightcap for Sleepy Bear. Sorry to hear that the button isn’t working for you. Are you looking below the ad, under “Thanks for Sharing”? If you still don’t see it, let me know and I can email you a pdf. Do you need a pdf of Sleepy Bear too? I am always amazed by all the projects you have going. You must be a fast crocheter!
August 4, 2016 at 6:32 pm
Thanks Jen 🙂
Yes, I’ve got the Sleepy Bear PDF, but can’t find the button for the blanket etc., anywhere – if you could send me the pattern I’d be eternally grateful, Hun 🙂
I’m not sure that I’m a fast crocheter, but I’ve got all the time in the world to do it with 🙂
August 4, 2016 at 6:40 pm
Happy to do it. I’ll pop on over to me email now and send it to you!
August 5, 2016 at 12:28 pm
I enjoyed looking at all the sleepy bears so much. I would lovr to try the heart pattern. ❤