 Tina Ballerina Bear is an expert at having fun. She’ll even show you how when you crochet her with this free pattern.
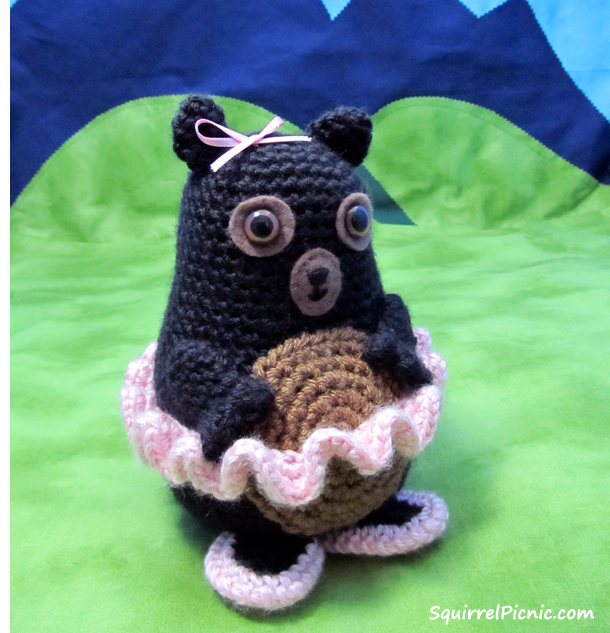
Tina’s just one of the characters here at Squirrel Picnic, but she is by far the most outrageously fun-loving of the bunch. She loves karaoke, pillow fights, food fights, tickle fights, water-balloon fights, and limbo. But most importantly, she loves to dance… all the time. In fact, she was dancing right before I took this photo of her. That’s why she has that startled “caught in the act” look on her face.
She’s also a bit of a party girl. You know anyone who wears a tutu year-round brings the party with them wherever they go. She’s ready to celebrate anything and everything. She once threw a party just to celebrate the fact that she had cleaned the dishes.
Her enthusiasm and excitement are contagious. She inspires me to let loose now and then and to fully enjoy every opportunity that comes my way, big or small. So if you have something to celebrate, don’t hold back. Get out your tutu and live it up!
Tina Ballerina Bear Crochet Pattern

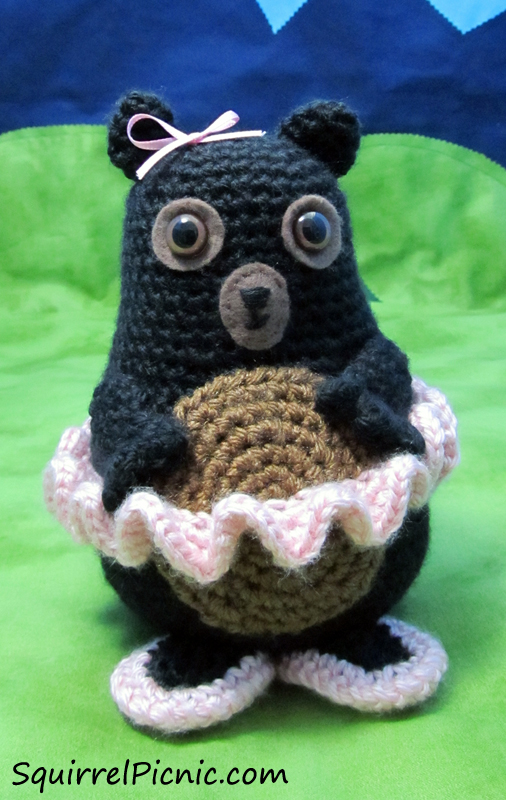
Finished size: 6″ tall and 16″ around at the widest point
Materials
85 yds worsted-weight yarn in black (Caron Simply Soft in Black, 6 oz [170 g] / 315 yds [288 m])
35 yds worsted-weight yarn in light brown (Vanna’s Choice by Lion Brand, 3.5 oz [100 g], 170 yds [156 m])
50 yds worsted-weight yarn in pink (Caron Simply Soft in Soft Pink, 6 oz [170 g] / 315 yds [288 m])
G-6 (4.00 mm) crochet hook
1 set of size 12 mm safety eyes (If making this for a child, please consider embroidering the eyes.)
Light brown felt
Embroidery floss in black
Polyester Fiberfill
Tapestry needle
1/8 in satin ribbon in pink
Gauge
5 sc = 1″
5 rows = 1″
Abbreviations
beg = beginning
ch = chain
dc = double crochet
rep = repeat
rnd = round
sc = single crochet
sc2tog = decrease by single crocheting next 2 stitches together
sk = skip
slst = slip stitch
st(s) = stitch(es)
Instructions
For Eyes: Grab your light brown felt and scissors and head on over to this tutorial for step-by-step instructions on how to prepare the eyes for your bear. Complete steps 1-4, then set them aside and continue with the instructions for the Body. (You’ll pick them back up again after Rnd 35 of the Body.)
Body
Note: Body is worked in unjoined rounds. Do not begin round with a chain. Do not join with slst at end of round.
With black, ch 2.
Rnd 1: 6 sc in 2nd ch from hook. (6 sc)
Rnd 2: 2 sc in each sc around. (12 sc)
Rnd 3: * Sc in next sc, 2 sc in next sc, rep from * 5 more times. (18 sc)
Rnd 4: * Sc in next 2 sc, 2 sc in next sc, rep from * 5 more times. (24 sc)
Rnd 5: * Sc in next 3 sc, 2 sc in next sc, rep from * 5 more times. (30 sc)
Rnd 6: * Sc in next 4 sc, 2 sc in next sc, rep from * 5 more times. (36 sc)
Rnds 7-15: Sc in each sc around.
Rnd 16: * Sc in next 5 sc, 2 sc in next sc, rep from * 5 more times. (42 sc)
Rnd 17: Sc in each sc around.
Rnd 18: * Sc in next 6 sc, 2 sc in next sc, rep from * 5 more times. (48 sc)
Rnd 19: Sc in each sc around.
Rnd 20: * Sc in next 7 sc, 2 sc in next sc, rep from * 5 more times. (54 sc)
Rnds 21-30: Sc in each sc around.
Rnd 31: * Sc in next 7 sc, sc2tog, rep from * 5 more times. (48 sc)
Rnd 32: * Sc in next 6 sc, sc2tog, rep from * 5 more times. (42 sc)
Rnd 33: * Sc in next 5 sc, sc2tog, rep from * 5 more times. (36 sc)
Rnd 34: * Sc in next 4 sc, sc2tog, rep from * 5 more times. (30 sc)
Rnd 35: * Sc in next 3 sc, sc2tog, rep from * 5 more times. (24 sc)
Insert safety eyes between stitches in Rnds 9 and 10 and pop on the backs to secure.
Stuff bear firmly.
Rnd 36: * Sc in next 2 sc, sc2tog, rep from * 5 more times. (18 sc)
Rnd 37: * Sc in next sc, sc2tog, rep from * 5 more times. (12 sc)
Rnd 38: * Sk next sc, sc in next sc, rep from * 5 more times. (6 sc)
Slst in next sc. Fasten off, leaving a tail of about 12 inches. Thread tail through remaining sts and pull to close. Weave in end.
Nose and Mouth
Cut an oval out of light brown felt. Using dark brown or black embroidery floss, embroider a nose and mouth onto the felt. Then sew this oval onto Tina’s head. Check out this tutorial for step-by-step instructions.
Belly
Note: Belly is worked in joined rounds.
With light brown, ch 2.
Rnd 1: 6 sc in 2nd ch from hook. (6 sc)
Rnd 2: 2 sc in each sc around, join with slst to first sc. (12 sc)
Rnd 3: Ch 1, * sc in next sc, 2 sc in next sc, rep from * 5 more times, join with slst to first sc. (18 sc)
Rnd 4: Ch 1, * sc in next 2 sc, 2 sc in next sc, rep from * 5 more times, join with slst to first sc. (24 sc)
Rnd 5: Ch 1, * sc in next 3 sc, 2 sc in next sc, rep from * 5 more times, join with slst to first sc. (30 sc)
Rnd 6: Ch 1, * sc in next 4 sc, 2 sc in next sc, rep from * 5 more times, join with slst to first sc. (36 sc)
Fasten off, leaving a tail of at least 18 inches for sewing.
Sew this circle to the middle of Tina’s belly.
Tutu
Pull up a loop of pink in any st of Rnd 23 of the Body. Turn Body upside down.
Rnd 1: Pull up loop and sc in each st of Rnd 23. (When you get to the Belly Spot, just try to continue in a straight line to the other side.) Join with slst to first sc. Do not turn.
Rnd 2: Ch 1, 2 sc in each sc around, join with slst to first sc.
Rnd 3: Ch 1, 2 sc in each sc around, join with slst to first sc.
Fasten off and weave in ends. You may have to fiddle with the ruffles a bit to even them out.
Hands (Make 2)
With black, ch 2.
Rnd 1: 4 sc into 2nd ch from hook. (4 sc)
Rnd 2: 2 sc in each sc around. (8 sc)
Rnds 3-5: Sc in each sc around.
Tuck in ends and press flat, lining up 3 sets of sts in the middle.
Row 6: Working through both thicknesses, sc open end closed with 3 scs (skipping the sts on either end where it is folded). Turn. (3 sc)
Row 7: Ch 2 (does not count as a st), 2 dc in each of next 2 sc, (2 dc, ch 2, slst) in last sc. (6 dc, 2 ch-2)
Fasten off, leaving a tail of about 18 inches for sewing.
With the tail, thread through the first of the 3 sc in Row 6 of Hand. Pull the thread up and over the dcs in Row 7 and back through the same space. Pull tight to create “fingers.” Then thread through the 3rd sc in Row 6. Pull the thread up and over the dcs in Row 7 and back through the same space. Weave in to secure, but don’t trim just yet. (You’ll use the rest of the tail to sew the arm to the bear.)
Sew each arm to side of bear so that fingers reach out just in front of belly, above the tutu.
Feet with Ballet Slippers – Bottom (Make 2)
Note: Feet are worked in unjoined rounds. Do not begin round with a chain. Do not join with slst at end of round.
With pink, ch 6.
Rnd 1: Sc in 2nd ch from hook and in next 3 chs, 3 sc in last ch, turning around the ch as you go, sc in next 3 ch, 2 sc in last ch. (12 sc)
Rnd 2: 2 sc in next sc, sc in next 3 sc, 2 sc in each of next 3 sc, sc in next 3 sc, 2 sc in each of next 2 sc. (18 sc)
Rnd 3: 2 sc in next sc, sc in next 6 sc, 2 sc in each of next 3 sc, sc in next 6 sc, 2 sc in each of next 2 sc, slst in next sc. (24 sc)
Fasten off and weave in ends.
 Feet with Ballet Slippers – Top (Make 2)
With black, ch 6.
Rnd 1: Sc in 2nd ch from hook and in next 3 chs, 3 sc in last ch, turning around the ch as you go, sc in next 3 ch, 2 sc in last ch. (12 sc)
Rnd 2: 2 sc in next sc, sc in next 3 sc, 2 sc in each of next 3 sc, sc in next 3 sc, 2 sc in each of next 2 sc. (18 sc)
Switch to pink, leaving a long tail of black, which you will use later to sew foot to bottom of bear.
Rnd 3: 2 sc in next sc, sc in next 6 sc, 2 sc in each of next 3 sc, sc in next 6 sc, 2 sc in each of next 2 sc, slst in next sc. Fasten off, leaving a tail of at least 18 inches. (24 sc)
Assemble Feet
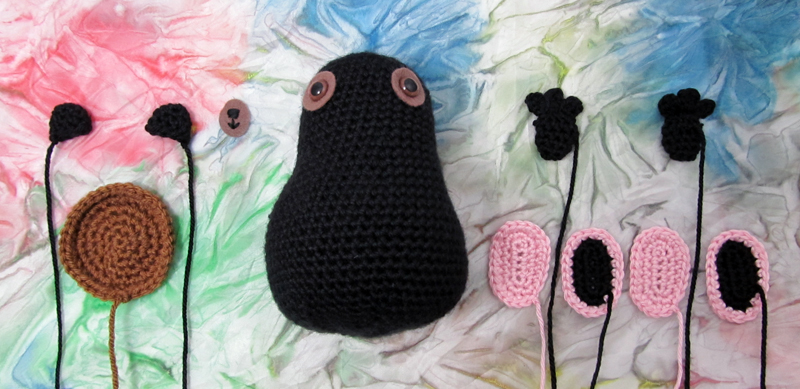
You should have 4 ovals for the feet: 2 in solid pink (Bottom of Foot) and 2 that are pink with black centers (Top of Foot).
Pair up 1 solid pink oval with 1 pink and black oval and hold them with right sides facing out. Thread the pink tail (from the oval with black center) onto a tapestry needle. Sew the two ovals together by pairing up the stitches on each and threading your needle through all loops in each pair. Weave in remaining pink end.
Repeat for other pair of ovals.
Using the long tail of black on the top of each foot, sew each foot to the bottom of the bear. I tend to place the feet toward the front of the bear so that the toes point out at an angle. The back of each foot ends up being close to the bottom center of the bear.
Ears (Make 2)
With black, ch 2.
Row 1: 4 sc in 2nd ch from hook. (4 sc)
Row 2: 2 sc in each sc around. (8 sc)
Fasten off, leaving a tail of about 12 inches for sewing.
Flatten the ears and sew each to the top of the head.
Thread a length of ribbon through a stitch between her ears and tie it in a bow.


August 14, 2014 at 5:43 am
I’m so in love……… ❤ ❤ ❤ ❤ ❤
August 14, 2014 at 8:16 am
Aw, Tina is blushing so hard her cheeks match her tutu. Thanks, Tajana! You rock!
August 14, 2014 at 6:08 am
She is just lovely! I love a Party Bear! ❤
August 14, 2014 at 8:16 am
Party bears are the best! They just wanna have fun. 🙂
August 14, 2014 at 7:30 am
So sweet
August 14, 2014 at 8:15 am
Thank you. 🙂
August 14, 2014 at 7:39 am
Absolutely beautiful… Thanks for sharing.
Best wishes, Aquileana 😛
August 14, 2014 at 8:14 am
Thank, Aquileana! Best wishes and lots of hugs to you too!
August 14, 2014 at 9:14 am
Very sweet 🙂
August 14, 2014 at 1:16 pm
Thank you!
August 14, 2014 at 11:28 am
Amazing! And so creative, I love the stories behind your characters.
August 14, 2014 at 1:15 pm
Yay! I’m glad you like the stories. That’s one of my favorite parts.
August 14, 2014 at 11:40 am
thanks for sharing.. 😉 so cute
August 14, 2014 at 1:15 pm
You’re welcome!
August 14, 2014 at 2:13 pm
I absolutely love your sense of humor–it’s very much like mine. Some people don’t “get” me, but I believe you would. Thanks for all the fantastic patterns. I love them all.
August 15, 2014 at 2:36 pm
Thank you so much, Barbara! You just made my day. I totally understand where you’re coming from. Not everyone gets me either. That’s why I’m so excited to meet fun people like you! I’m so glad you’re here!
August 15, 2014 at 10:34 pm
So cute….as always from your hook!
August 18, 2014 at 5:29 am
Thank you!
August 18, 2014 at 6:22 am
Your welcome!
August 20, 2014 at 9:57 am
Aw so cute, I have just found your blog your work is lovely, and I like the header picture. 🙂
August 20, 2014 at 2:26 pm
Thank you, Julie! It’s so nice to meet you. Welcome to the picnic!
August 28, 2014 at 2:54 pm
I was curious how many stitches are there between the eyes?
August 28, 2014 at 6:49 pm
Hi Toni! Thank you for your question. I placed my eyes in the stitches between Rnds 9 and 10, so that there are 5 stitches between each eye. I hope this helps you make a Tina Ballerina Bear of your own. Thanks for stopping by and please let me know if there’s anything else I can do for you.
August 31, 2014 at 7:20 pm
Thank you that was a huge help. I love this pattern. I have made 2 so far. Thank you so much.
September 1, 2014 at 5:35 am
You’re very welcome. I’m glad that helped, and I’m so excited to hear that you have made two Tina Ballerina Bears! Thanks for using my pattern. You rock! PS. If you’d like to share a photo of your Tina Bears with me at squirrelpicnic{at}gmail{dot}com, I’ll feature them in a roundup post later this year. I’d love to see them!
September 10, 2014 at 5:33 am
Fabulous one! Tina-ballerina is great!
September 10, 2014 at 12:28 pm
Thanks, Vanja!
October 16, 2014 at 6:01 pm
Someone help! I am a beginner and can’t understand the very first step
October 17, 2014 at 1:54 pm
Hi there! This bear is made by crocheting in the round. There are several ways to begin. You can make a slip knot, insert your hook, and ch 2 as my pattern suggests. That’s probably the easiest way, but there are other alternatives. Here is a YouTube video you might find helpful.
September 6, 2016 at 12:47 pm
The Slip Knot & Chain 2 method is an absolute lifesaver!
I still can’t understand the Magic Circle/Loop to save my life, but this way works wonderfully, especially if using a thicker yarn and pulling it tight.
I’m working on a Tina Ballerina right now, for my mom, she is precious!
September 7, 2016 at 12:49 pm
Thanks, Tracy! I’m so glad to hear you are enjoying crocheting a Tina Ballerina bear and that the chain 2 method of beginning is working well for you. Funny you should mention the magic loop method. I just released a video on YouTube about the magic loop. I’ve come across several different ways to make it in my crochet explorations across the Internet 🙂 and this one has been the easiest. Check it out if you get a chance: https://youtu.be/RwReSgkkqes.