![]() I’d like to introduce you to a friend of mine. His name is Sleepy Bear.
I’d like to introduce you to a friend of mine. His name is Sleepy Bear.
“Hey, Sleepy Bear, wake up. There’s someone here who would like to meet you. Sleepy Bear?”
Well, you’ll have to excuse him. He’s a really sound sleeper. Since he can’t be disturbed, I’ll just tell you all about him.
I’ve been working on this pattern for almost a year now. I don’t think I’ve ever fiddled with a pattern that long! And I’ve made almost a dozen bears in the process. The first one I ever made I gave to a friend who had been hit by a car while riding his bike to work. He said the bear, which he named Buster, brought him a lot of comfort while he was recovering. I made another for my cousin’s first child and another for a friend out of yarn she had given me. The rest I plan to donate to the Children’s Hospital of Denver where they can bring some comfort to the patients.
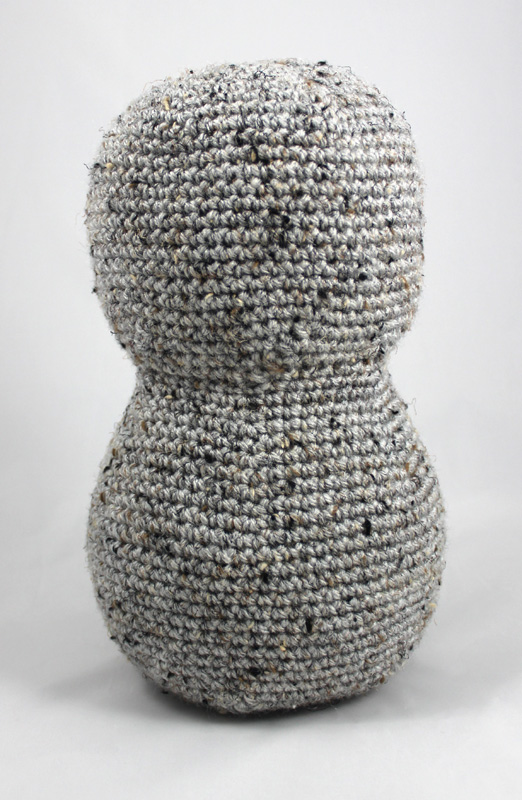
This bear pattern is unique in one key way: the head and body are crocheted together. I have trouble sewing on heads, especially on larger animals like this one. It’s really hard to get them on perfectly straight. Do you have that trouble too? So with this pattern, you crochet the head, do a round in the front loops only to create the neck and then continue with the body. I think you’ll really like this detail.
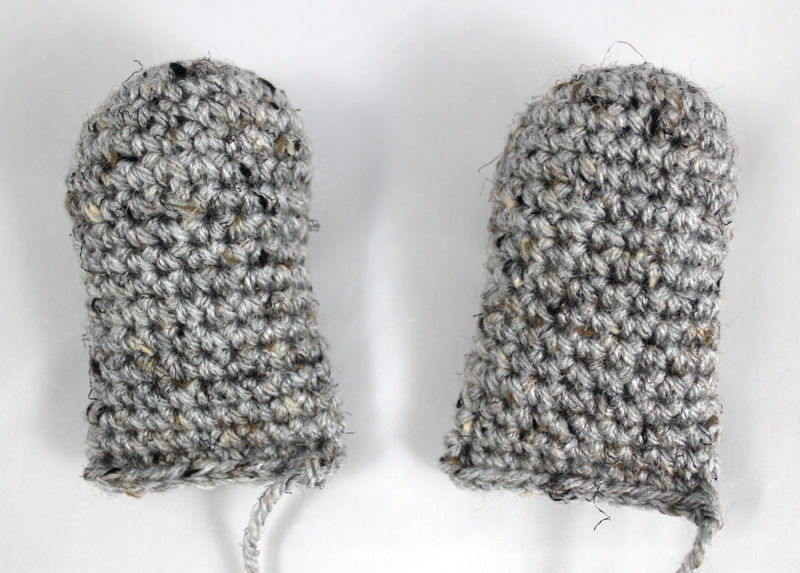
Another distinguishing feature of this pattern is the way the appendages are sewn on. Each includes instructions to close up the end. By crocheting the arms and legs and ears closed, you are able to sew them on through that row of single crochet loops. It’s easy! I like for my bears arms and legs to face forward when they are sitting down, so I sew the legs on at an angle on the bottom and the arms on the sides so that they point forward. I’ve included photos to show this placement in case you want to make your bear like mine, but feel free to play around with the placement to find the positioning you like best.
Curious how Sleepy Bear comes together?
Watch this one-minute time-lapse video showing the bear from the first stitch to the finished face: https://youtube.com/shorts/sjijXju9SRo
Update: This Sleepy Bear pattern has been carefully revised and expanded into a complete PDF pattern. The updated version includes the original bear plus the naptime accessories, along with clearer instructions, embroidery photo tutorials, and a C2C color chart. You can find the updated pattern here: https://jenniferolivarez.com/sleepy-bear
Sleepy Bear’s Naptime Accessories
Any nap just wouldn’t be complete without a nightcap and blanky.
Check out these new free crochet patterns for Sleepy Bear accessories.

Sleepy Bear Crochet Pattern


Over the years, I’ve tried several different yarns with this pattern. I’ve had success with each of them, so I’ll share their information below. You don’t have to use one of these yarns, of course: if you’re feeling adventurous, you might use the yarn weight and quantity, as well as gauge information, to substitute a yarn of your choice.
Knit Picks Comfy Worsted
2.5 balls Knit Picks Comfy Worsted (109 yds, 50 g)
Makes a 10″ tall bear
Gauge for bear made with Knit Picks Comfy
9 sc sts = 2″
10 rnds = 2″
Vanna’s Choice by Lion Brand
2 balls Vanna’s Choice by Lion Brand in Grey Marble (145 yds [133 m], 3 oz [85 g]) *Be careful. I ended up with only a yard or so left over when I made this bear. Unless you’re sure about your gauge, you might want to invest in three balls for this pattern.
Makes an 11″ tall bear
Gauge for bear made with Lion Brand
9 sc sts = 2″
9 rnds = 2″
Caron Simply Soft
1 ball Caron Simply Soft (250 yds [228 m], 5 oz [141.7 g])
Makes a 10″ tall bear
Gauge for bear made with Caron Simply Soft
9.5 sc sts = 2″
10 rnds = 2″
Materials
Worsted-weight yarn in the color of your choice
Small amount of worsted-weight yarn in a contrasting color for the muzzle
Small amount of black yarn for eyes, nose, and mouth
G-6 (4.00 mm) crochet hook
Polyester Fiberfill
Yarn Needle
Stitch Marker (optional)
Abbreviations
ch = chain
dec = decrease by single crocheting 2 together
ea = each
FL = front loop
FO = fasten off
inc = increase with 2 sc in next st
rep = repeat
rnd = round
sc = single crochet
sk = skip
slst = slip stitch
st(s) = stitch(es)
Instructions
NOTE: This amigurumi is worked in unjoined rounds. Do not slip stitch at the end of each round. You may find it helpful to use a stitch marker or scrap yarn to mark the beginning of the round and move the marker up with each round as you work.
Head and Body
Ch 2 or begin with a magic loop.
Rnd 1: 6 sc in 2nd ch from hook (or in magic loop and close).
Rnd 2: 2 sc in ea sc around. (12)
Rnd 3: * Sc, inc, rep from * 5 more times. (18)
Rnd 4: * 2 sc, inc, rep from * 5 more times. (24)
Rnd 5: * 3 sc, inc, rep from * 5 more times. (30)
Rnd 6: * 4 sc, inc, rep from * 5 more times. (36)
Rnd 7: * 5 sc, inc, rep from * 5 more times. (42)
Rnd 8: * 6 sc, inc, rep from * 5 more times. (48)
Rnd 9: * 7 sc, inc, rep from * 5 more times. (54)
Rnd 10: * 8 sc, inc, rep from * 5 more times. (60)
Rnd 11: * 9 sc, inc, rep from * 5 more times. (66)
Rnds 12-24: Sc in ea sc around.
Rnd 25: * 9 sc, dec, rep from * 5 more times. (60)
Rnd 26: * 8 sc, dec, rep from * 5 more times. (54)
Rnd 27: * 7 sc, dec, rep from * 5 more times. (48)
Rnd 28: * 6 sc, dec, rep from * 5 more times. (42)

Crochet in the front loop only to create the bear’s neck.
Stuff the head at this point.
Rnd 29: Sc in the FL only of ea sc around.
Rnd 30: * 6 sc, inc, rep from * 5 more times. (48)
Rnd 31: Sc in ea sc around.
Rnd 32: * 7 sc, inc, rep from * 5 more times. (54)
Rnd 33: Sc in ea sc around.
Rnd 34: * 8 sc, inc, rep from * 5 more times. (60)
Rnd 35: Sc in ea sc around.
Rnd 36: * 9 sc, inc, rep from * 5 more times. (66)
Rnd 37: Sc in ea sc around.
Rnd 38: * 10 sc, inc, rep from * 5 more times. (72)
Rnds 39-51: Sc in ea sc around.
Rnd 52: * 10 sc, dec, rep from * 5 more times. (66)
Rnd 53: * 9 sc, dec, rep from * 5 more times. (60)
Rnd 54: * 8 sc, dec, rep from * 5 more times. (54)
Rnd 55: * 7 sc, dec, rep from * 5 more times. (48)
Rnd 56: * 6 sc, dec, rep from * 5 more times. (42)
Rnd 57: * 5 sc, dec, rep from * 5 more times. (36)
Rnd 58: * 4 sc, dec, rep from * 5 more times. (30)
Rnd 59: * 3 sc, dec, rep from * 5 more times. (24)
Stuff the body.
Rnd 60: * 2 sc, dec, rep from * 5 more times. (18)
Rnd 61: * Sc, dec, rep from * 5 more times. (12)
Rnd 62: * Sc, sk, rep from * 5 more times. (6)
FO, leaving a long tail. Thread through remaining sts and pull to close. Weave in end.
 Arms (Make 2)
Ch 2 or begin with magic loop.
Rnd 1: 5 sc in 2nd ch from hook (or into magic loop and close).
Rnd 2: 2 sc in ea sc around. (10)
Rnd 3: * Sc, inc, rep from * 4 more times. (15)
Rnd 4: * 2 sc, inc, rep from *4 more times. (20)
Rnd 5: * 3 sc, inc, rep from * 4 more times. (25)
Rnds 6-8: Sc in ea sc around.
Rnd 9: * 3 sc, dec, rep from * 4 more times. (20)
Rnds 10-18: Sc in ea sc around.
Stuff arm and flatten the opening so that the sts line up in pairs. Sc these pairs together to close.
FO, leaving long tail. Pin to body in the position shown below and sew on using long tail.

Repeat for other arm.
 Legs (Make 2)

Ch 2 or begin with magic loop.
Rnd 1: 6 sc in 2nd ch from hook (or into magic loop and close).
Rnd 2: 2 sc in each sc of round (12)
Rnd 3: * Sc, inc, rep from * 5 more times. (18)
Rnd 4: * 2 sc, inc, rep from * 5 more times. (24)
Rnd 5: * 3 sc, inc, rep from * 5 more times. (30)
Rnd 6: * 4 sc, inc, rep from * 5 more times. (36)
Rnds 7-9: Sc in ea sc around.
Rnd 10: * 4 sc, dec, rep from * 5 more times. (30)
Rnd 11: * 3 sc, dec, rep from * 5 more times. (24)
Rnds 12-19: Sc in ea sc around.
Stuff leg and flatten the opening so that the sts line up in pairs. Sc these pairs together to close.
FO, leaving long tail. Pin to body in the position shown below and sew on using long tail.

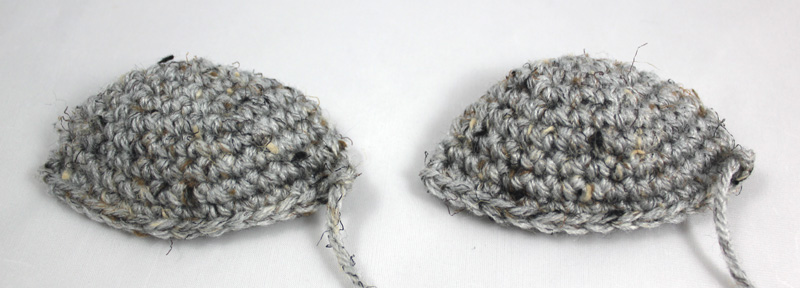
 Ears (Make 2)
Ch 2 or begin with magic loop.
Rnd 1 : 6 sc in 2nd ch from hook (or into magic loop and close).
Rnd 2: 2 sc in ea sc around. (12)
Rnd 3: * Sc, inc, rep from * 5 more times. (18)
Rnd 4: * 2 sc, inc, rep from * 5 more times. (24)
Rnd 5: * 3 sc, inc, rep from * 5 more times. (30)
Rnds 6-8: Sc in ea sc around.
Flatten the ear opening so that the sts line up in pairs. Sc these pairs together to close.
FO, leaving a long tail. Pin to body and sew on using long tail.

Muzzle
With yarn in a contrasting color, ch 2 or begin with magic loop.
Rnd 1: 6 sc in 2nd ch from hook (or into magic loop and close).
Rnd 2: 2 sc in ea sc around, join with slst, ch 1. (12)
Rnd 3: * Sc, inc, rep from * 5 more times. Join with slst, ch 1. (18)
Rnd 4: * 2 sc, inc, rep from * 5 more times. Join with slst, ch 1. (24)
Rnd 5: * 3 sc, inc, rep from * 5 more times. Join with slst, ch 1. (30)
Rnd 6: * 4 sc, inc, rep from * 5 more times. Join with slst. (36)
FO, leaving a long tail. Using a long strand of black yarn and yarn needle, embroider a nose and mouth. The slideshow below will show you how to embroider a triangle-shaped nose and a smiley mouth like the one on my Sleepy Bear. Here’s a PDF version of the tutorial: How to Embroider a Nose and Mouth by Jennifer Olivarez
If you’d prefer a flatter nose, stop after creating the first thick band and then make your smile. Or maybe your bear is the serious type and just has one line.

Pin to head and sew onto the bear’s face using the long tail.

Eyes
Using tapestry needle and a yard length of black yarn, embroider sleepy eyes on the bear’s head.
And there you go. You have a bear who’s always ready for bedtime.


March 13, 2015 at 8:45 am
It’s the first time I’ve seen this method of creating a neck for a soft toy 🙂 this is so creative! What I normally do is decrease until the diameter of the opening is about the size I want for the neck, then sc even 2 rounds before continuing with the body, but this may make the neck a bit longer than I want it. If it’s 1 round then it might not be distinct enough though. I’m still in the beginning stages (muddling around) making toys though, so it is always a pleasant surprise to see new methods of doing things that other people generously share. Thank you 🙂
March 13, 2015 at 8:58 am
Hi, Ealserb! Thank you so much for sharing how you create the neck on your animals. I would like to try that! I agree it’s always fun to hear how different toy makers work. So cool! I’m glad you enjoyed hearing about my method too.
March 13, 2015 at 9:20 am
He will be on my hook today! I am going to finish sewing a bunny together and then get started 🙂 Thank you for such a cutie.
March 13, 2015 at 9:53 am
Wow, that’s awesome, Theresa! Enjoy!
March 13, 2015 at 9:31 am
Thanks, that’s great, I love that the head and body are all in one, I’m really not a fan of sewing together!! X
March 13, 2015 at 9:54 am
Glad you like it! Anything to keep from sewing too much. I even like weaving in ends more than sewing on heads! 🙂
March 13, 2015 at 10:10 am
I just want to take a nap with one of my own. I love shape! 🙂
March 13, 2015 at 12:00 pm
Thanks! I can attest to his napping ability. He is one of the best snugglers I’ve ever snuggled.
March 13, 2015 at 11:18 am
Soooo cute!
March 13, 2015 at 12:00 pm
Thanks!
March 13, 2015 at 12:26 pm
Oh my goodness he is so sweet. Thanks for sharing.
March 13, 2015 at 12:29 pm
Thanks! I’m really glad you like him. 🙂
March 13, 2015 at 3:33 pm
Oh lovely sleepy bear! Yes, I have the same problems attaching heads on big amigurumi, because they are heavy and always dangle! Yours is a good solution for the problem 🙂
March 14, 2015 at 12:36 pm
I’m so glad you like him and my solution to the head problem. I think it’s a lot faster this way too, especially since before it would take me several tries to sew it on straight! 🙂
March 13, 2015 at 8:45 pm
Ahhh I love your sleepy bear! Thanks for sharing your pattern! I can’t wait to make me one now! How adorable! Hugz Lisa and Bear
March 14, 2015 at 12:33 pm
Thanks, Lisa and Bear! I hope you enjoy making a Sleepy Bear. Hugs to you both!
March 13, 2015 at 11:34 pm
Wow, this is a cute bear! I love the shapes and he has such a sweet face with those sleeping eyes. I’m glad you didn’t give up designing this bear over the year 🙂
March 14, 2015 at 12:32 pm
Thanks, Karin! I’m glad you like him and I’m glad I didn’t give up too. He was worth it. 😀
March 14, 2015 at 10:07 am
The tutorial on the nose is awesome. So far I could never figure out how to make a uniform nose. You made my day with this!!! Many greetings from Virginia, ivonne
March 14, 2015 at 12:21 pm
Hi, ivonne! I’m so glad that you found the tutorial helpful. Thanks for letting me know. It’s always good to hear when something works. May all your future noses be easy breezy! 🙂
March 14, 2015 at 4:44 pm
🙂 That almost sounds like one of those Irish St. Patrick’s Day blessings. haha.
March 15, 2015 at 10:47 am
🙂
March 14, 2015 at 7:32 pm
Seriously that is the very “Bearest” Bear I have seen. I too sometimes have trouble getting the head on straight and sometimes pretend my sideways looking critter was intentional. (and sometimes it is). Great tip and great pattern. 😀
March 15, 2015 at 10:47 am
Thanks, Sharon! I like your thinking. I do the same thing — whenever I make a mistake, I say I’ve just added my own design detail. 🙂
April 5, 2015 at 8:52 am
Thank you so very much for such a cute, cute bear and your detailed pattern! This will be my 1st ami!!
April 5, 2015 at 10:56 am
Thanks, Kathy! I’m so glad you like Sleepy Bear, and I’m very excited that you will be making him as your first ami. I am so honored!
April 24, 2015 at 8:35 pm
i like the brown bear on here the most but noticed you have no instructions on how to make this bear he is so cute would love to make that one for my grand babies
April 25, 2015 at 4:24 am
Yes, Debbie, I’m sorry that I don’t have instructions for the brown bear. It’s basically the same as Sleepy Bear except that I made the head and body separately, then sewed the head to the body. The head is also a bit larger. Let me see if I can help. If you wanted to try it, you might follow the Head and Body instructions in the Sleepy Bear pattern until Rnd 11. Then continue with this.
Rnd 12: * 10 sc, inc, rep from * 5 more times. (72)
Rnd 13: * 11 sc, inc, rep from * 5 more times. (78)
Rnds 14-26: Sc in ea sc around.
Rnd 27: * 11 sc, dec, rep from * 5 more times. (72)
Rnd 28: * 10 sc, dec, rep from * 5 more times. (66)
Rnd 29: * 9 sc, dec, rep from * 5 more times. (60)
Rnd 30: * 8 sc, dec, rep from * 5 more times. (54)
Rnd 31: * 7 sc, dec, rep from * 5 more times. (48)
Rnd 32: * 6 sc, dec, rep from * 5 more times. (42)
Rnd 33: * 5 sc, dec, rep from * 5 more times. (36)
Rnd 34: * 4 sc, dec, rep from * 5 more times. (30)
Rnd 35: * 3 sc, dec, rep from * 5 more times. (24)
Position and secure 2 18 mm safety eyes. Stuff the head.
Rnd 36: * 2 sc, dec, rep from * 5 more times. (18)
Rnd 37: * Sc, dec, rep from * 5 more times. (12)
Rnd 38: * Sc, sk, rep from * 5 more times. (6)
FO, leaving a long tail. Thread through remaining sts and pull to close.
Body
Ch 2 or begin with a magic loop.
Rnd 1: 6 sc in 2nd ch from hook (or in magic loop and close).
Rnd 2: 2 sc in ea sc around. (12)
Rnd 3: * Sc, inc, rep from * 5 more times. (18)
Rnd 4: * 2 sc, inc, rep from * 5 more times. (24)
Rnd 5: * 3 sc, inc, rep from * 5 more times. (30)
Rnd 6: * 4 sc, inc, rep from * 5 more times. (36)
Rnd 7: * 5 sc, inc, rep from * 5 more times. (42)
Rnd 8: * 6 sc, inc, rep from * 5 more times. (48)
Then continue with Rnd 31 of the Head and Body instructions in the Sleepy Bear pattern. Use the long tail left on the head to sew the head to the body. Also use the Sleepy Bear pattern to crochet the head and limbs.
April 25, 2015 at 1:22 pm
Love it! Such a wonderful softy toy! Perfect sleepy bear for little ones.
Thank you sweetie for coming up and sharing such wonderful pattern.
April 25, 2015 at 4:51 pm
Thank you as always for your kind words. You are such a dear. I have to admit, I have a Sleepy Bear of my own, so I can attest that it is perfect for “big” ones too. 🙂
May 10, 2015 at 9:07 am
Thanks so much for sharing your patterns as you do, I just finished my first sleepy bear and plan on making more!!
May 10, 2015 at 12:50 pm
That’s awesome, Roxie! I’m so glad you’re enjoying making sleepy bears. Would you share a photo of him? If you email it to squirrelpicnic(at)gmail(dot)com, I’ll include it in an upcoming feature called “You Made This!” and credit you, of course.
August 7, 2015 at 12:35 am
I love the pattern and I am almost done. I made him for my son and he is so excited to get him. This is the first toy I have made and found your pattern very easy to follow and love that the head and body were made together. Thank you very much for sharing your pattern for free. I will email you a pic when he is done.
August 7, 2015 at 4:09 am
That’s great to hear! I’m so glad you are enjoying my pattern. I look forward to seeing your bear!
August 25, 2015 at 12:05 am
Thanks for sharing! I will be making one soon.
August 27, 2015 at 4:15 am
You’re welcome, Jennifer. Enjoy!
Pingback: Sleepy Bear Crochet Pattern | mariajoverruiz
September 4, 2015 at 2:28 am
this is probably the best pattern I’ve found for a teddy bear. I love the photos to show each step of the way. I can’t wait to try this out ! Thank you for sharing.
September 4, 2015 at 3:40 am
Thanks, Emilie! I’m so glad you like it. Enjoy!
Pingback: Custom Item: Pink sleepy bear | Crochet Adventures!
November 4, 2015 at 7:11 pm
Thank you so much for sharing this bear pattern, I have tried one, and it is so cute, !!
Darlene, from Omaha, NB.
November 5, 2015 at 4:56 am
Thanks, Darlene! I’m so pleased to hear you enjoyed making a Sleepy Bear.
November 12, 2015 at 8:45 am
this is adorable! the pattern was very easy to fallow and it turned out super cute 😉
November 15, 2015 at 11:45 am
Thanks, Azi! I’m so glad you enjoyed it. 🙂
December 15, 2015 at 6:10 am
What is FL?
December 15, 2015 at 9:30 am
Hi Rana. Thanks for your question. FL is front loop (or the loop in a stitch closest to you). Enjoy your Sleepy Bear!
December 18, 2015 at 11:44 pm
Is it weird I feel my arms and legs worked up much smaller than the body? I kept a stitch count, and it matches up with what you had, I just feel like my body looks much bigger than how yours is pictured. Any ideas on what might have happened? Or am I just crazy and they should be smaller like this?
December 19, 2015 at 5:08 am
Hi Courtney! Thanks for your question. Your situation is very interesting, and I’m not sure I can help. But I will try. In the least I can give you the measurements for the arms and legs on my Sleepy Bear and see if they match yours. The arms are 3 3/4″ long and 6 1/4″ around at the widest part (about rnd 7). The legs are almost 4″ long and 8″ around at the widest part (about rnd 8). The first thing that comes to mind is to make sure that you used the same hook throughout the pattern. Using a different hook, even in the same size, can make a difference. Good luck with your Sleepy Bear! Hope this information helps.
December 19, 2015 at 8:03 pm
Thank you for replying!! I used Loops & Threads Impeccable yarn (medium 4)! My body seems to measure about 11 1/4″, my arms 4″x7″, and I am working the leg right now.
December 21, 2015 at 5:04 am
Sounds like you’re right on track!
December 27, 2015 at 1:37 pm
I can’t wait to start on sleepy bear, he’ll be a 1st birthday gift for a friends baby.
I’d also like to add stripy bear to my list, do you have his pattern available too
December 27, 2015 at 1:40 pm
Hi Desert Darner! I’m so glad that you are looking forward to making a Sleepy Bear for your friend’s new baby. I do have a pattern for a striped bear that is based on the Sleepy Bear pattern. Check it out at https://squirrelpicnic.com/2015/04/24/motley-the-bear-crochet-pattern/. Enjoy!
January 11, 2016 at 4:39 pm
My new baby brother is due in May, and I’ve been making him baby stuff. This is the cutest little bear ever and I really hope he likes it when he’s older! Thank you so much for such a wonderful pattern!
January 12, 2016 at 5:14 am
How exciting that you will soon have a baby brother. That’s awesome! And what a lucky guy he is to have you. I know he will love all the presents you’re making. I’m so touched that a Sleepy Bear is one of them.
February 22, 2016 at 9:25 pm
Thanks for the sleepy bear pattern. Cannot wait to make it. I plan to make these and donate to a local hospital. Very grateful.
February 24, 2016 at 6:21 pm
Thanks, Jackie! I’m so excited that you are planning to make sleepy bears for a local hospital. What a great idea! Let me know when you do. I’d love to share your story here.
February 25, 2016 at 10:05 pm
I love this pattern! It so cute and easy to understand! This will be my “go-to” pattern for gifts 🙂 I just finished a bear for my boyfriends sisters son. He’s turning 1 and I thought this would be perfect!
February 28, 2016 at 1:36 pm
Thanks, Brittany! I’m honored that Sleepy Bear will be your go-to gift pattern. That’s awesome!
Pingback: Mothers Day Update | Bitchin' Beautician
March 30, 2016 at 7:31 am
He’s so cute! I’m definitely going to try him out today. I made a bear from a paid pattern yesterday and he was adorable, but I like your guy better, I think – sewing on the neck for my other bear was so tedious!
March 30, 2016 at 6:45 pm
I’m so excited to hear that you will be making a Sleepy Bear next. That’s awesome! Will you share a picture of him when you are done? I’d love to see him. Enjoy!
April 30, 2016 at 8:05 am
Thank you for such a detailed and easy pattern to follow! This is my first stuffed crochet =} I have a question though-the instructions for the FL sc all the way around-it feels awkward. Is it the loop on the outside or inside? And what is the point of this FL only round?
Thanks!
April 30, 2016 at 10:08 am
Hi Wendy! I’m pleased to hear that you chose Sleepy Bear as your first crochet stuffed animal. The front loop is the loop that is closest to you as you are crocheting. Crocheting in the front loop only is what creates the bear’s neck. It is also what makes this pattern unique. Usually you would have to crochet the head and body as two separate pieces and then sew them together at the end. Hope this explanation helps and that you enjoy crocheting the rest of your Sleepy Bear.
May 3, 2016 at 5:27 pm
Awesome rating system of the acorns! You are super inspiring ..I have only crocheted simple beanies. I need to mix up my patterns and branch out! Adorable stuff here and what talent you have. It is like stepping into a whimsical animal parade!
May 8, 2016 at 12:32 pm
Thank you, MissyJean! It’s nice to meet you. I’m so glad you enjoyed your visit to the picnic. Stop back again sometime!
June 18, 2016 at 10:11 am
great pattern! 😄
how long does he take to make?
June 18, 2016 at 2:43 pm
Hi craftycrocheter! Thanks for your interest in my Sleepy Bear pattern. I’d say on average, it takes about 8 hours to crochet a Sleepy Bear.
Pingback: Crochet projects! | Bitchin' Beautician
July 18, 2016 at 5:11 am
this is the 2nd stuffed animal i’ve made, i got to the bottom of the head, and think i made a mistake through the whole head by accidentally skipping an extra set of stitches on each round. I only did 5 of each set of increases instead of 6, i hope it comes out ok as i would like to have this done by thursday. Because of this mistake, i’m thinking I need to add an extra decrease to make the neck come out correct. I guess only time will tell 🙂 But i love this pattern, its so adorable and perfect for what its being made for
July 18, 2016 at 6:00 am
Hi Brittaney! So awesome to hear that you are making a Sleepy Bear. Too bad about the head, but I bet it will be okay. If you made the increases in the same place, I imagine it would just mean that one side is flatter than the others. Is that correct? Maybe that could be the side for the face. hmm, just a thought. I hope you enjoy the rest of the pattern! Do let me know how it turns out.
August 13, 2016 at 6:07 pm
Hi… I’ve already made a number of sleepy bears. My friends love ’em (for their grandkids etc.) so I can’t hang on to even one. They are fun to make tho and so don’t really mind ! thanks so much for this pattern.
August 15, 2016 at 3:54 am
You’re very welcome. I’m so glad to hear how much you like the pattern and that you’ve made a bunch of sleepy bears for your friends’ grandkids. Thanks for letting me know. You made my day!
Pingback: crochet bear pattern | nicesketches
August 28, 2016 at 5:03 pm
You are most generous to not only share this adorable pattern, but to give such detailed instructions–thank you!
August 29, 2016 at 5:45 am
You’re welcome! I am so glad that you like it. 🙂
September 8, 2016 at 4:01 pm
I love this pattern and have made several with the sleepy eyes. However, I would like to use plastic eyes on some. How do I figure out if they are centered as you can’t put them on after you complete the body. What is your method for this?
September 8, 2016 at 6:52 pm
Hi, Donna! I’m so excited to hear that you are enjoying this pattern and have made several Sleepy Bears! And what a great question you have for me. I suggest crocheting the head as normal through Rnd 28 and stuffing it lightly. Then crochet your muzzle and pin it to your bear. (I usually position the muzzle so that the bottom falls at about Rnd 26.) You don’t have to sew it on yet. This is just to give you an idea. I would then place my safety eyes on either side of the muzzle between Rnds 15 and 16, without popping on the backs just yet. Prop the head up somewhere and stand back to inspect if the eyes are even and in the position you desire. Then pop on the backs when you are satisfied. I hope that these guidelines help you to create some lively and awake bears. 🙂 Please let me know if this method works for you (or doesn’t). Best wishes!
Pingback: Popping out again – Tatie's World Part Two
October 28, 2016 at 11:17 pm
Hi Jennifer, what a sweet little bear! I was wondering what you’re thoughts are on people selling items made from your patterns?
October 30, 2016 at 7:10 am
Hi Anna! Thank you for asking. Here’s the gist of my policy (I just lifted it from my About page): You are welcome to sell the finished products made from my patterns, under these stipulations: I ask that you credit Jennifer Olivarez for the design and include a link to the free pattern — within the listing if selling it online or on a tag attached to the item if selling it in a shop or at a fair.
October 31, 2016 at 9:40 pm
Thanks, sounds good!
December 31, 2016 at 11:29 pm
Hi and thanks for this cute bear. I have never made a bear but I want this one for my new GGchild who will be here in July. I just dont know how to get from one round to the next. I see that it says ” close “, does that mean that I end the round with a slipstitch in the beginning of previous round?. And then do I chain one and then begin the next round. I’m sorry to bother you but I just want to do it right Thanks for any help. Lilly.
January 1, 2017 at 12:30 am
Hi, me again. I just found the magic loop and I am now on my way with the bear. I am new to this laptop, ( any computer stuff } the reason I didn’t see how to get to the info about the loop. Thank’s again. Lilly.
January 4, 2017 at 11:01 am
Hi Lilly! I’m glad you were able to work it out. Sorry I have been away and wasn’t able to help you. Enjoy making your Sleepy Bear. Best wishes!