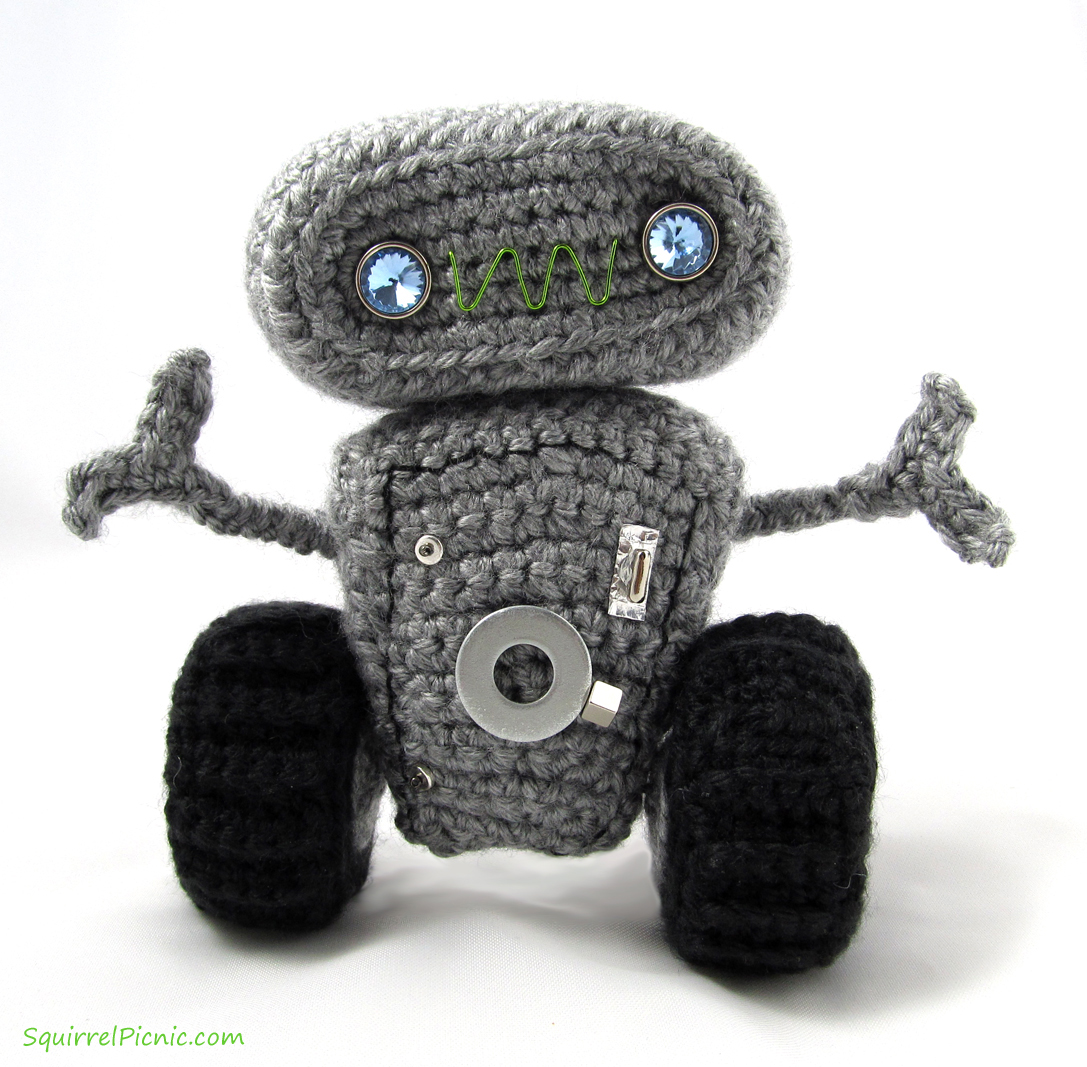
Introducing the newest resident of Squirrel Picnic… MEAP! This cuddly little robot made his debut in the Squirrel Picnic comic last weekend. Now I’m providing the pattern so you can make a robot too. And you may not know it yet, but you need a robot. Your cuddly robot can help you in many ways. He’s great for dusting the house and mopping up spills. Glue on a magnet and he can mind your small tools, metal parts, and trinkets. He can even cheer you up when you are sad or just look cute on your desktop.
Crochet MEAP the Robot Pattern
This pattern walks you through making an armature in case you want your robot’s wheels to spin and the head and arms to move. These steps require a bit more work, and truth be told, your robot may have some trouble standing still with moveable wheels. If instead, you’d like a stationary cuddly robot, omit the armature, sew on the head and wheels, and stuff as normal. I think you should still be able to insert a 7″ length of wire for the arms without attaching it to anything. Crochet around the wire and create the claws as directed in the last two steps of the pattern, and they should function just fine.
Finished size: 6″ tall
Materials
75 yards worsted-weight yarn in gray (Caron Simply Soft in Grey Heather)
small amount of worsted-weight yarn in black (Caron Simply Soft in Black)
G-6 (4.00 mm) crochet hook
2 9/16″ buttons for eyes
22 gauge copper wire in parrot green
26 gauge copper wire in black
16 gauge copper wire in black
Round nose pliers
Polyester fiberfill
Tapestry needle
Gray thread
Sewing needle
Embellishments (I used 5 mm silver spacer beads and 4 mm silver round beads for compartment door hinges, aluminum foil and a silver ball chain connector for the handle, and a metal washer with a magnetic cube just for fun.)
NOTE: If you are making this robot for a child, please do not make the wire armature. Each of the parts may be sewn together instead. Also consider embroidering the eyes and embellishments.
Instructions
Body
Crochet 2 triangles for the front and back
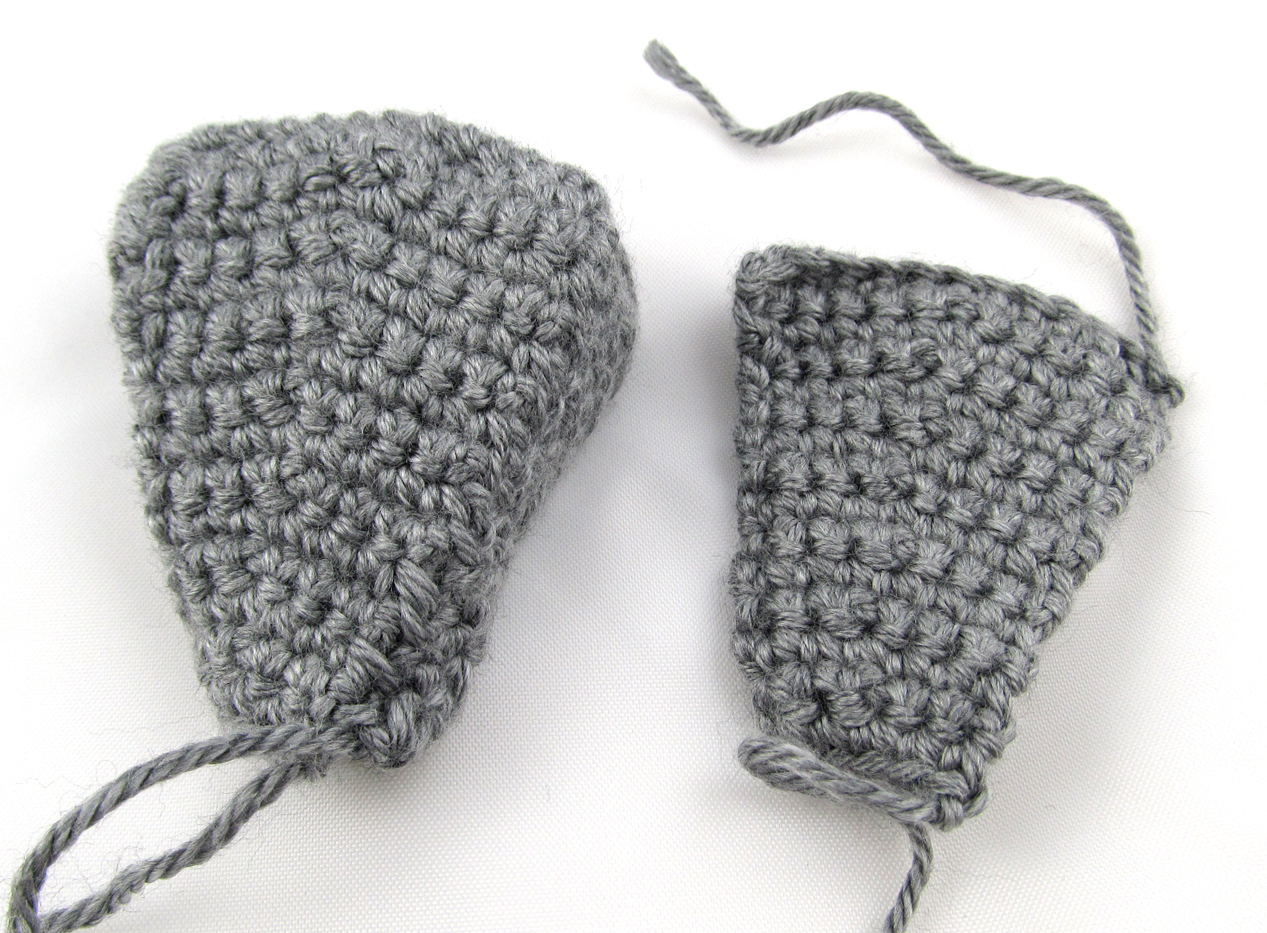
Ch 13
Row 1: Sc in 2nd ch from hook and to end of row. Ch 1, turn.
Row 2: 5 sc, dec, 5 sc, ch 1, turn. (11)
Row 3: Sc in each st across, ch 1, turn.
Row 4: 5 sc, dec, 4 sc, ch 1, turn. (10)
Row 5: Rep row 3.
Row 6: 4 sc, dec, 4 sc, ch 1, turn. (9)
Row 7: Rep row 3.
Row 8: 4 sc, dec, 3 sc, ch 1, turn. (8)
Row 9: Rep row 3.
Row 10: 3 sc, dec, 3 sc, ch 1, turn. (7)
Row 11: Rep row 3.
Row 12: 3 sc, dec, 2 sc, ch 1, turn. (6)
Row 13: Rep row 3.
Row 14: 2 sc, dec, 2 sc, ch 1, turn. (5)
Row 15: Rep row 3.
FO, work in ends.
Crochet 2 triangles for the sides of body

Ch 7
Row 1: Sc in 2nd ch from hook and in each st across, ch 1, turn. (6)
Row 2: Sc in each st across, ch 1, turn.
Row 3: 2 sc, dec, 2 sc, ch 1, turn. (5)
Rows 4-5: Rep row 2.
Row 6: 2 sc, dec, 1 sc, ch 1, turn. (4)
Rows 7-8: Rep row 2.
Row 9: sc, dec, sc, ch 1, turn. (3)
Rows 10-11: Rep row 2.
Row 12: Sc, dec, ch 1, turn. (2)
Row 13: 2 sc, ch 1, turn.
Row 14: 2 sc, turn.
Row 15: Dec
FO, leaving long tail for sewing.
Crochet rectangle for the top of body
Ch 13
Row 1: Sc in 2nd ch and in each st across, ch 1, turn. (12)
Rows 2-6: Sc, ch 1, turn.
FO, leaving a long tail for sewing.
Sew body together
Sew the sides to the top, and then sew that to the back. Don’t sew on the front yet.
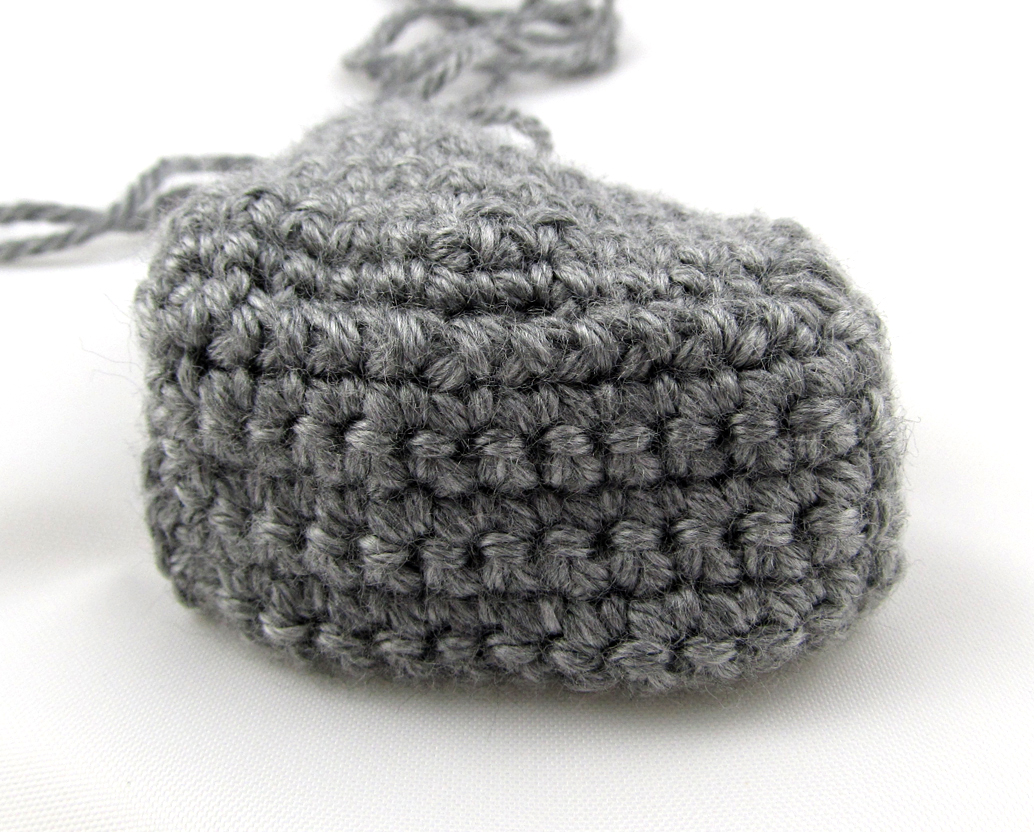
Head
Crochet back of head
Oval is worked in the round. First sc of each round is in same sc as slst.
Ch 12
Rnd 1: Sc in 2nd ch from hook, sc in BL only of each ch across, 3 sc in t-ch, sc in FL of each ch across, 3 sc in last ch, join with slst to first sc.
Rnd 2: Ch 1, sc in next 10 sc, 2 sc in next 3 sc, sc in next 10 sc, 2 sc in next 3 sc, join with slst.
Rnd 3: Ch 1, sc in next 10 sc, (2 sc in next sc, sc in next sc) 3 times, sc in next 10 sc, (2 sc in next sc, sc in next sc) 3 times, join with slst. Set this oval aside.
Crochet rest of head
Ch 12
Rnd 1: Sc in 2nd ch from hook, sc in BL only of each ch across, 3 sc in t-ch, sc in FL of each ch across, 3 sc in last ch, join with slst to first sc.
Rnd 2: Ch 1, sc in next 10 sc, 2 sc in next 3 sc, sc in next 10 sc, 2 sc in next 3 sc, join with slst.
Rnd 3: Ch 1, sc in next 10 sc, (*2 sc in next sc, sc in next sc, repeat from * 2 more times), sc in next 10 sc, (*2 sc in next sc, sc in next sc, repeat from * 2 more times), join with slst.
Rnd 4: Sc in BL only of each sc around, join with slst.
Rnds 5-8: Sc in each sc around.
Rnd 9: Sc in each sc around, join with slst.
FO, leaving long tail for sewing.
Stuff head and sew the other oval to the back.
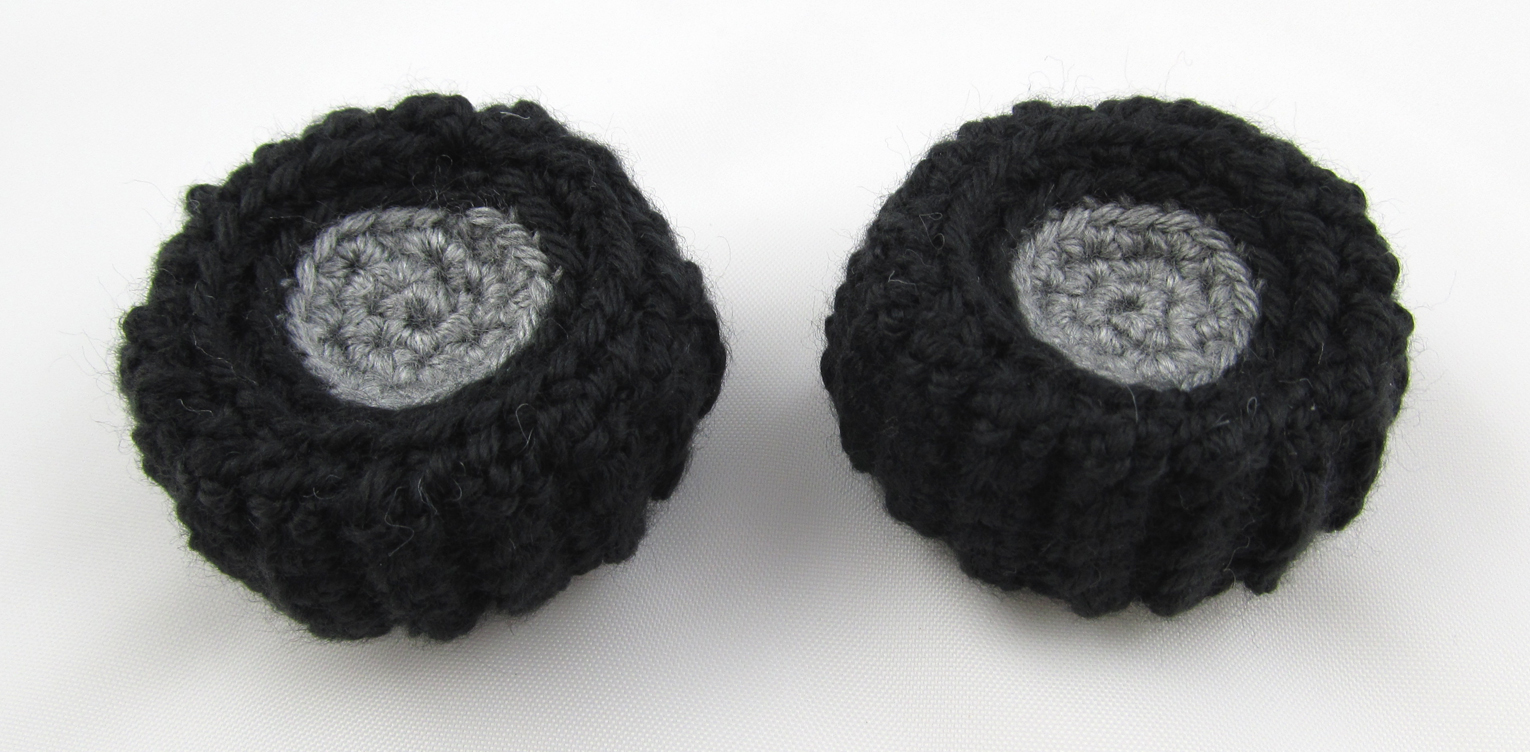
Wheels

Crochet the tread
With black yarn, ch 6
Row 1: Sc in 2nd ch from hook and in each ch across, ch 1, turn. (5)
Row 2: Sc in BL only of each st across, ch 1, turn.
Repeat row 2 until piece measures 7″.
Crochet wheel hub
With gray yarn, ch 2
Rnd 1: 6 sc in 2nd ch from hook. (6)
Rnd 2: 2 sc in each sc around (12)
Rnd 3: *2 sc in next sc, sc in next sc, repeat from * 5 more times. (18)
Rnd 4: With black yarn, sc in BL of each sc around.
Rnd 5: In BL, *2 sc in next sc, sc in next sc, repeat from * 8 more times, join with slst. (27)
FO, leaving a long tail for sewing.
Sew one end of the “tread” to the other. Sew on a hub. Stuff and sew on the other hub.
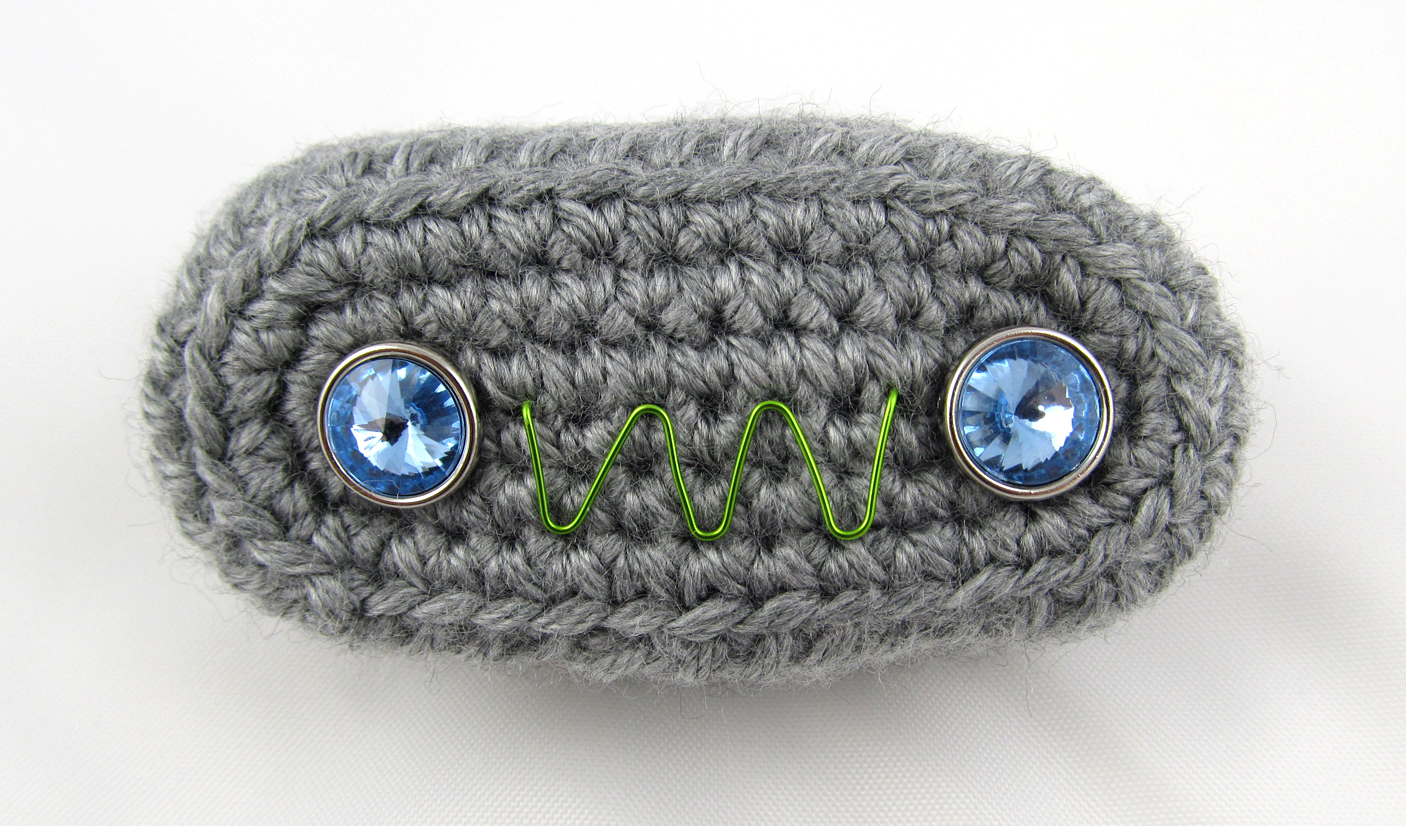
Putting Your Robot Together
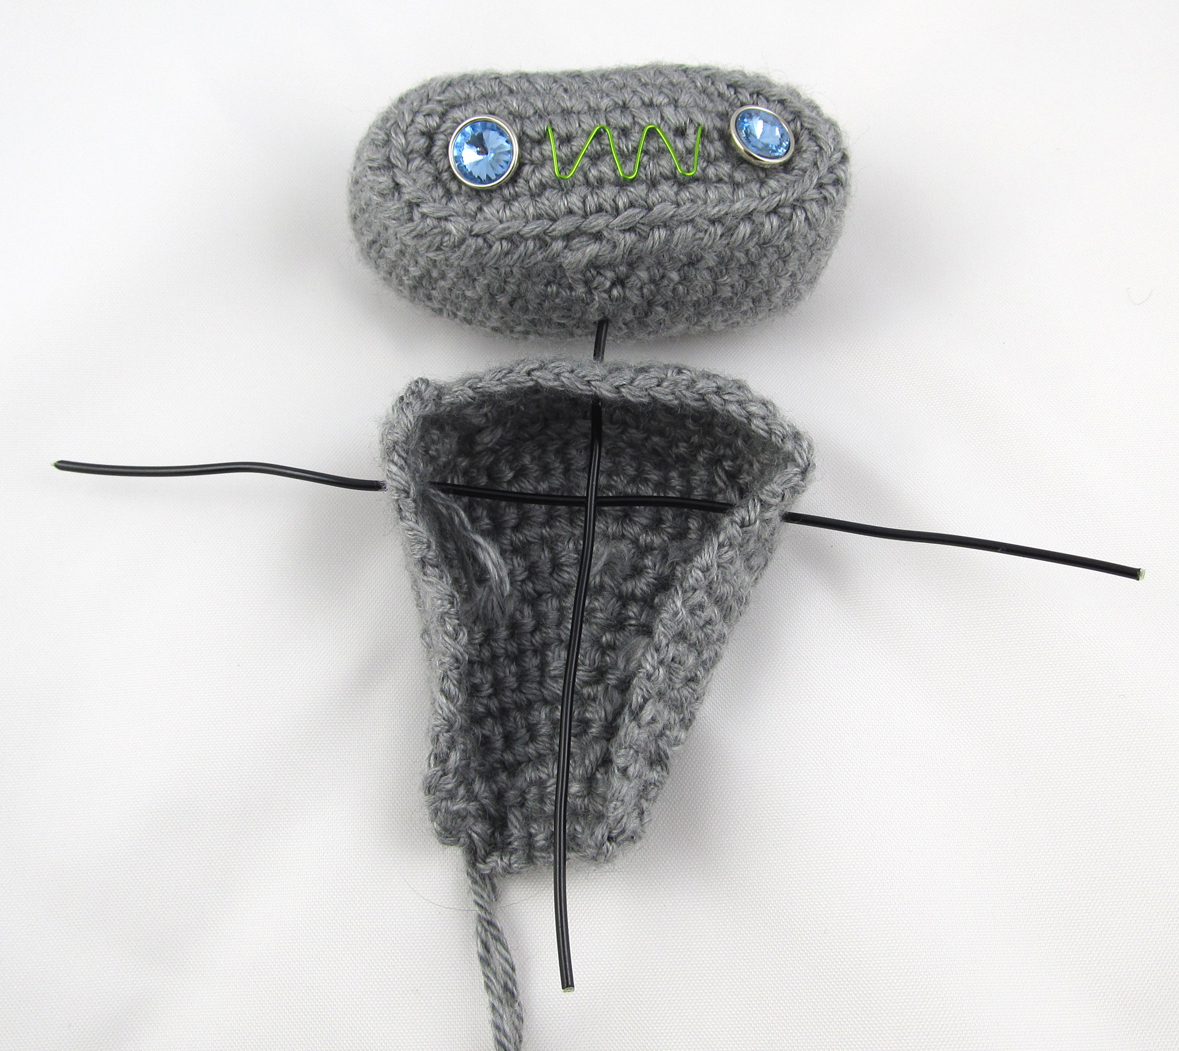
- Sew eyes to the head.
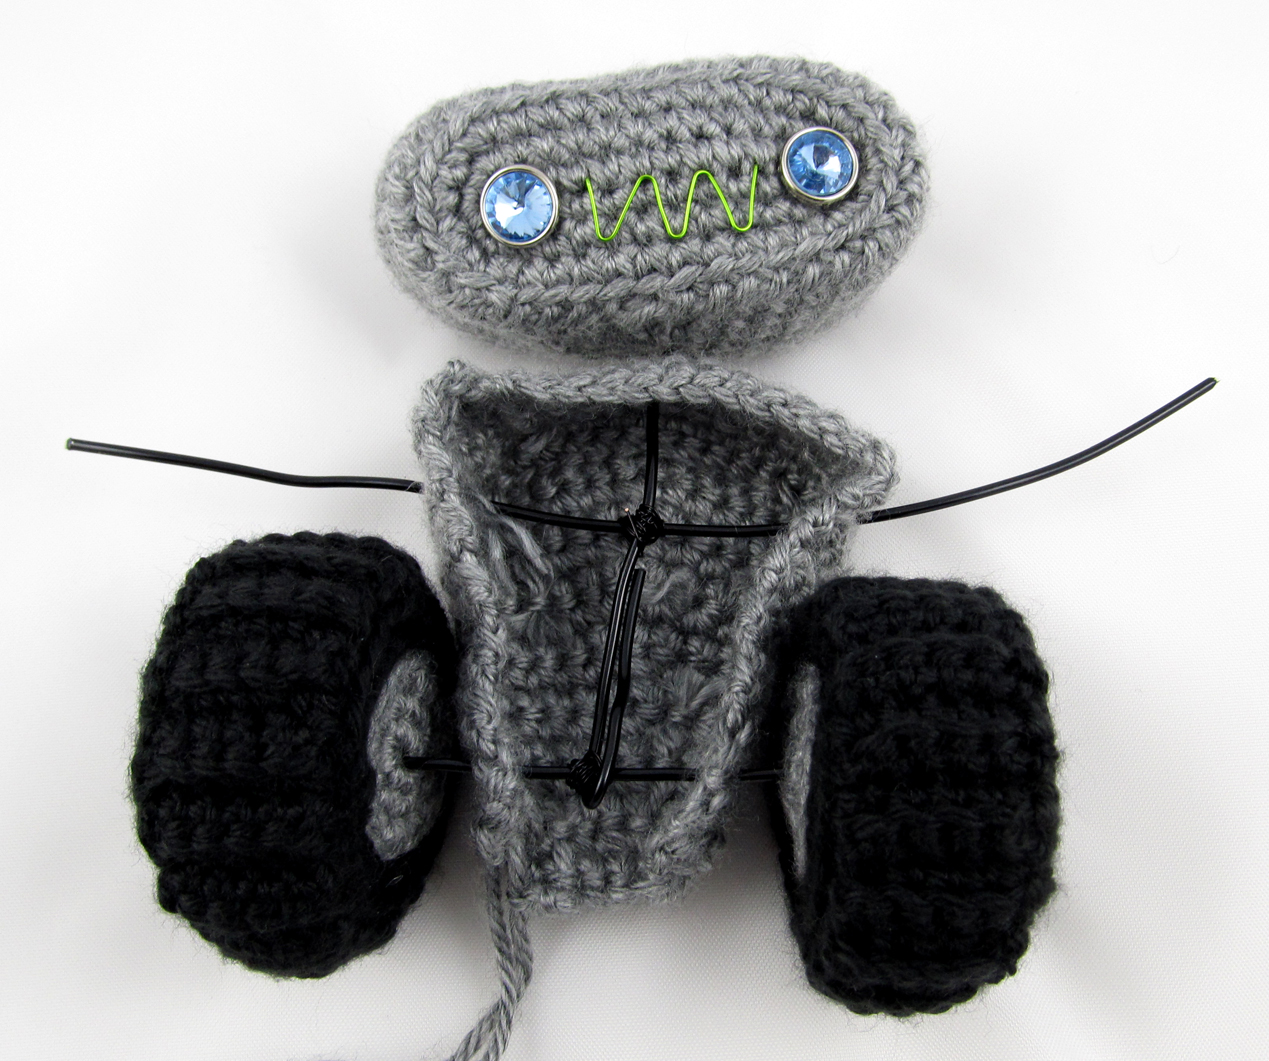
- Using round nose pliers, bend green wire into the shape of a mouth. Trim so that each end piece is about 1/2″ long. Bend end pieces back. Place onto robot’s face.

- For the armature, cut 16 gauge black wire into these 3 lengths: 6″, 7″, and 8″.
- Take the 6″ length and bend it about a 1/2″ from the end to form an L. Thread this length through the top of the body in the center, with the L sticking out the top. Push the L into the center of the head. I left my robot’s head loose like this so that I can swivel it 360 degrees and make him look up and down as well. If you want your robot’s head to be more permanent, you could sew the head onto the body instead.
- Take the 7″ length of wire and thread it through the body about 1/4″ from the top. Wrap 26 gauge wire around to join it to the center wire.

- Take the 8″ length of wire and thread it through the body about 1/4″ from the bottom. Wrap 26 gauge wire around to join it to the center wire. Bend up the center wire on the bottom.

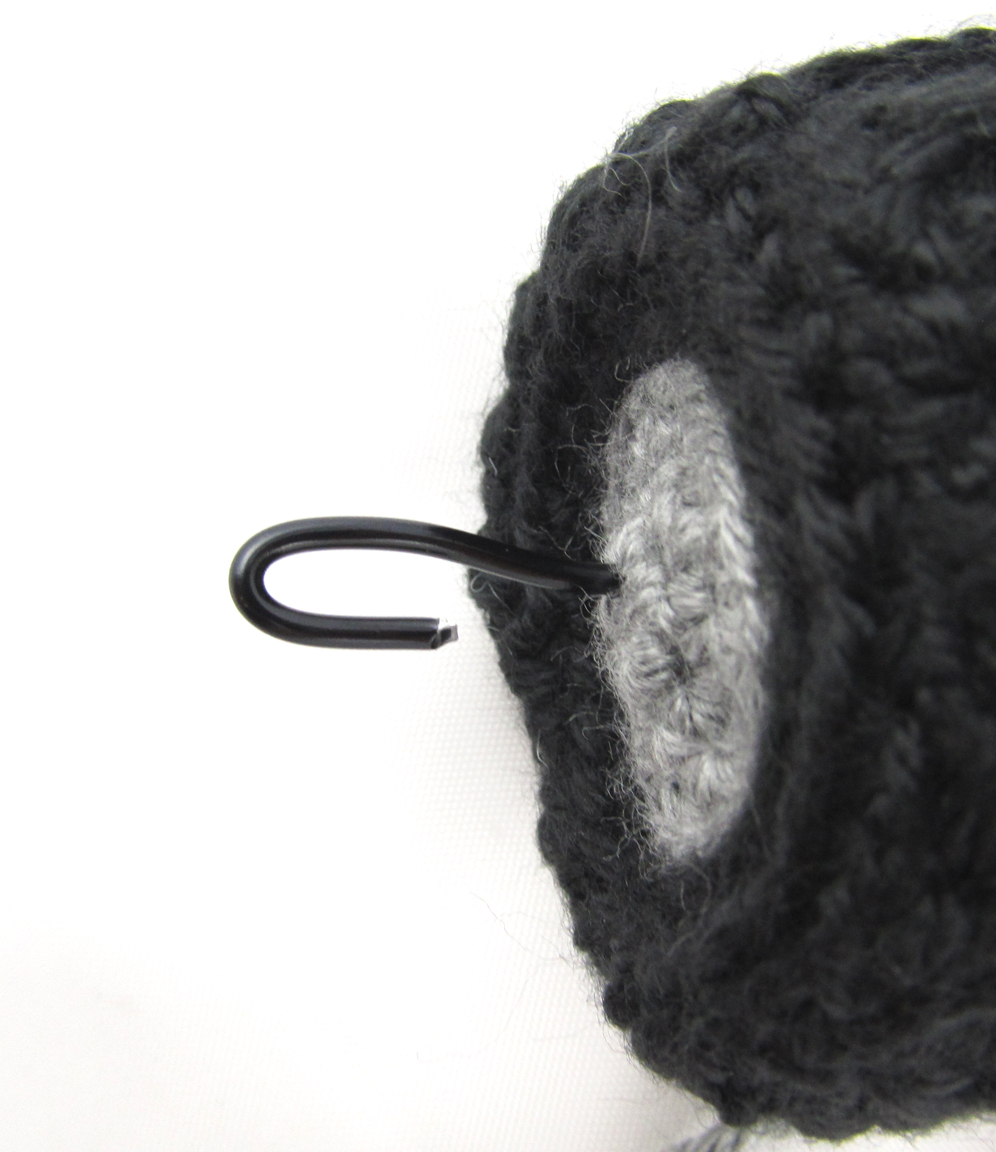
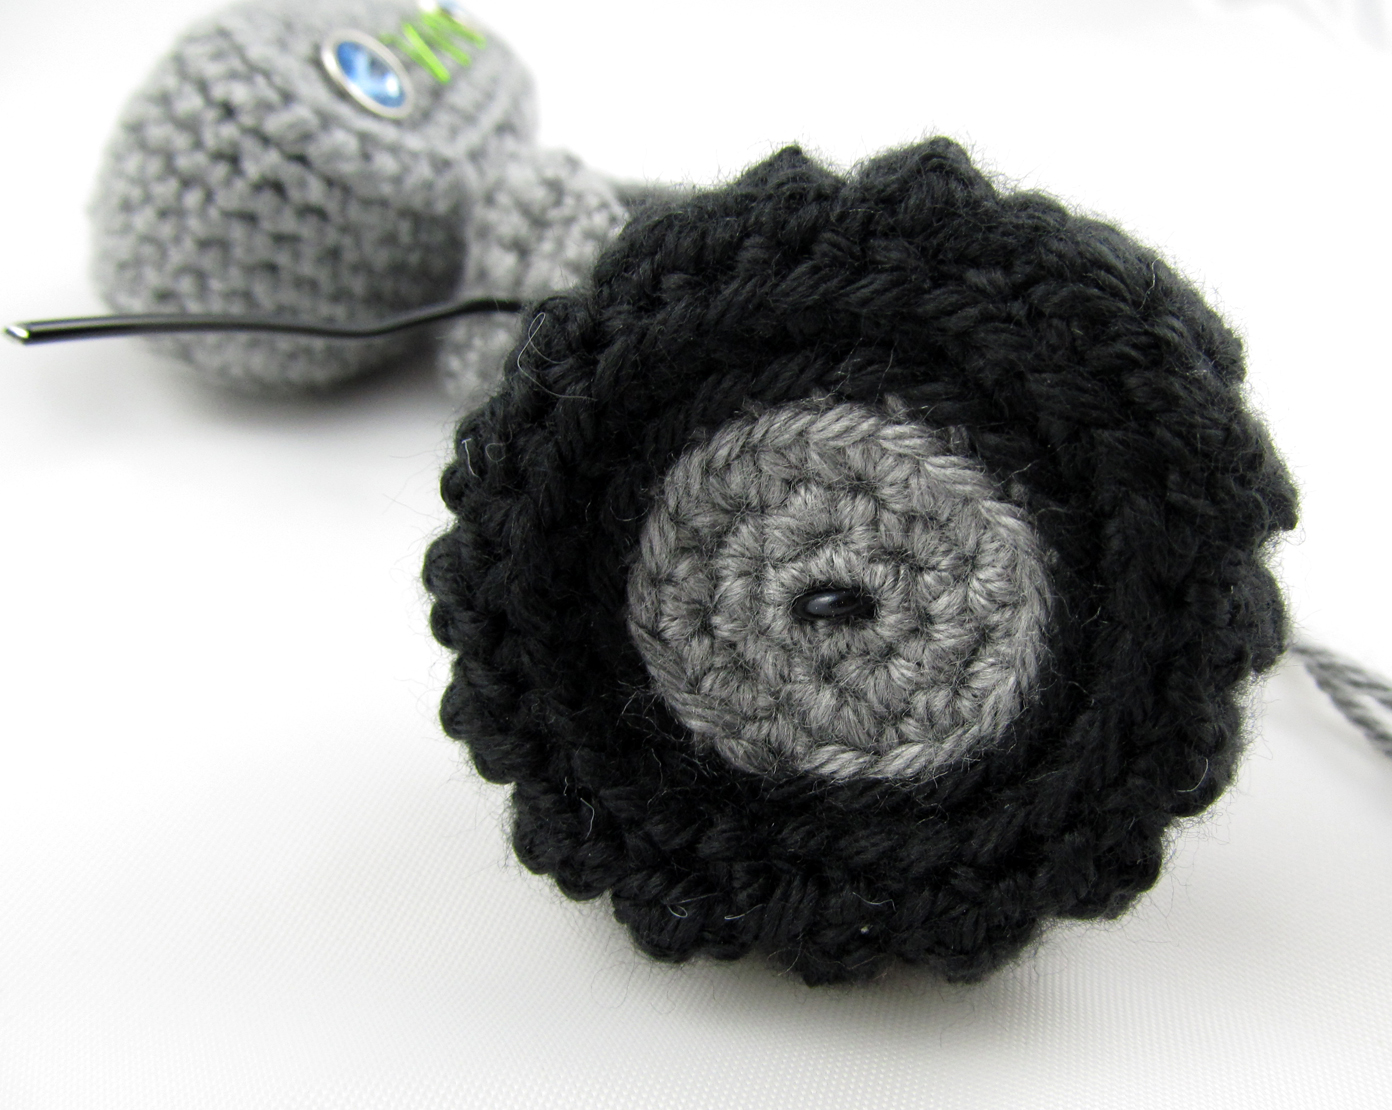
- Thread a wheel onto the end of the 8″ wire. Bend a U into the end of the wire…

and pull it back into the wheel…

Repeat for the other wheel.

- Stuff the body (stuff under the armature first) and sew on the front.
- Glue or sew on any other embellishments (hinges for a compartment door, handles, gauges, a solar panel, or an exhaust pipe, to name a few ideas).
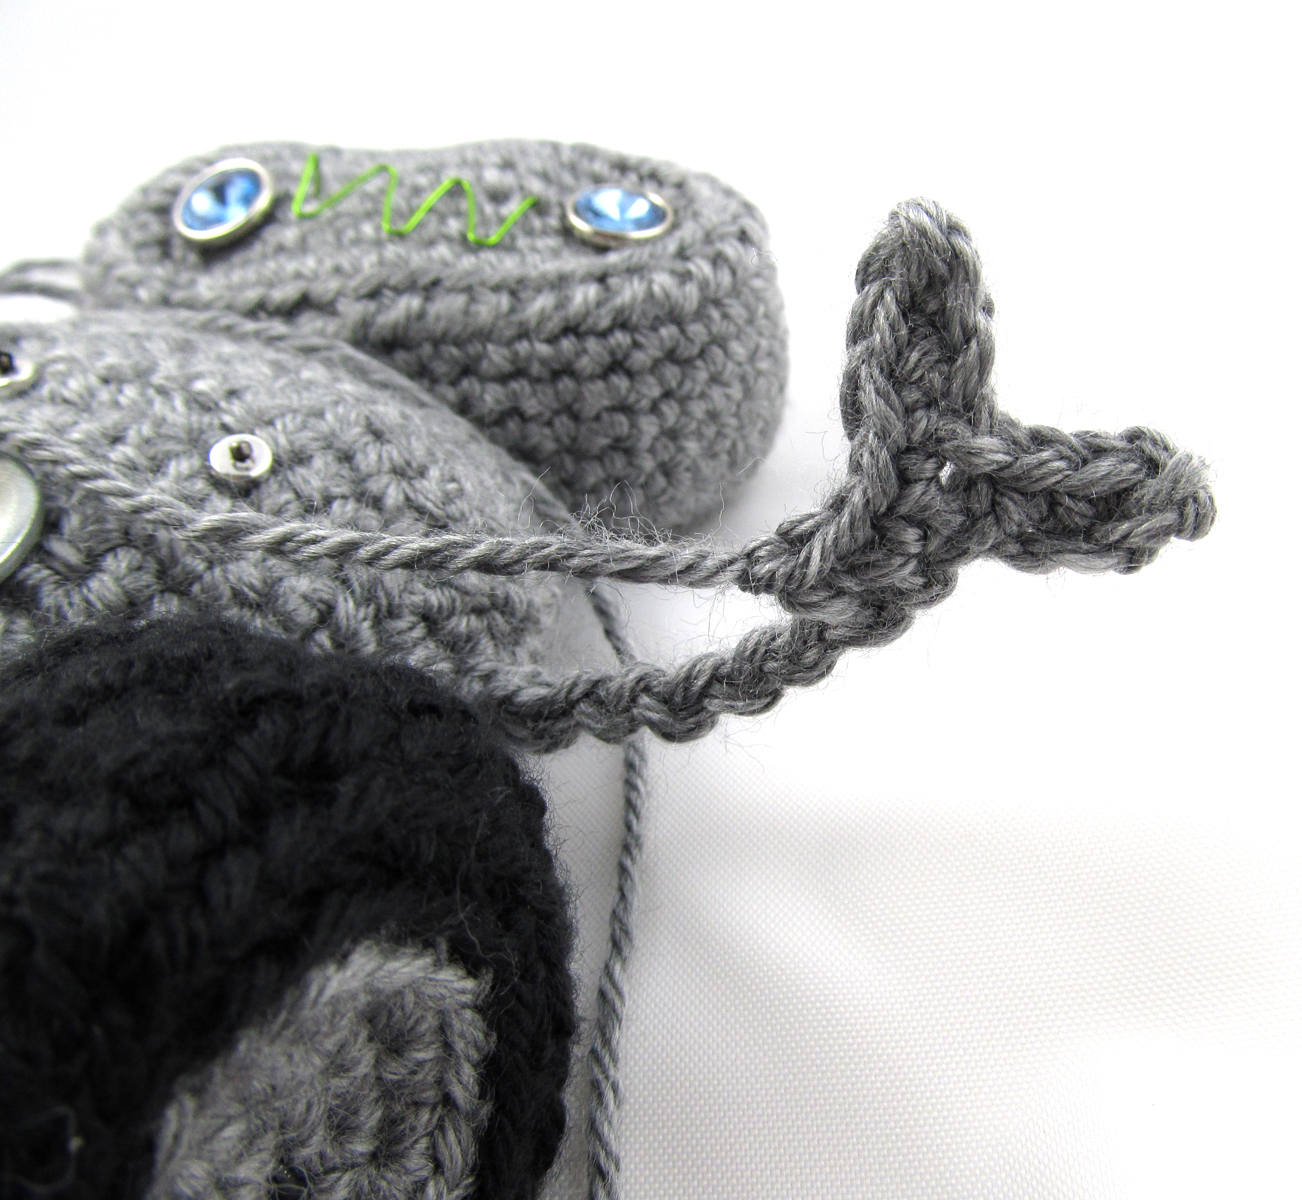
- To cover the arms, pull a loop of gray up through the hole where the wire for the arm pokes through. Sc around the wire until about 2″ are covered. Fold the end of the wire back.
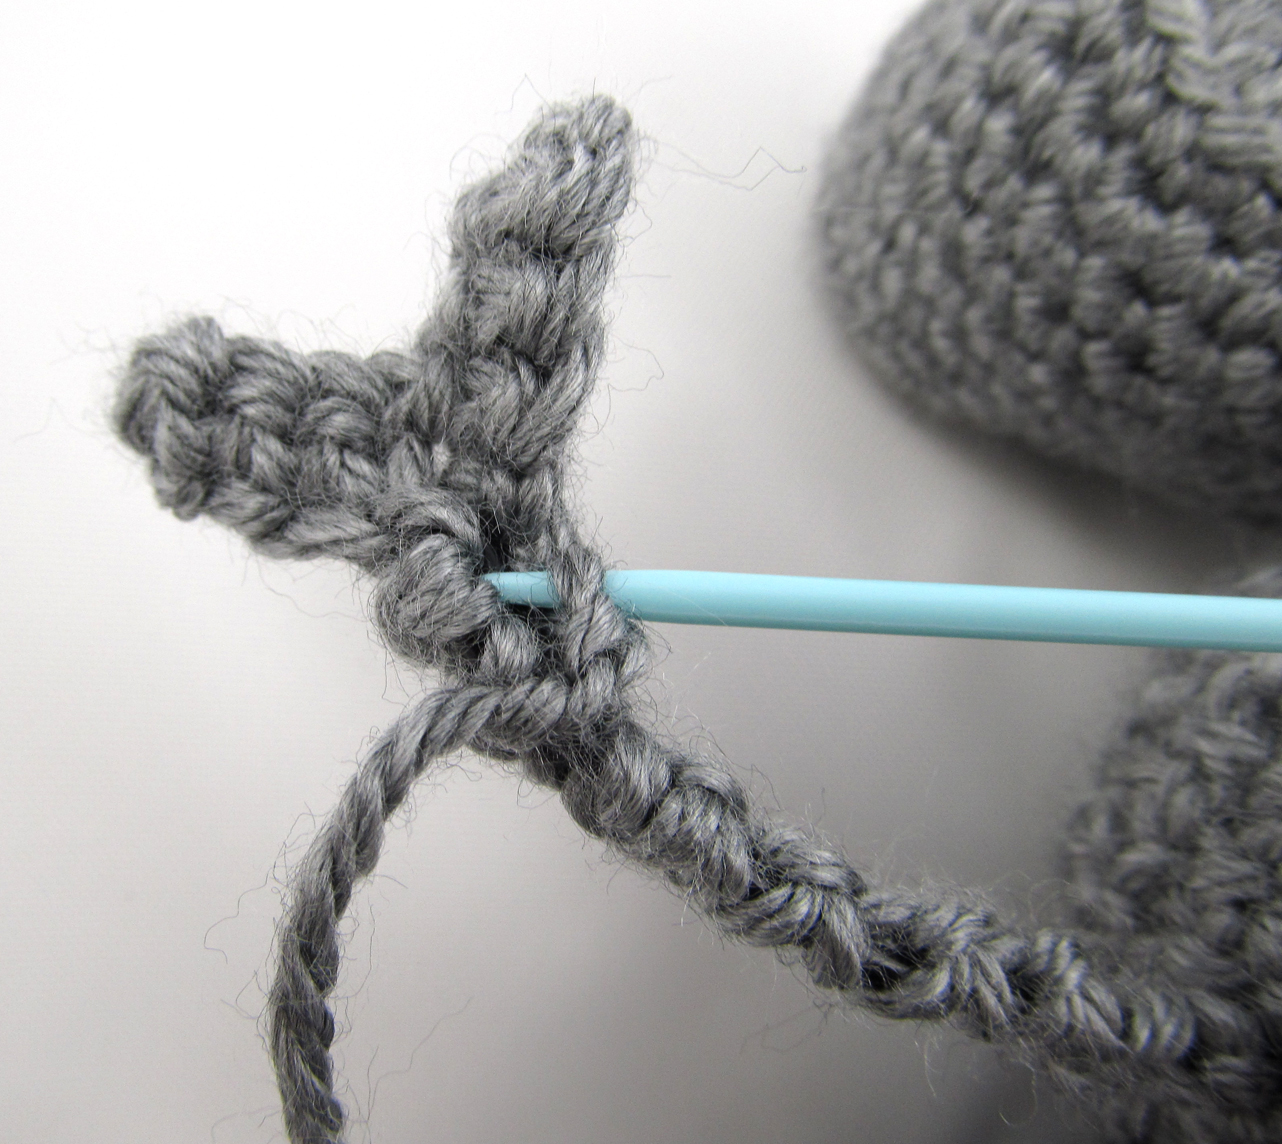
- For each claw, ch 4. Sc in 2nd ch from hook and in each ch across. Ch 4, sc in 2nd ch from hook and in each ch back to the center of the claw. 3 sc down the arm. BO, leaving a tail.

Sew the bottom of the claw closed around the bent-down wire in the back.


Voilà!


July 20, 2013 at 7:42 am
Love it 🙂
July 23, 2013 at 3:03 pm
Thanks, Irene!
July 20, 2013 at 8:52 pm
This is just too adorable! I very much want to make a clay version of this cute little guy. ❤ Fantastic work. 🙂
July 21, 2013 at 8:29 am
Thanks Portia! I’d love to see a clay MEAP. How fun!
July 20, 2013 at 11:56 pm
I love everything about him but I have to say the wheels are fantastic. Fabulous wheels. You have the texture just right. I have a queue of things waiting for my attention in my working life at the moment but the absolute second I get a chance I am going to make my self one. I rarely make anything for my self! In fact I think I will gather up the materials so I can start right now! 🙂
July 21, 2013 at 8:26 am
Thank you, gentlestitches! I’m so glad you like my robot. The wheels were fun to make, and I was so pleased that using an easy rib pattern (crochet in BL only) worked perfectly for a wheel’s tread. It’s so nice when the simplest solutions work out.
Best of luck with your working life projects, and I can’t wait to see your robot!
July 21, 2013 at 9:47 am
MEAP the Robot is awesome! 😀
Love it! But really, really love it a lot!
It is hard to find the words to express how much 🙂
Thanks for sharing this wonderful pattern.
Hugs
July 22, 2013 at 7:44 am
Aw, thanks, amigurumibb. It means so much to me that you love MEAP. It means a lot to him too. 🙂 Hugs right back atcha!
July 21, 2013 at 5:43 pm
SO CUTE.
July 22, 2013 at 7:45 am
Thanks!
Pingback: help in the form of a tiny crochet robot. | gentlestitches
Pingback: Week in a Fairy Land | AmigurumiBB's Blog
December 22, 2013 at 10:14 pm
This is awesome! My husband keeps joking that I should crochet him a robot…so I am making this for him for a Christmas surprise! Almost done!
Thanks for the instructions.
December 23, 2013 at 2:52 pm
Thank you so much for taking the time to share that you are making a cuddly robot for your husband. That’s so exciting! Please will you let me know how it turns out and how he likes it? This robot is one of my harder patterns, so kudos to you! I know he will love it.
April 18, 2014 at 8:24 am
Reblogged this on carmeljim and commented:
I love this
April 18, 2014 at 10:16 am
Thank you so much for sharing MEAP with your friends! You rock!
Pingback: Puntos de Fantasía
Pingback: Domo Arigato for 10 Free #Crochet Robot Patterns!
November 17, 2014 at 11:22 pm
It’s just adorable! :))) Thanks for sharing!
November 18, 2014 at 10:26 am
Thanks, Louve!
Pingback: Happy New Year from Squirrel Picnic and gentlestitches | gentlestitches
Pingback: Meep the Cuddly Robot • wixxl
Pingback: Tall and Fast Flower Cushion update – gentlestitches