 Last spring, Brittani from Wisconsin challenged me to make her son a play set. Specifically, he really wanted a farm play set. Through my research, I found a few barnyard play sets already in existence, including this free one from Lion Brand (you have to log in to view the free pattern). I really loved the play set idea, so Brittani and her son agreed to let me come up with a unique alternative.
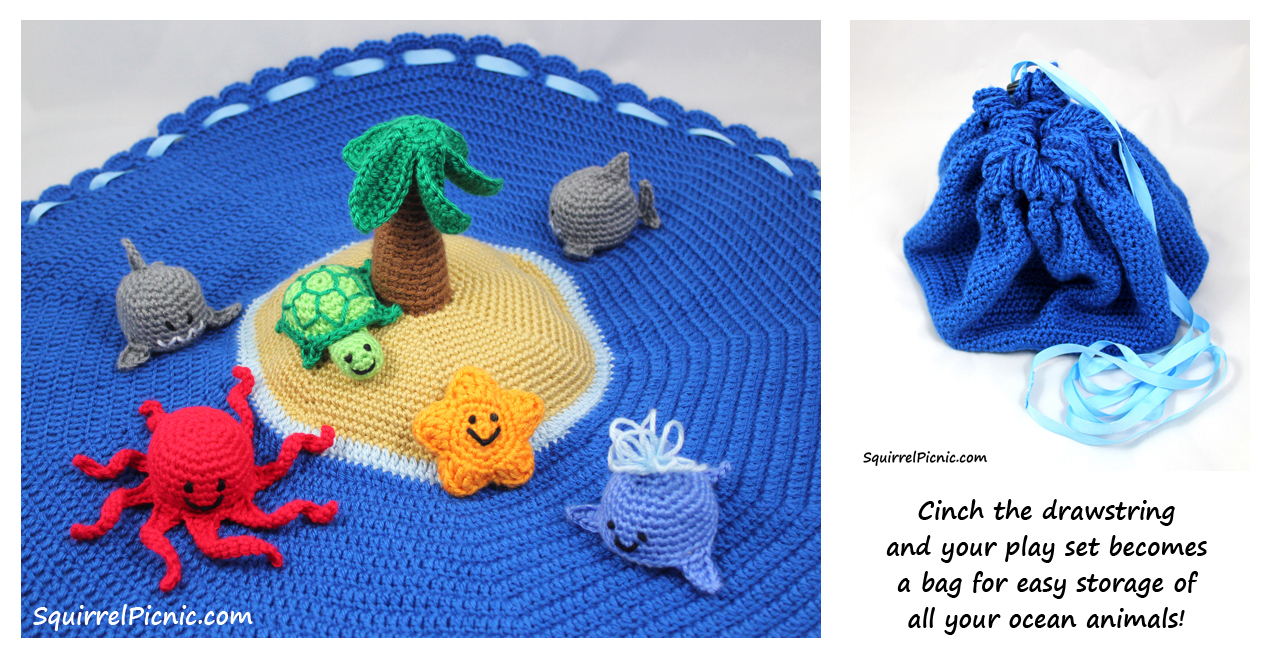
I was surprised to find there are a lot of crochet play set patterns out there. In addition to the farm one, I found a safari play set, a teddy bear picnic, a flower pot play set, a racetrack, and lots and lots of toy food. No one had made an ocean play set though, and I instantly fell in love with the idea of crocheting an island surrounded by little ocean animals. Thankfully, Brittani and her son loved the idea too!
The detail I liked most from all the play sets I encountered was how some of them transformed into a bag or box to hold all the little pieces of the set. I included this feature by adding a drawstring to the play set base. Because the play set is rather large (three feet in diameter), the drawstring is a bit longer than I expected, but I think it’s still quite useful to be able to toss all your little ocean animals into the bag and cinch it up so they don’t get lost. Update: A friend of the blog, Ankhara, suggested to pull the drawstring out from two opposite sides of the play set to close it. This way the drawstring will not be too long. Thanks for the tip!
This pattern should be fun and enjoyable for crocheters of all skill levels. The animals are very quick to make because most of their limbs are crocheted in the final rounds. I thought it would be nice not to have too many pieces to sew on at the end.
In fact everything is nice and easy on this island. It’s paradise! At this beach, you don’t have to worry about sunburn or sand that works its way into everything. The sharks even play nice here! I hope you enjoy making an island play set of your very own. I’d love to see photos if you do! Send them to squirrelpicnic{at}gmail{dot}com.
Island Play Set Crochet Pattern

Want to print this pattern? Click on the Print & PDF button at the end of this post (under “Thank You for Sharing”).
Finished size of base: about 3 feet in diameter
Materials
(I used Caron Simply Soft Solids yarn for this piece, but feel free to use your favorite yarn.)
420 yds light worsted-weight yarn in blue
150 yds light worsted-weight yarn in beige
15 yds light worsted-weight yarn in light blue
Small amount of light worsted-weight yarn in bright green
Small amount of light worsted-weight yarn in brown
Yarn for the Animals:
For Starfish: Light worsted-weight yarn in orange
For Whale: Light worsted-weight yarn in blue and white
For Shark: Light worsted-weight yarn in gray
For Turtle: Light worsted-weight yarn in light green and dark green
For Octopus: Light worsted-weight yarn in red
Light worsted-weight yarn in black for embroidering smiley faces onto the animals
Light worsted-weight yarn in white for embroidering a toothy grin on the shark
G-6 (4.00 mm) crochet hook
Waste yarn for stitch marker
Yarn needle
3 yds of 3/8” cord or braided ribbon in light blue
Plastic cord lock (also known as a cord toggle)
Needle and thread for sewing ends of ribbon together
Polyester Stuffing
Gauge
5 sts in sc = 1 inch
5 rnds = 1 inch
Abbreviations
beg = beginning
BL = back loop
ch = chain
ch-sp = chain space
dc = double crochet
dec = decrease by single crocheting 2 together
ea = each
FL = front loop
FO = fasten off
hdc = half double crochet
inc = increase with 2 sc in next st
rep = repeat
rnd = round
sc = single crochet
sk = skip
slst = slip stitch
st(s) = stitch(es)
Instructions
 Island and Ocean Base

Note: Join with slst at the end of each round.
With beige, ch 2. (Or begin with a magic loop.)
Rnd 1: 6 sc in 2nd ch from hook (or in magic loop).
Rnd 2: 2 sc in ea sc around. (12)
Rnd 3: Ch 1, * sc, inc, rep from * 5 more times. (18)
Rnd 4: Ch 1, * 2 sc, inc, rep from * 5 more times. (24)
Rnd 5: Ch 1, * 3 sc, inc, rep from * 5 more times. (30)
Rnd 6: Ch 1, * 4 sc, inc, rep from * 5 more times. (36)
Rnd 7: Ch 1, * 5 sc, inc, rep from * 5 more times. (42)
Rnd 8: Ch 1, * 6 sc, inc, rep from * 5 more times. (48)
Rnd 9: Ch 1, * 7 sc, inc, rep from * 5 more times. (54)
Rnd 10: Ch 1, * 8 sc, inc, rep from * 5 more times. (60)
Rnd 11: Ch 1, * 9 sc, inc, rep from * 5 more times. (66)
Rnd 12: Ch 1, * 10 sc, inc, rep from * 5 more times. (72)
Rnd 13: Ch 1, * 11 sc, inc, rep from * 5 more times. (78)
Rnd 14: Ch 1, * 12 sc, inc, rep from * 5 more times. (84)
Rnd 15: Ch 1, * 13 sc, inc, rep from * 5 more times. (90)
Rnd 16: Ch 1, * 14 sc, inc, rep from * 5 more times. (96)
Rnd 17: Ch 1, * 15 sc, inc, rep from * 5 more times. (102)
Rnd 18: Ch 1, * 16 sc, inc, rep from * 5 more times. (108)
Rnd 19: Ch 1, * 17 sc, inc, rep from * 5 more times. (114)
Rnd 20: Ch 1, * 18 sc, inc, rep from * 5 more times. (120)
Rnd 21: Ch 1, * 19 sc, inc, rep from * 5 more times. (126)
Switch to light blue.
Note: From this point on, unless otherwise noted, the ch 2 at the beginning of each round does not count as a dc. At end of each round, join with slst to first dc.
Rnd 22: Ch 2, * 13 dc, inc, rep from * 8 more times. (135)
Switch to dark blue.
Rnd 23: Ch 2, * 14 dc, inc, rep from * 8 more times. (144)
Rnd 24: Ch 2, * 15 dc, inc, rep from * 8 more times. (153)
Rnd 25: Ch 2, * 16 dc, inc, rep from * 8 more times. (162)
Rnd 26: Ch 2, * 17 dc, inc, rep from * 8 more times. (171)
Rnd 27: Ch 2, * 18 dc, inc, rep from * 8 more times. (180)
Rnd 28: Ch 2, * 19 dc, inc, rep from * 8 more times. (189)
Rnd 29: Ch 2, * 20 dc, inc, rep from * 8 more times. (198)
Rnd 30: Ch 2, * 21 dc, inc, rep from * 8 more times. (207)
Rnd 31: Ch 2, * 22 dc, inc, rep from * 8 more times. (216)
Rnd 32: Ch 2, * 23 dc, inc, rep from * 8 more times. (225)
Rnd 33: Ch 2, * 24 dc, inc, rep from * 8 more times. (234)
Rnd 34: Ch 2, * 25 dc, inc, rep from * 8 more times. (243)
Rnd 35: Ch 2, * 26 dc, inc, rep from * 8 more times. (252)
Rnd 36: Ch 2, * 27 dc, inc, rep from * 8 more times. (261)
Rnd 37: Ch 2, * 28 dc, inc, rep from * 8 more times. (270)
Rnd 38: Ch 2, * 29 dc, inc, rep from * 8 more times. (279)
Rnd 39: Ch 2, * 30 dc, inc, rep from * 8 more times. (288)
Rnd 40: Ch 4 (counts as first dc + ch 2), sk 2 dc, * 2 dc, ch 2, sk 2 dc, rep from * 70 more times. Dc, join with slst to 2nd chain of beginning ch 4.
Rnd 41: Ch 1, sc, * 5 dc in ch-sp, sc in next 2 dc, rep from * 70 more times. 5 dc in last ch-sp, sc in next dc, join with slst to first sc.
FO and weave in ends.
Thread light blue ribbon in and out of the holes created in Rnd 40. Thread on the toggle and tie or sew the ends of the ribbon together.
Island Top
With beige, rep Rnds 1-21 but do not work in joined rnds. (It might help to use a stitch marker or waste yarn to mark the beg of each rnd.)
FO, leaving a long tail.
Sew Island Top to Rnd 21 of the Base. When you get about 3/4 of the way around, stuff island lightly.
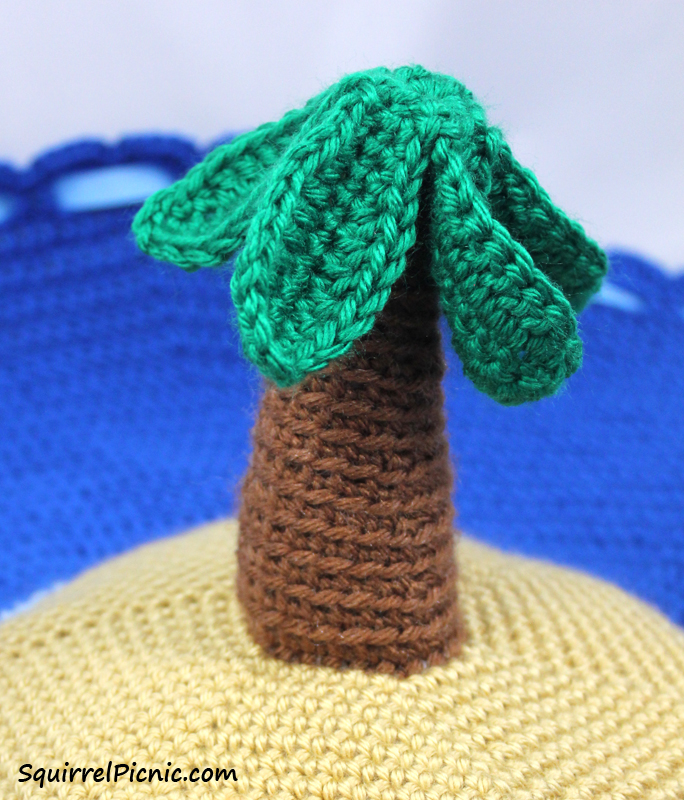
Palm Tree Fronds
With green, ch 4, join with slst to 1st ch to form a ring. Ch 1.
Rnd 1: * Sc into the ring. Ch 12, sc in 2nd ch from hook and ea ch down, rep from * 4 more times.
Rnd 2: * Sk 1 sc, slst in 1st ch, sc in next 2, hdc, dc in the next 5, hdc, sc, ch 3. Working down the other side: Sc, hdc, dc in the next 5, hdc, sc in next 2, slst, rep from * 4 more times. Join with slst. FO, leaving a long tail for sewing.
 Palm Tree
Note: Stuff firmly with polyester stuffing as you go.
With brown, ch 4. Join with slst to create a ring. Ch 1.
Rnd 1: 6 sc in center of the ring.
Rnd 2: Sc in ea sc around.
Note: From this point on, work in BL only.
Rnd 3: * Sc, inc, rep from * 2 more times. (9)
Rnds 4-5: Sc in ea sc around.
Rnd 6: * 2 sc, inc, rep from * 2 more times. (12)
Rnds 7-10: Sc in ea sc around.
Rnd 11: * 3 sc, inc, rep from * 2 more times. (15)
Rnds 12-15: Sc in ea sc around.
Rnd 16: * 4 sc, inc, rep from * 2 more times. (18)
Rnds 17-18: Sc in ea sc around.
Rnd 19: * 5 sc, inc, rep from * 2 more times. (21)
Rnds 20-22: Sc in ea sc around. Join with slst.
FO, leaving long tail for sewing.
Sew Palm Fronds to top of Palm Tree. Thread the green yarn from the palm fronds onto a yarn needle and work the thread back through to the stitches in Rnd 1. Sew these 6 stitches to the 6 stitches in Rnd 1 of the Palm Tree.
Sew completed palm tree to the center of the island.
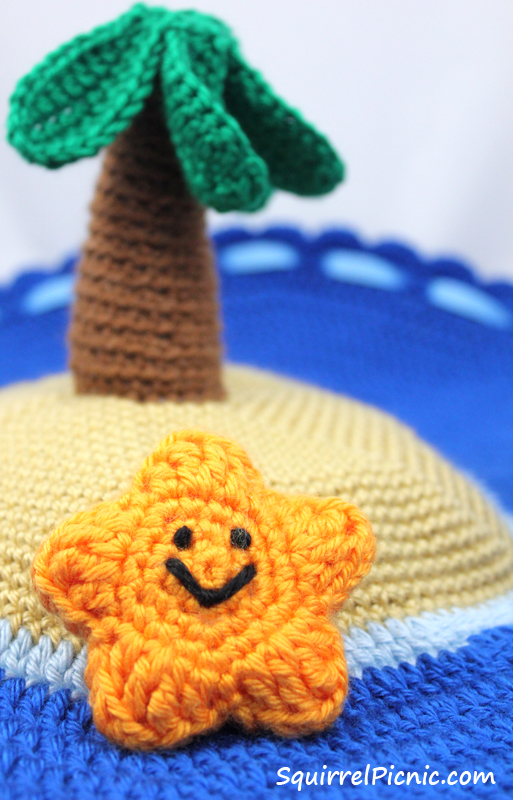
 Starfish (Make 2 Sides)
With orange, ch 2 (or begin with magic loop).
Rnd 1: 5 sc in 2nd ch from hook (or in magic loop).
Rnd 2: 2 sc in ea sc around. (10)
Rnd 3: * Sc, inc, rep from * 4 more times. (15)
Rnd 4: * 2 sc, inc, rep from * 4 more times. (20)
Rnd 5: * Ch 2, dc in next st, (tr, ch 2, tr) in next st, dc in next st, ch 2, slst in next st. Rep from * 4 more times.
FO.
With RS facing out, sew the two sides together. Stuff lightly once you’ve gotten about 3/4 of the way around.
Using black yarn and a yarn needle embroider a smiley face to the starfish.
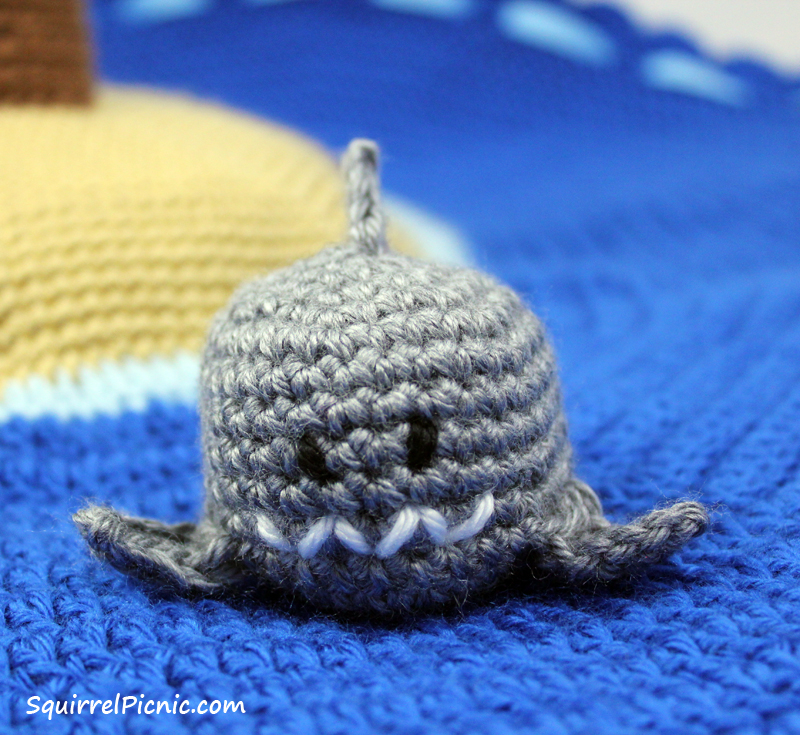
 Shark
Shark
Top of Body
With gray, ch 2 (or begin with magic loop).
Rnd 1: 6 sc in 2nd ch from hook (or in magic loop).
Rnd 2: Inc in ea sc around. (12)
Rnd 3: * Sc, inc, rep from * 5 more times. (18)
Rnd 4: * 2 sc, inc, rep from * 5 more times. (24)
Rnd 5: * 3 sc, inc, rep from * 5 more times. (30)
 Rnds 6- 9: Mark the beg of rnd 6 with waste yarn and don’t remove it. (You will use this marker to help you position the shark’s fins later on.) Sc in ea sc around.
Rnd 10: * Sc 8, (ch 6, working down the ch: sc, hdc, 3 dc. Back to the rnd: sk 2 sc, sc in next sc), rep from * 1 more time. Sc 8, join with slst. FO and weave in ends.
Bottom of Body
With gray, ch 2 (or begin with magic loop).
Rnd 1: 6 sc in 2nd ch from hook (or in magic loop).
Rnd 2: Inc in ea sc around. Join with slst, ch 1. (12)
Rnd 3: * Sc, inc, rep from * 5 more times. Join with slst, ch 1. (18)
Rnd 4: * 2 sc, inc, rep from * 5 more times. Join with slst, ch 1. (24)
Rnd 5: * 3 sc, inc, rep from * 5 more times. Join with slst, ch 1. (30) FO, leaving a long tail.
Stuff the shark lightly and sew the Bottom to the Body.
Tail
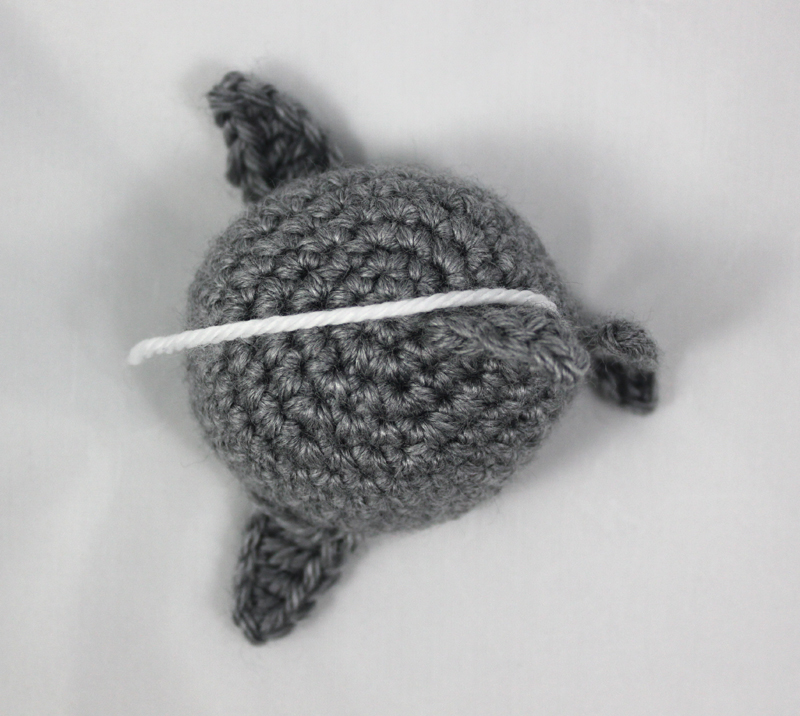 Ch 4, working back down the ch: slst, 2 sc. Ch 6, working back down the ch: slst, 4 sc, slst in 1st ch. FO, leaving a long tail. Sew this to the shark’s back with taller part of the tail on top. Use the waste yarn marker from Rnd 6 of the Body to help you draw a guideline running from the back to the front, dividing the shark evenly with a fin on each side. Sew the tail along this line at about Rnd 9 of the Body.
Dorsal Fin
Ch 5, working back down the ch: slst, sc, hdc, dc. FO, leaving a long tail. Sew to Body in line with the tail, between Rnds 1 and 4.
With black yarn and a yarn needle, embroider two lines for eyes. With white yarn, embroider a jagged mouth.
 Whale
Whale
Top of Body
With blue, ch 2 (or begin with magic loop).
Rnd 1: 6 sc in 2nd ch from hook (or in magic loop).
Rnd 2: Inc in ea sc around. (12)
Rnd 3: * Sc, inc, rep from * 5 more times. (18)
Rnd 4: * 2 sc, inc, rep from * 5 more times. (24)
Rnd 5: * 3 sc, inc, rep from * 5 more times. (30)
Rnds 6- 9: Sc in ea sc around.
Rnd 10: * Sc 8, (ch 6, working down the ch: sc, hdc, 3dc. Back to the rnd: sk 2 sc, sc in next sc), rep from * 1 more time. Sc 8, join with slst in next sc. This sc is the Base for crocheting the tail. Crochet the tail in two steps: (A) Ch 6, working down the chain: slst, sc, hdc, 2 dc. (B) Ch 6, working down the chain: slst, sc, hdc, 2 dc. Slst in the bottom of the last dc of A. Slst in Base. FO and weave in ends.
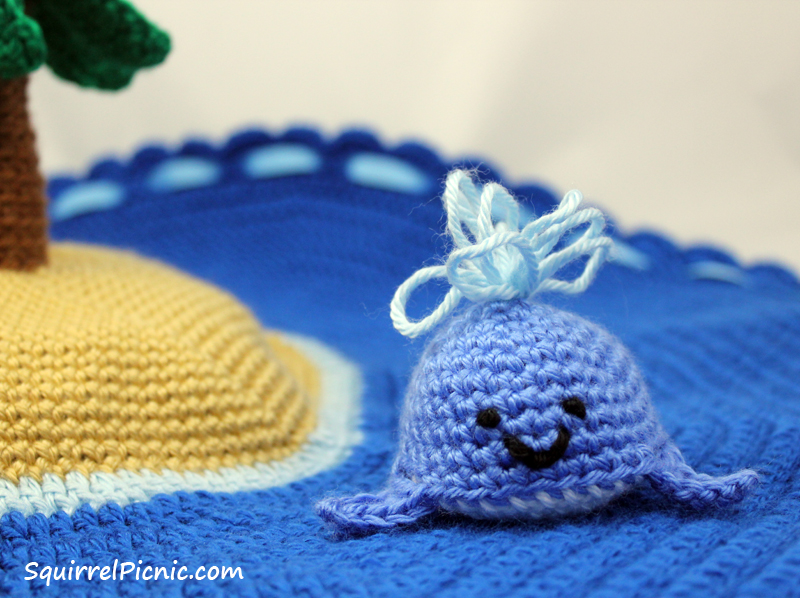
Use black yarn and a yarn needle to embroider a smiley face.
Blow Hole and Spout
To create the whale’s spout, wrap light blue yarn around your palm 4 or 5 times. Slide the yarn off your hand and tie it in the center with another length of yarn (photo Step 1). Use your crochet hook to thread this length of yarn through a hole in the top of the whale and pull a small bit of the bundle of light blue yarn into the hole as well. I’ll call this the blow hole from now on. Now we’ll secure the bundle of light blue yarn to the inside of the whale. Turn the whale inside out. Thread one end of the tied yarn (the purple yarn in the photos) onto a yarn needle and work this end through a stitch on the whale’s body near the blow hole. Then work it under the light blue yarn bundle to the other side (photo Step 2). Repeat on the other side (photo step 3). Tie the two ends tightly in the center (photo Step 4). Turn the whale right side out again.

Bottom of Body
With white, ch 2 (or begin with magic loop).
Rnd 1: 6 sc in 2nd ch from hook (or in magic loop).
Rnd 2: Inc in ea sc around. Join with slst, ch 1. (12)
Rnd 3: * Sc, inc, rep from * 5 more times. Join with slst, ch 1. (18)
Rnd 4: * 2 sc, inc, rep from * 5 more times. Join with slst, ch 1. (24)
Rnd 5: * 3 sc, inc, rep from * 5 more times. Join with slst, ch 1. (30) FO, leaving a long tail.
Lightly stuff the body and sew the Bottom to the Body.
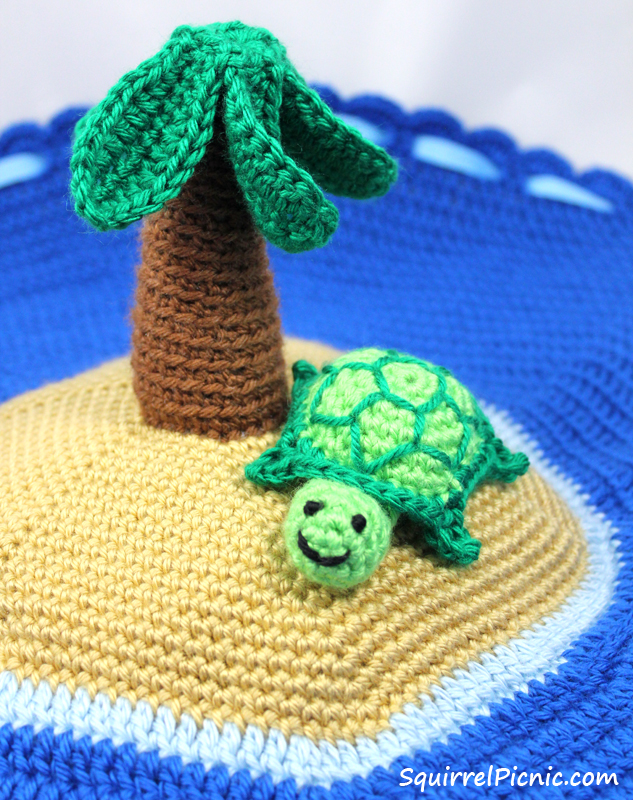
 Turtle
Top of Body
Special instruction for Rnd 7 of Turtle Body Top:
Create a foot = Ch 4, then working back down the ch: slst, 2 hdc. Sc in next sc of rnd.
With light green, ch 2 (or begin with magic loop).
Rnd 1: 6 sc in 2nd ch from hook (or in magic loop).
Rnd 2: Inc in ea sc around. (12)
Rnd 3: * Sc, inc, rep from * 5 more times. (18)
Rnd 4: * 2 sc, inc, rep from * 5 more times. (24)
Rnd 5: * 3 sc, inc, rep from * 5 more times. (30)
Rnd 6: Sc in ea sc around.
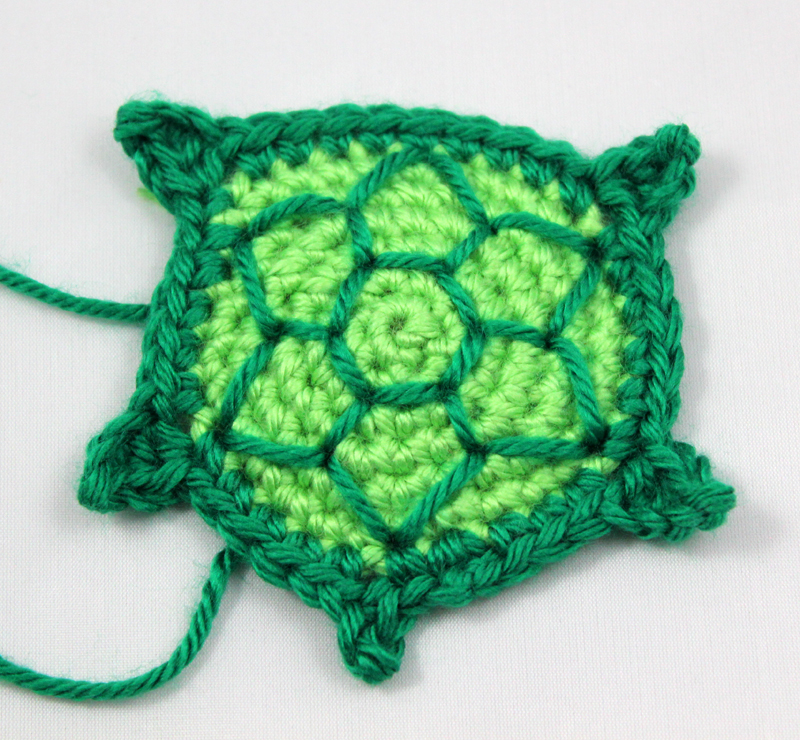
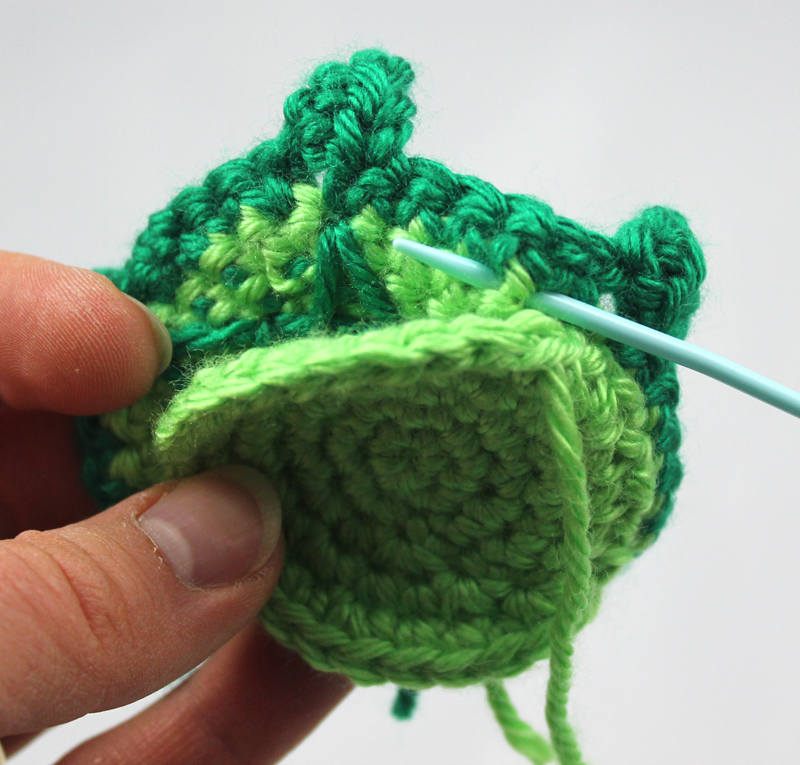
Rnd 7: Switch to dark green yarn. 4 sc, create a foot, 5 sc, create a foot, 8 sc, create a foot, 5 sc, create a foot, 4 sc, (ch 3, working down the ch: slst, sc), sc in next sc of rnd, join with slst to beg of rnd. FO and weave in ends.
With yarn needle and a length of dark green yarn about 4 ft long, embroider plates onto the turtle’s shell.
 Bottom of Body
With with light green, ch 2 (or begin with magic loop).
Rnd 1: 6 sc in 2nd ch from hook (or in magic loop).
Rnd 2: Inc in ea sc around. Join with slst, ch 1. (12)
Rnd 3: * Sc, inc, rep from * 5 more times. Join with slst, ch 1. (18)
Rnd 4: * 2 sc, inc, rep from * 5 more times. Join with slst, ch 1. (24)
Rnd 5: * 3 sc, inc, rep from * 5 more times. Join with slst. (30) FO, leaving a long tail.
Lightly stuff the turtle and sew the Bottom to Rnd 6 of the Body.
 Head
Head
With light green, ch 2 (or begin with magic loop).
Rnd 1: 4 sc in 2nd ch from hook (or in magic loop).
Rnd 2: Inc in ea sc around. (8)
Rnd 3: * Sc, inc, rep from * 3 more times. (12)
Rnds 4-5: Sc in ea sc around.
Rnd 6: * Sc, dec, rep from * 3 more times. (8)
Rnd 7: Sc in ea sc around.
Stuff lightly.
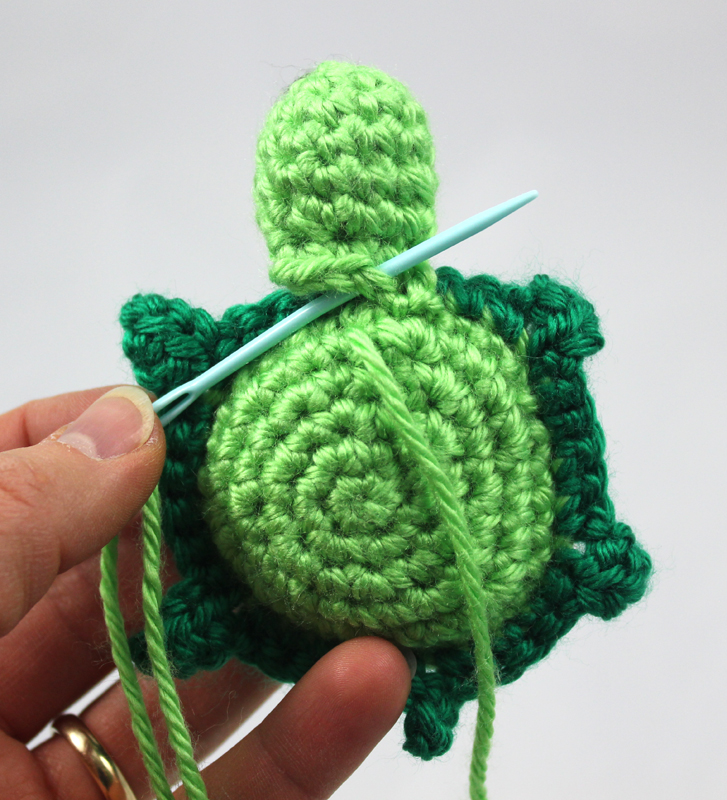
Close opening by lining up the sts (4 on top and 4 on bottom) and sc the pairs of sts together. FO, leaving a long tail. Sew Head to front of Bottom of Body.
Use black yarn and a yarn needle to embroider a smiley face.
 Octopus

Top of Body and Arms
With red, ch 2 (or begin with magic loop).
Rnd 1: 6 sc in 2nd ch from hook (or in magic loop).
Rnd 2: Inc in ea sc around. (12)
Rnd 3: * Sc, inc, rep from * 5 more times. (18)
Rnd 4: * 2 sc, inc, rep from * 5 more times. (24)
Rnd 5: * 3 sc, inc, rep from * 5 more times. (30)
Rnds 6- 10: Sc in ea sc around.
Rnd 11: * 3 sc, dec, rep from * 5 more times. (24)
Rnd 12: * Sc, (ch 17, working back down the chain: slst, 11 sc, 2 hdc, 2 dc), sk 2 sc, rep from * 7 more times. Slst in last sc. FO and weave in ends.
 Bottom of Body
With red, ch 2 (or begin with magic loop).
Rnd 1: 6 sc in 2nd ch from hook (or in magic loop).
Rnd 2: Inc in ea sc around. Join with slst, ch 1. (12)
Rnd 3: * Sc, inc, rep from * 5 more times. Join with slst, ch 1. (18)
Rnd 4: * 2 sc, inc, rep from * 5 more times. Join with slst. (24)
FO, leaving a long tail.
Stuff the Octopus and sew the Bottom to the Body, using both the scs and skipped sts in Rnd 12. It will look like the Bottom is way too small, but trust me, both the Bottom and the Body have 24 sts, so you can be confident that it will fit.
Use black yarn and yarn needle to embroider a smiley face.


Pingback: FF5 – Gone Fishin’ – Fromm Me To You
April 19, 2016 at 10:39 pm
Reblogged this on adornosmalulu.
September 26, 2016 at 4:59 pm
Thanks so much for the island pattern!! I’m going to give it to my grandson for his first birthday. I didn’t see a way to send you a picture.
September 26, 2016 at 5:57 pm
Hi Kim! I’m so excited to hear that you made an island play set for your grandson. Feel free to send photos to squirrelpicnic(at)gmail(dot)com. I’d love to see them!