 Last spring, Brittani from Wisconsin challenged me to make her son a play set. Specifically, he really wanted a farm play set. Through my research, I found a few barnyard play sets already in existence, including this free one from Lion Brand (you have to log in to view the free pattern). I really loved the play set idea, so Brittani and her son agreed to let me come up with a unique alternative.
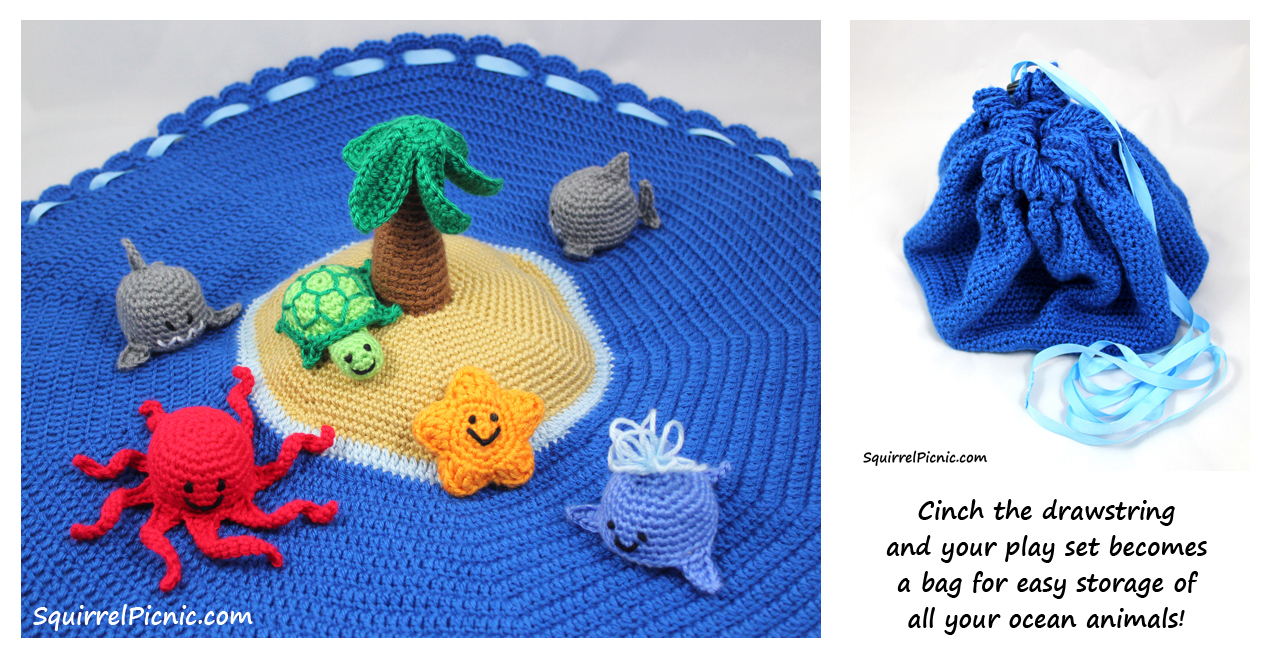
I was surprised to find there are a lot of crochet play set patterns out there. In addition to the farm one, I found a safari play set, a teddy bear picnic, a flower pot play set, a racetrack, and lots and lots of toy food. No one had made an ocean play set though, and I instantly fell in love with the idea of crocheting an island surrounded by little ocean animals. Thankfully, Brittani and her son loved the idea too!
The detail I liked most from all the play sets I encountered was how some of them transformed into a bag or box to hold all the little pieces of the set. I included this feature by adding a drawstring to the play set base. Because the play set is rather large (three feet in diameter), the drawstring is a bit longer than I expected, but I think it’s still quite useful to be able to toss all your little ocean animals into the bag and cinch it up so they don’t get lost. Update: A friend of the blog, Ankhara, suggested to pull the drawstring out from two opposite sides of the play set to close it. This way the drawstring will not be too long. Thanks for the tip!
This pattern should be fun and enjoyable for crocheters of all skill levels. The animals are very quick to make because most of their limbs are crocheted in the final rounds. I thought it would be nice not to have too many pieces to sew on at the end.
In fact everything is nice and easy on this island. It’s paradise! At this beach, you don’t have to worry about sunburn or sand that works its way into everything. The sharks even play nice here! I hope you enjoy making an island play set of your very own. I’d love to see photos if you do! Send them to squirrelpicnic{at}gmail{dot}com.
Island Play Set Crochet Pattern

Want to print this pattern? Click on the Print & PDF button at the end of this post (under “Thank You for Sharing”).
Finished size of base: about 3 feet in diameter
Materials
(I used Caron Simply Soft Solids yarn for this piece, but feel free to use your favorite yarn.)
420 yds light worsted-weight yarn in blue
150 yds light worsted-weight yarn in beige
15 yds light worsted-weight yarn in light blue
Small amount of light worsted-weight yarn in bright green
Small amount of light worsted-weight yarn in brown
Yarn for the Animals:
For Starfish: Light worsted-weight yarn in orange
For Whale: Light worsted-weight yarn in blue and white
For Shark: Light worsted-weight yarn in gray
For Turtle: Light worsted-weight yarn in light green and dark green
For Octopus: Light worsted-weight yarn in red
Light worsted-weight yarn in black for embroidering smiley faces onto the animals
Light worsted-weight yarn in white for embroidering a toothy grin on the shark
G-6 (4.00 mm) crochet hook
Waste yarn for stitch marker
Yarn needle
3 yds of 3/8” cord or braided ribbon in light blue
Plastic cord lock (also known as a cord toggle)
Needle and thread for sewing ends of ribbon together
Polyester Stuffing
Gauge
5 sts in sc = 1 inch
5 rnds = 1 inch
Abbreviations
beg = beginning
BL = back loop
ch = chain
ch-sp = chain space
dc = double crochet
dec = decrease by single crocheting 2 together
ea = each
FL = front loop
FO = fasten off
hdc = half double crochet
inc = increase with 2 sc in next st
rep = repeat
rnd = round
sc = single crochet
sk = skip
slst = slip stitch
st(s) = stitch(es)
Instructions
 Island and Ocean Base

Note: Join with slst at the end of each round.
With beige, ch 2. (Or begin with a magic loop.)
Rnd 1: 6 sc in 2nd ch from hook (or in magic loop).
Rnd 2: 2 sc in ea sc around. (12)
Rnd 3: Ch 1, * sc, inc, rep from * 5 more times. (18)
Rnd 4: Ch 1, * 2 sc, inc, rep from * 5 more times. (24)
Rnd 5: Ch 1, * 3 sc, inc, rep from * 5 more times. (30)
Rnd 6: Ch 1, * 4 sc, inc, rep from * 5 more times. (36)
Rnd 7: Ch 1, * 5 sc, inc, rep from * 5 more times. (42)
Rnd 8: Ch 1, * 6 sc, inc, rep from * 5 more times. (48)
Rnd 9: Ch 1, * 7 sc, inc, rep from * 5 more times. (54)
Rnd 10: Ch 1, * 8 sc, inc, rep from * 5 more times. (60)
Rnd 11: Ch 1, * 9 sc, inc, rep from * 5 more times. (66)
Rnd 12: Ch 1, * 10 sc, inc, rep from * 5 more times. (72)
Rnd 13: Ch 1, * 11 sc, inc, rep from * 5 more times. (78)
Rnd 14: Ch 1, * 12 sc, inc, rep from * 5 more times. (84)
Rnd 15: Ch 1, * 13 sc, inc, rep from * 5 more times. (90)
Rnd 16: Ch 1, * 14 sc, inc, rep from * 5 more times. (96)
Rnd 17: Ch 1, * 15 sc, inc, rep from * 5 more times. (102)
Rnd 18: Ch 1, * 16 sc, inc, rep from * 5 more times. (108)
Rnd 19: Ch 1, * 17 sc, inc, rep from * 5 more times. (114)
Rnd 20: Ch 1, * 18 sc, inc, rep from * 5 more times. (120)
Rnd 21: Ch 1, * 19 sc, inc, rep from * 5 more times. (126)
Switch to light blue.
Note: From this point on, unless otherwise noted, the ch 2 at the beginning of each round does not count as a dc. At end of each round, join with slst to first dc.
Rnd 22: Ch 2, * 13 dc, inc, rep from * 8 more times. (135)
Switch to dark blue.
Rnd 23: Ch 2, * 14 dc, inc, rep from * 8 more times. (144)
Rnd 24: Ch 2, * 15 dc, inc, rep from * 8 more times. (153)
Rnd 25: Ch 2, * 16 dc, inc, rep from * 8 more times. (162)
Rnd 26: Ch 2, * 17 dc, inc, rep from * 8 more times. (171)
Rnd 27: Ch 2, * 18 dc, inc, rep from * 8 more times. (180)
Rnd 28: Ch 2, * 19 dc, inc, rep from * 8 more times. (189)
Rnd 29: Ch 2, * 20 dc, inc, rep from * 8 more times. (198)
Rnd 30: Ch 2, * 21 dc, inc, rep from * 8 more times. (207)
Rnd 31: Ch 2, * 22 dc, inc, rep from * 8 more times. (216)
Rnd 32: Ch 2, * 23 dc, inc, rep from * 8 more times. (225)
Rnd 33: Ch 2, * 24 dc, inc, rep from * 8 more times. (234)
Rnd 34: Ch 2, * 25 dc, inc, rep from * 8 more times. (243)
Rnd 35: Ch 2, * 26 dc, inc, rep from * 8 more times. (252)
Rnd 36: Ch 2, * 27 dc, inc, rep from * 8 more times. (261)
Rnd 37: Ch 2, * 28 dc, inc, rep from * 8 more times. (270)
Rnd 38: Ch 2, * 29 dc, inc, rep from * 8 more times. (279)
Rnd 39: Ch 2, * 30 dc, inc, rep from * 8 more times. (288)
Rnd 40: Ch 4 (counts as first dc + ch 2), sk 2 dc, * 2 dc, ch 2, sk 2 dc, rep from * 70 more times. Dc, join with slst to 2nd chain of beginning ch 4.
Rnd 41: Ch 1, sc, * 5 dc in ch-sp, sc in next 2 dc, rep from * 70 more times. 5 dc in last ch-sp, sc in next dc, join with slst to first sc.
FO and weave in ends.
Thread light blue ribbon in and out of the holes created in Rnd 40. Thread on the toggle and tie or sew the ends of the ribbon together.
Island Top
With beige, rep Rnds 1-21 but do not work in joined rnds. (It might help to use a stitch marker or waste yarn to mark the beg of each rnd.)
FO, leaving a long tail.
Sew Island Top to Rnd 21 of the Base. When you get about 3/4 of the way around, stuff island lightly.
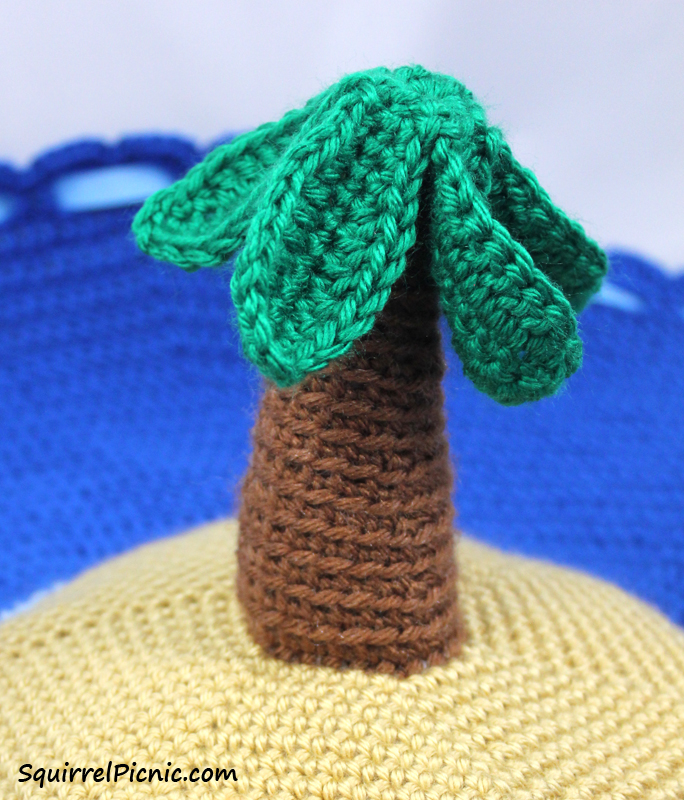
Palm Tree Fronds
With green, ch 4, join with slst to 1st ch to form a ring. Ch 1.
Rnd 1: * Sc into the ring. Ch 12, sc in 2nd ch from hook and ea ch down, rep from * 4 more times.
Rnd 2: * Sk 1 sc, slst in 1st ch, sc in next 2, hdc, dc in the next 5, hdc, sc, ch 3. Working down the other side: Sc, hdc, dc in the next 5, hdc, sc in next 2, slst, rep from * 4 more times. Join with slst. FO, leaving a long tail for sewing.
 Palm Tree
Note: Stuff firmly with polyester stuffing as you go.
With brown, ch 4. Join with slst to create a ring. Ch 1.
Rnd 1: 6 sc in center of the ring.
Rnd 2: Sc in ea sc around.
Note: From this point on, work in BL only.
Rnd 3: * Sc, inc, rep from * 2 more times. (9)
Rnds 4-5: Sc in ea sc around.
Rnd 6: * 2 sc, inc, rep from * 2 more times. (12)
Rnds 7-10: Sc in ea sc around.
Rnd 11: * 3 sc, inc, rep from * 2 more times. (15)
Rnds 12-15: Sc in ea sc around.
Rnd 16: * 4 sc, inc, rep from * 2 more times. (18)
Rnds 17-18: Sc in ea sc around.
Rnd 19: * 5 sc, inc, rep from * 2 more times. (21)
Rnds 20-22: Sc in ea sc around. Join with slst.
FO, leaving long tail for sewing.
Sew Palm Fronds to top of Palm Tree. Thread the green yarn from the palm fronds onto a yarn needle and work the thread back through to the stitches in Rnd 1. Sew these 6 stitches to the 6 stitches in Rnd 1 of the Palm Tree.
Sew completed palm tree to the center of the island.
 Starfish (Make 2 Sides)
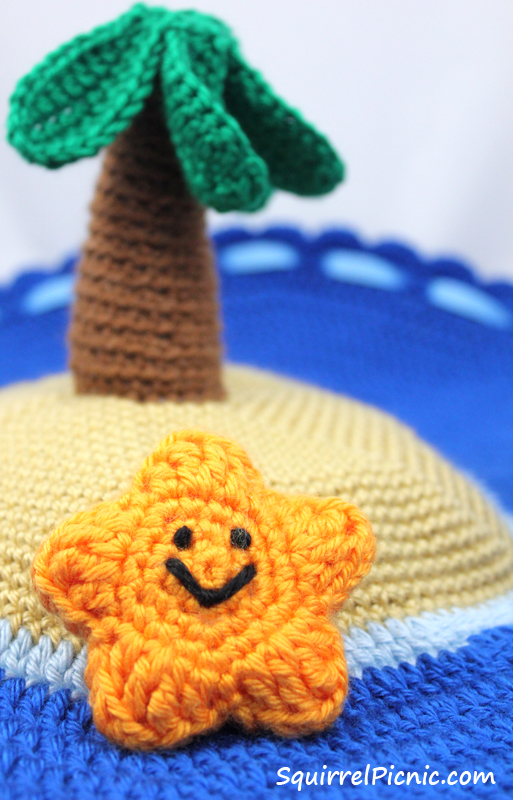
With orange, ch 2 (or begin with magic loop).
Rnd 1: 5 sc in 2nd ch from hook (or in magic loop).
Rnd 2: 2 sc in ea sc around. (10)
Rnd 3: * Sc, inc, rep from * 4 more times. (15)
Rnd 4: * 2 sc, inc, rep from * 4 more times. (20)
Rnd 5: * Ch 2, dc in next st, (tr, ch 2, tr) in next st, dc in next st, ch 2, slst in next st. Rep from * 4 more times.
FO.
With RS facing out, sew the two sides together. Stuff lightly once you’ve gotten about 3/4 of the way around.
Using black yarn and a yarn needle embroider a smiley face to the starfish.
 Shark
Shark
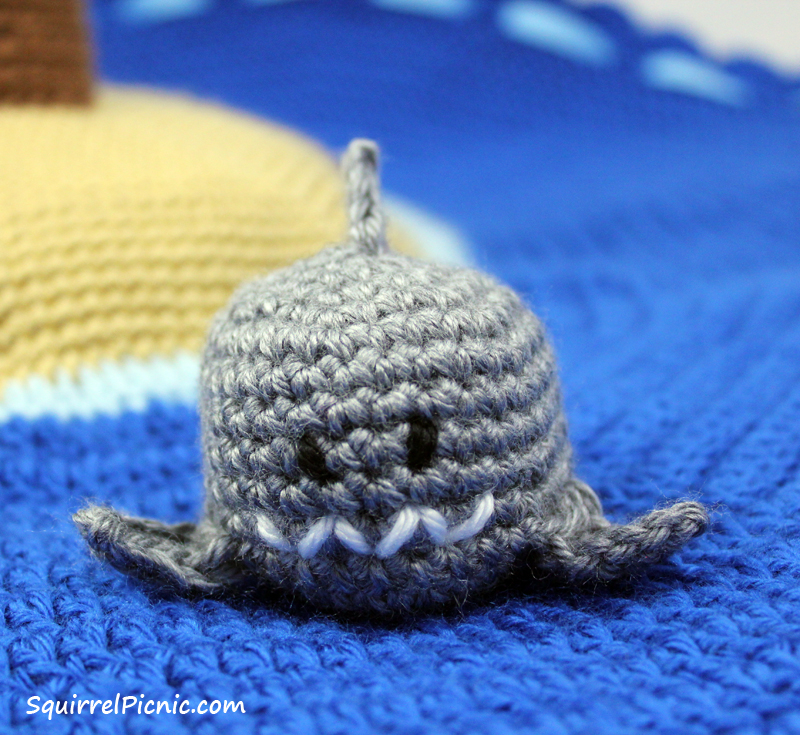
Top of Body
With gray, ch 2 (or begin with magic loop).
Rnd 1: 6 sc in 2nd ch from hook (or in magic loop).
Rnd 2: Inc in ea sc around. (12)
Rnd 3: * Sc, inc, rep from * 5 more times. (18)
Rnd 4: * 2 sc, inc, rep from * 5 more times. (24)
Rnd 5: * 3 sc, inc, rep from * 5 more times. (30)
 Rnds 6- 9: Mark the beg of rnd 6 with waste yarn and don’t remove it. (You will use this marker to help you position the shark’s fins later on.) Sc in ea sc around.
Rnd 10: * Sc 8, (ch 6, working down the ch: sc, hdc, 3 dc. Back to the rnd: sk 2 sc, sc in next sc), rep from * 1 more time. Sc 8, join with slst. FO and weave in ends.
Bottom of Body
With gray, ch 2 (or begin with magic loop).
Rnd 1: 6 sc in 2nd ch from hook (or in magic loop).
Rnd 2: Inc in ea sc around. Join with slst, ch 1. (12)
Rnd 3: * Sc, inc, rep from * 5 more times. Join with slst, ch 1. (18)
Rnd 4: * 2 sc, inc, rep from * 5 more times. Join with slst, ch 1. (24)
Rnd 5: * 3 sc, inc, rep from * 5 more times. Join with slst, ch 1. (30) FO, leaving a long tail.
Stuff the shark lightly and sew the Bottom to the Body.
Tail
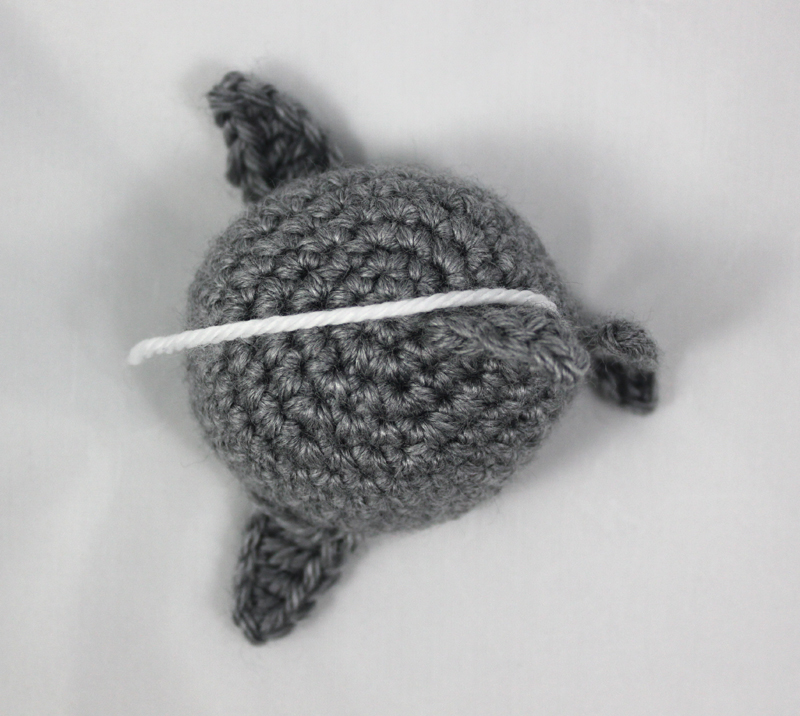 Ch 4, working back down the ch: slst, 2 sc. Ch 6, working back down the ch: slst, 4 sc, slst in 1st ch. FO, leaving a long tail. Sew this to the shark’s back with taller part of the tail on top. Use the waste yarn marker from Rnd 6 of the Body to help you draw a guideline running from the back to the front, dividing the shark evenly with a fin on each side. Sew the tail along this line at about Rnd 9 of the Body.
Dorsal Fin
Ch 5, working back down the ch: slst, sc, hdc, dc. FO, leaving a long tail. Sew to Body in line with the tail, between Rnds 1 and 4.
With black yarn and a yarn needle, embroider two lines for eyes. With white yarn, embroider a jagged mouth.
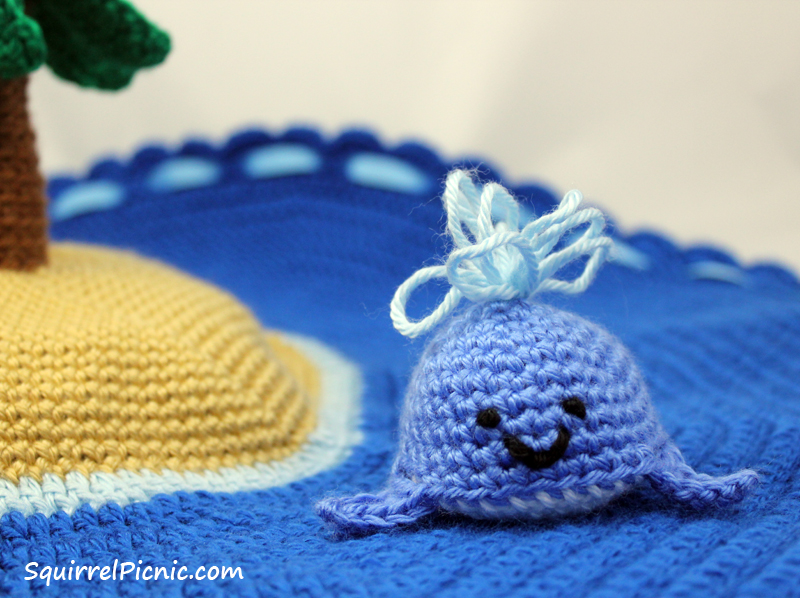
 Whale
Whale
Top of Body
With blue, ch 2 (or begin with magic loop).
Rnd 1: 6 sc in 2nd ch from hook (or in magic loop).
Rnd 2: Inc in ea sc around. (12)
Rnd 3: * Sc, inc, rep from * 5 more times. (18)
Rnd 4: * 2 sc, inc, rep from * 5 more times. (24)
Rnd 5: * 3 sc, inc, rep from * 5 more times. (30)
Rnds 6- 9: Sc in ea sc around.
Rnd 10: * Sc 8, (ch 6, working down the ch: sc, hdc, 3dc. Back to the rnd: sk 2 sc, sc in next sc), rep from * 1 more time. Sc 8, join with slst in next sc. This sc is the Base for crocheting the tail. Crochet the tail in two steps: (A) Ch 6, working down the chain: slst, sc, hdc, 2 dc. (B) Ch 6, working down the chain: slst, sc, hdc, 2 dc. Slst in the bottom of the last dc of A. Slst in Base. FO and weave in ends.
Use black yarn and a yarn needle to embroider a smiley face.
Blow Hole and Spout
To create the whale’s spout, wrap light blue yarn around your palm 4 or 5 times. Slide the yarn off your hand and tie it in the center with another length of yarn (photo Step 1). Use your crochet hook to thread this length of yarn through a hole in the top of the whale and pull a small bit of the bundle of light blue yarn into the hole as well. I’ll call this the blow hole from now on. Now we’ll secure the bundle of light blue yarn to the inside of the whale. Turn the whale inside out. Thread one end of the tied yarn (the purple yarn in the photos) onto a yarn needle and work this end through a stitch on the whale’s body near the blow hole. Then work it under the light blue yarn bundle to the other side (photo Step 2). Repeat on the other side (photo step 3). Tie the two ends tightly in the center (photo Step 4). Turn the whale right side out again.

Bottom of Body
With white, ch 2 (or begin with magic loop).
Rnd 1: 6 sc in 2nd ch from hook (or in magic loop).
Rnd 2: Inc in ea sc around. Join with slst, ch 1. (12)
Rnd 3: * Sc, inc, rep from * 5 more times. Join with slst, ch 1. (18)
Rnd 4: * 2 sc, inc, rep from * 5 more times. Join with slst, ch 1. (24)
Rnd 5: * 3 sc, inc, rep from * 5 more times. Join with slst, ch 1. (30) FO, leaving a long tail.
Lightly stuff the body and sew the Bottom to the Body.
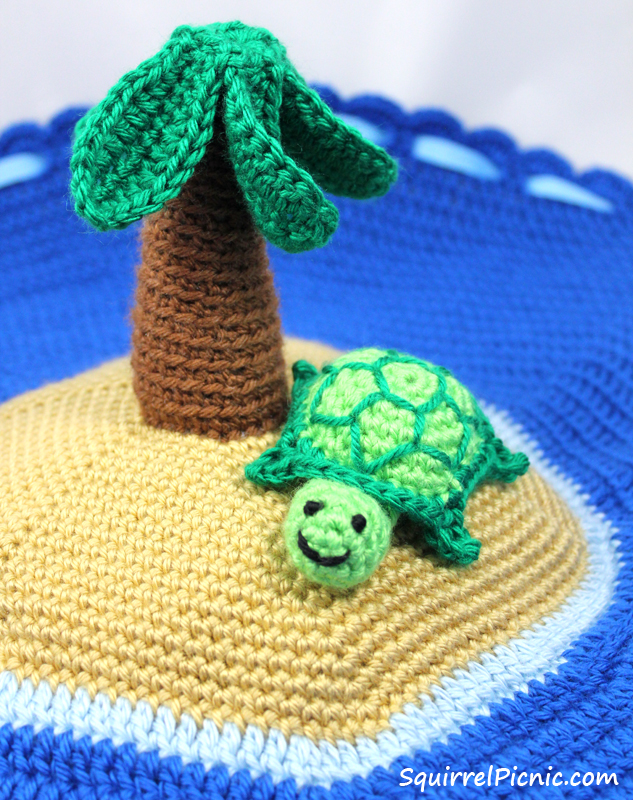
 Turtle
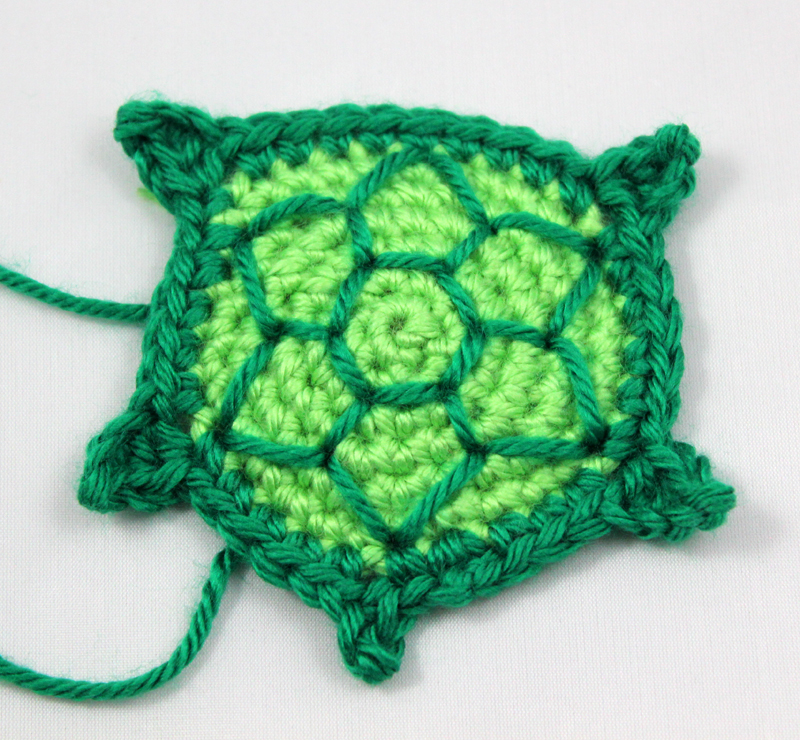
Top of Body
Special instruction for Rnd 7 of Turtle Body Top:
Create a foot = Ch 4, then working back down the ch: slst, 2 hdc. Sc in next sc of rnd.
With light green, ch 2 (or begin with magic loop).
Rnd 1: 6 sc in 2nd ch from hook (or in magic loop).
Rnd 2: Inc in ea sc around. (12)
Rnd 3: * Sc, inc, rep from * 5 more times. (18)
Rnd 4: * 2 sc, inc, rep from * 5 more times. (24)
Rnd 5: * 3 sc, inc, rep from * 5 more times. (30)
Rnd 6: Sc in ea sc around.
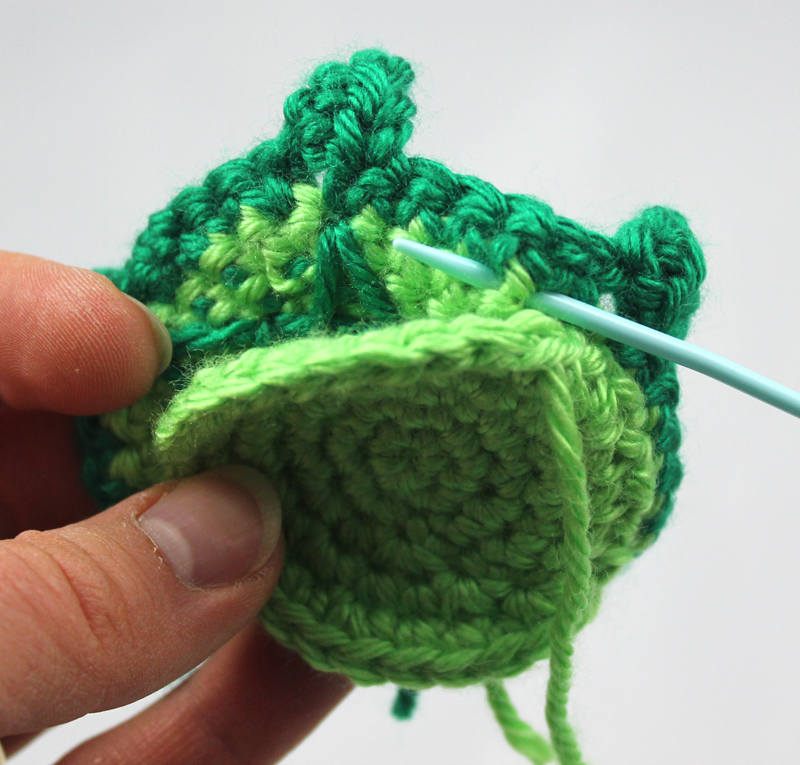
Rnd 7: Switch to dark green yarn. 4 sc, create a foot, 5 sc, create a foot, 8 sc, create a foot, 5 sc, create a foot, 4 sc, (ch 3, working down the ch: slst, sc), sc in next sc of rnd, join with slst to beg of rnd. FO and weave in ends.
With yarn needle and a length of dark green yarn about 4 ft long, embroider plates onto the turtle’s shell.
 Bottom of Body
With with light green, ch 2 (or begin with magic loop).
Rnd 1: 6 sc in 2nd ch from hook (or in magic loop).
Rnd 2: Inc in ea sc around. Join with slst, ch 1. (12)
Rnd 3: * Sc, inc, rep from * 5 more times. Join with slst, ch 1. (18)
Rnd 4: * 2 sc, inc, rep from * 5 more times. Join with slst, ch 1. (24)
Rnd 5: * 3 sc, inc, rep from * 5 more times. Join with slst. (30) FO, leaving a long tail.
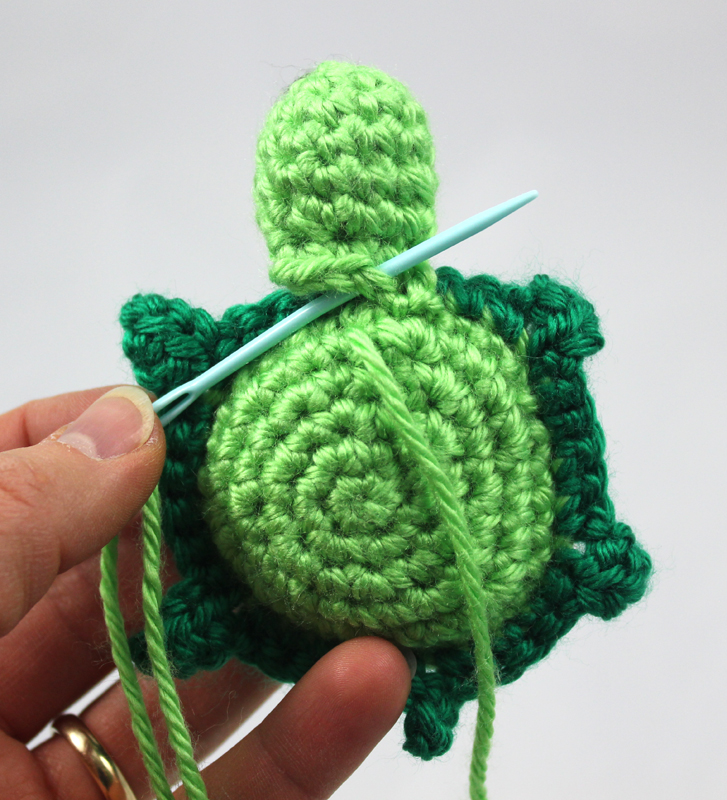
Lightly stuff the turtle and sew the Bottom to Rnd 6 of the Body.
 Head
Head
With light green, ch 2 (or begin with magic loop).
Rnd 1: 4 sc in 2nd ch from hook (or in magic loop).
Rnd 2: Inc in ea sc around. (8)
Rnd 3: * Sc, inc, rep from * 3 more times. (12)
Rnds 4-5: Sc in ea sc around.
Rnd 6: * Sc, dec, rep from * 3 more times. (8)
Rnd 7: Sc in ea sc around.
Stuff lightly.
Close opening by lining up the sts (4 on top and 4 on bottom) and sc the pairs of sts together. FO, leaving a long tail. Sew Head to front of Bottom of Body.
Use black yarn and a yarn needle to embroider a smiley face.
 Octopus

Top of Body and Arms
With red, ch 2 (or begin with magic loop).
Rnd 1: 6 sc in 2nd ch from hook (or in magic loop).
Rnd 2: Inc in ea sc around. (12)
Rnd 3: * Sc, inc, rep from * 5 more times. (18)
Rnd 4: * 2 sc, inc, rep from * 5 more times. (24)
Rnd 5: * 3 sc, inc, rep from * 5 more times. (30)
Rnds 6- 10: Sc in ea sc around.
Rnd 11: * 3 sc, dec, rep from * 5 more times. (24)
Rnd 12: * Sc, (ch 17, working back down the chain: slst, 11 sc, 2 hdc, 2 dc), sk 2 sc, rep from * 7 more times. Slst in last sc. FO and weave in ends.
 Bottom of Body
With red, ch 2 (or begin with magic loop).
Rnd 1: 6 sc in 2nd ch from hook (or in magic loop).
Rnd 2: Inc in ea sc around. Join with slst, ch 1. (12)
Rnd 3: * Sc, inc, rep from * 5 more times. Join with slst, ch 1. (18)
Rnd 4: * 2 sc, inc, rep from * 5 more times. Join with slst. (24)
FO, leaving a long tail.
Stuff the Octopus and sew the Bottom to the Body, using both the scs and skipped sts in Rnd 12. It will look like the Bottom is way too small, but trust me, both the Bottom and the Body have 24 sts, so you can be confident that it will fit.
Use black yarn and yarn needle to embroider a smiley face.


September 18, 2014 at 11:42 am
love it! your work always brings a smile!
September 18, 2014 at 11:58 am
Thanks, Jo! That means so much to me! 🙂
September 18, 2014 at 12:13 pm
Omg that’s super cute
September 18, 2014 at 12:17 pm
Thanks!
September 18, 2014 at 12:42 pm
So stinking CUTE! I really need to learn to crochet.
September 18, 2014 at 12:48 pm
Yes, yes, you do. 🙂
September 18, 2014 at 12:45 pm
This is too adorable! I want one to bring the beach to my office today 🙂
September 18, 2014 at 12:49 pm
Great idea! I kinda want to sew crochet palm trees on everything now.
September 18, 2014 at 1:13 pm
What a creative idea! Thank you so much for sharing all the patterns. I’m totally making this for my two year old. ❤
September 18, 2014 at 1:21 pm
Thanks, Debivi! I’m so excited that you will make one for your kiddo. That’s so cool! You will have to share pictures. 🙂
September 18, 2014 at 1:18 pm
Did I already say that I love everything you do…..? Thank you so much for sharing your talent,I’m a faithful student of yours!
September 18, 2014 at 1:24 pm
You are the best, Tajana! Friends like you make what I do so worthwhile. Now that I have finished this challenge, though, I am looking forward to maybe working on all those half-finished knitting projects I have. You inspire me to get those things done!
September 18, 2014 at 1:28 pm
❤ ❤ ❤ ❤ ❤ Too kind from you!!!! As I already said,I really would like to have a cup of tea with you chatting about all crochet knit and sew projects! I can say that your sea world inspired me…. my BM's not yet born nephew will have something alike…. thanks,my dear ❤ 🙂
September 18, 2014 at 1:41 pm
I often wish that you and I lived closer. We would have tea together all the time. 🙂 It’s so nice to have a friend like you… even far away.
September 18, 2014 at 1:45 pm
Bless you ❤ ❤ ❤ a thousands of hugs are on the way ❤ ❤ ❤
September 18, 2014 at 1:33 pm
so cute. I know a little boy and girl that would love all of them. thank you for sharing, debi
September 18, 2014 at 1:42 pm
You’re very welcome, Debi! I’m so glad you like it.
September 18, 2014 at 2:24 pm
That looks wonderful! You are so talented!
September 18, 2014 at 2:37 pm
Hi Bea Bru! Thank you so much for your kind words.
September 18, 2014 at 5:57 pm
Holy potatoes – this is adorable!! I don’t crochet yet, but I’m inspired by you for when I start!
September 18, 2014 at 7:33 pm
Thanks, Erin! I’m so pleased that I’ve inspired you. I hope you take on crochet and make lots of adorable things. 🙂
September 18, 2014 at 5:58 pm
You have outdone yourself, Jennifer!!!!! This is so creative and adorable! I loooove the turtle and the whale…I might modify the turtle to be a teenage mutant ninja turtle, since the knitting group I am starting is called the Teenage Ninja Knitters. Love to you, Hodge and Podge from me, Liv, Andy, and Beatrix! ❤ ❤ ❤
September 18, 2014 at 7:31 pm
Thanks, Grace! You are the best. I love your knitting group name. How clever! Lots of love to you and Liv, Andy, and Beatrix!
September 18, 2014 at 6:50 pm
Oh Jennifer! The drawstring bag is a stroke of genius!!! Children love things with a play mat and parents love something easily packed and transportable. I wish I had a crochet clone who could just “make stuff” while I do the other stuff. What am I saying? The clone can do the other stuff and I will make play sets. LOL!!! On my todo list. Croshades not here yet but I will send you an email the moment they get here. 🙂
September 18, 2014 at 7:30 pm
Yay, Sharon! I’m just tickled by your kind words. I want a clone too! What a fabulous idea! My clone can go to work for me so I can stay home and design more play sets. 🙂 I hope your croshades arrive soon. I’m on pins and needles waiting to see what you and your son come up with!
September 18, 2014 at 9:31 pm
This is a wonderful idea and sooooo cute. I love it and it shows again your wonderful talent and great imagination. Thanks for sharing the pattern!
September 19, 2014 at 12:15 pm
Thank you so much, Karin! It means a lot coming from you. I am always so amazed at your creativity. Your crab and octopus story and patterns made my jaw drop. Phenomenal! I’m so tickled you like my ocean critters too. 🙂
September 19, 2014 at 12:22 pm
All of the little beach critters in this playset are so squishably cute! My favorite is the shark! Jaws wouldn’t have been so scary had he looked like that….
September 19, 2014 at 1:17 pm
Thank you, ES! You make a very good point there. I can even picture a cute crochet shark in place of the one at Universal Studios. That would have been hilarious!
Pingback: Make It! Challenge #10: Crochet Island Play Set...
September 20, 2014 at 9:09 am
This is awesome! And the shark is soo cute! 🙂
September 20, 2014 at 2:13 pm
Thank you, TINe! The shark is my favorite too. 🙂
September 20, 2014 at 10:57 am
I just came across your page in the middle of the night and I couldn’t be happier I did! Thank you so much for sharing such an amazing pattern!
September 20, 2014 at 2:12 pm
Thank you, Tanya! It’s so nice to meet you, and I’m glad that you enjoyed the pattern. Welcome to the picnic!
Pingback: Wandering…. | Tatie's world
September 21, 2014 at 4:52 am
I can’t believe your generosity in offering this pattern for free! I just fell upon it on Pinterest and it will make the perfect Christmas gift for my nephew (I haven’t been crocheting for very long so I need to start projects early). Anyways, I just couldn’t pass the opportunity to say thank you… Thank you for sharing your hard work and talent with us. Now I need to go see what other treasures I’ll find on your blog. 🙂
September 21, 2014 at 12:50 pm
Thank you, Mimi, for sharing your appreciation! That means a lot to me. I always tell people that I get paid in happiness, as it truly makes me happy to give others the opportunity to use my patterns and I love seeing what they make with them. I’m excited that you will be making an island play set for your nephew. What a lucky kid!
September 21, 2014 at 12:26 pm
What a brilliant set, and it will go wonderfully with all the other Bag sets I’ve collected to make for all the little ones I know – I especially love the Turtle, with his lovely smiley face 🙂
September 21, 2014 at 12:45 pm
Thank you for your kind words. The turtle was especially fun for me to make. The kiddos in your life are very lucky to have such a talented crocheter to make them bag sets.
September 21, 2014 at 12:48 pm
I don’t know about talented, but I’m very determined that there will be at least one hand crafted item for every child I know – it sure beats plastic! 🙂
September 21, 2014 at 12:54 pm
That it does! Handmade presents are the best because so much love goes into them. Best of luck with your island play set. Please share pictures. I’d love to see it when it’s done. 🙂
September 21, 2014 at 1:11 pm
I will do 🙂
I’m in the middle of crocheting a surprise pressie for my daughter at the moment, but as soon as I finish it, I’ll be starting your set – and I’ll make sure I take some pics to show you 🙂
September 21, 2014 at 1:12 pm
Yay! I will look forward to it. 🙂
September 21, 2014 at 10:45 pm
this is soooooo brilliant idea to keep the little ones occupied.. 😉 thanks for the pattern.. well done!
September 22, 2014 at 9:04 am
Thank you!
September 22, 2014 at 6:18 pm
Oh my gosh, this is adorable. I just had a baby shower and her theme was nautical. Wished I had seen this before, as I would have made it for the new mom. I did make her a lovey blanket with a sailor as the star and appliqued sailboats and anchors for her theme. It turned out so cute, but I really love yours. My next nautical project will be this one. Thank you for the pattern and the inspiration.
September 23, 2014 at 1:19 pm
Hi Deborah! It’s so nice to meet you. Your lovey blanket sounds adorable. I bet the mother and baby will cherish it. I’m excited that you are thinking of making an island play set as your next nautical project. You’ll have to share pictures. I would love to see it. 🙂
September 23, 2014 at 8:17 pm
I LOVE this. Thanks for sharing the patterns! I’m making on right now and I’ll share pics when I’m done 🙂
September 25, 2014 at 11:31 am
Thank you! I’m so excited that you are already working on an island play set. You rock! I look forward to seeing the photos!
September 27, 2014 at 9:57 am
Hi, Making this for my granddaughter for Christmas. It is wonderful. I have a question–In the Island and Ocean Base section, what happened to rounds 22 And 23. The numbers skip from round 21 to round 24. Is this just a mistake or are 2 rounds missing from the instructions?
September 27, 2014 at 10:16 am
Hi Brenda! Thank you so much for pointing that out for me! I really appreciate it. Luckily it was just a typo and I’ve corrected it. I hope you enjoy making your island play set. Thanks again!
September 27, 2014 at 7:14 pm
This is just adorable. You are right-there needed to be an ocean playset.
Christine
September 27, 2014 at 7:52 pm
Thanks, Christine! I’m so glad that you like it. 🙂
September 28, 2014 at 4:32 pm
I thought this was a great idea…So….I made one. Took me a week. I can’t post the picture.
It’s on my FB page.
September 29, 2014 at 8:27 am
Yay, D’Ann! I’m so excited that you made an island play set! Sorry it does take a while to do. That ocean part is rather tedious, but you got through it and now you have a play set to show for it. Congratulations! I tried to check it out on your Facebook page, but I couldn’t find it. Would you mind checking your privacy setting for that image? Or you could always share it on the Squirrel Picnic Facebook page, if that’s easier. I look forward to seeing your handiwork!
October 15, 2014 at 1:08 pm
Hi! Love this pattern I’m trying to do this at the moment. I’m trying to do the island at the moment and I’m not sure I’ve got it right. Are we counting the chain as a stitch? And if we are joining with a slip stitch after each round are we slip stitching into the chain one of last round or into the first single crochet? Any clarification would be greatly appreciated:)
October 15, 2014 at 1:58 pm
Hi Andrea! I’m so excited that you are making an island play set. Thank you for your question. The joined-round method I used for the bottom of the island is to ignore the ch-1: When counting stitches, ignore the ch 1. When joining rounds, your last single crochet will be in the slst of the previous round, then skip over the ch 1 and slst in the first single crochet of the round. To start the next round, ch 1 and sc in the next st. I found a good explanation of this method by Yuliya Tkacheva of Ms. Weaver’s Designs (see Method 3 on the page). I hope this helps. Please let me know if there’s anything else I can do for you.
October 15, 2014 at 2:35 pm
Thank you so much! That helps a ton!:)
Pingback: 30 Free Amigurumi Patterns
Pingback: 30 Free Amigurumi Patterns Oombawka Design Crochet
October 24, 2014 at 1:35 am
bravo bravo c’est tout mignon
October 24, 2014 at 8:46 am
Thank you, Colette!
October 25, 2014 at 2:13 pm
I love your patterns; thank you
October 27, 2014 at 5:28 am
You’re welcome! I’m so glad you like my patterns. Thanks for stopping by and letting me know. 🙂
November 5, 2014 at 2:42 pm
i totally love this play set , my son really likes dinos , so im goinng to just change colors and add dinos , thanks for the grate ideas
November 5, 2014 at 3:31 pm
You’re welcome! Would you share a picture of your dino play set when its ready (email to squirrelpicnic{at}gmail{dot}com)? I would love to see it. What a cool idea!
November 6, 2014 at 3:57 am
I don’t see a PDF button at the end of the post, am I missing something? This is a great pattern, thanks for sharing
November 6, 2014 at 4:25 am
Hi Marci! Glad you like the pattern. At the end of the post, scroll down just a tad bit more and you’ll see a “Thank You for Sharing” section. The Print and PDF button is the last one on the right. It will take you to PrintFriendly.com, which will make a PDF for you for free. Enjoy your play set!
Pingback: Getting Ready for Christmas! Ho Ho Ho | Marvellous Mini Makes
December 21, 2014 at 1:55 am
It’s very very nice, fantastic !
Thank you for sharing
December 21, 2014 at 3:32 pm
You’re welcome! I’m glad you like it. 🙂
April 6, 2015 at 2:05 pm
I just finished making this!! I was asked to make some soft toys for the quiet corner at our Church so will be donating this – pretty sure I will be making another for my own kids! Fab pattern, amazing creativity 🙂
April 6, 2015 at 6:14 pm
Thanks, Emma! I’m so excited that you crocheted an island play set for your church. That’s awesome and very kind of you. Would you mind sharing a photo with me? If you’ll email it to squirrelpicnic(at)gmail(dot)com, I will include it in a feature called “You Made This!” which will be posted here on the blog in June.
April 8, 2015 at 7:22 am
I just finished this playset. Thankyou so much for the free pattern. I have posted a pic on your Facebook page.
April 8, 2015 at 8:34 am
Thank you, Jenny, for making an island play set with my pattern and for sharing your photo with me. It always warms my heart to see what people can do with my patterns. I really love the whale. And your animals’ faces are adorable. If it’s okay with you, I’d like to feature your photo in a blog post called “You Made This!” in June. I’ll be sure to include your name with your work. Thanks again!
Pingback: Eine Insel mit zwei Bergen … | Heikes Blog für alles, was lustig und lecker ist
Pingback: Ein Unikat für ein Unikat | regenbogengarne
May 4, 2015 at 2:38 pm
Hi I’ve just finished the base mine is only 2foot (26inches) and it should be 3? I’ve used the same yarn and a 4mm testing my gauge and it’s coming up correct, lol? Where could I be going wrong x
May 4, 2015 at 6:27 pm
Hi, Alicia! I am happy to help if I can. The only thing I can think to ask is, did you start using double crochet stitches in Rnd 22? If not, I imagine it would probably be even smaller than you describe. Did you have the correct number of stitches (288) before you began the border in Rnd 40? This is the first time I’ve heard of this problem and I’m very curious to hear what might be up.
May 6, 2015 at 4:41 pm
i am so excited about this project. I am making it for a friend who is expecting a baby soon.
Could u please send me or post a picture of how you did the toggle at the end of your ribbon?
Thank you so much!
May 6, 2015 at 6:54 pm
Hi Wendy! That’s so awesome that you are making an island play set for your friend’s new baby. You’re a very sweet friend. I wish I could show you a picture of the toggle I used, but I no longer have the play set. I’m glad you asked about it though. I didn’t realize until now that I may have been using the wrong name for it. I used a double barrel cord lock (aka cord toggle). You’ll push down on the button while threading each end of your ribbon or cord through a hole. Then sew or glue or tie the ends of your ribbon or cord together and you’re good to go. In lieu of a photo, here is a YouTube video. Although this video was made specifically for sailors it seems, I think it still gives you a good idea of what I’m talking about. 🙂
May 17, 2015 at 12:00 pm
Thank you for sharing this amazing pattern Jenifer and your wonderful talents ,I have now shared it onto my fb crochet group page with over 29000+ members so i hope you get lots more visits from them and some of them will share it to, here’s the link if you would like to come and see it https://www.facebook.com/groups/crochetcrazy/?ref=bookmarks ….thank you Sheila
May 18, 2015 at 4:14 am
Hi Sheila! Thank you so much for sharing my island play set pattern with your friends. You rock!
June 3, 2015 at 2:09 pm
So beautiful!!! It will make happy children. Thank you so much for sharing your wonderful ideas!
Greatings from Switzerland ;o)
June 4, 2015 at 3:55 am
Hi Gouezela! It’s so nice to meet you. Thanks for your kind words. I’m so glad you enjoyed my play set. 🙂
June 13, 2015 at 2:37 am
Hi, Making the playset for my grandson. He is going to love it, thank you for the pattern. I just started on the island but it does not seem to look like yours. It does not have the lines, is this due to my counting stitches incorrectly? Thanks for your help.
June 15, 2015 at 5:10 am
I’m very excited that you are making a play set for your grandson. Let me see if I can help. I wonder if the reason your island looks different from mine is that the pattern calls for you to make two islands. If you are just starting your island, the island you are working on is actually part of the base. The “island” you see in my photos is the second piece that is crocheted and sewn to the base and stuffed. The second island piece is done with unjoined rounds, so the lines that are created wherever there are increases will look a little different (less spiral and more straight). I hope this helps. Please let me know if there is anything else I can do.
July 3, 2015 at 4:09 pm
Love it. 😊 you commented that you thought the drawstring was a bit long, but you can just pull up some of the drawstring from 2 opposite sides (or from 4) to make the length more manageable. Gotta go make one of these for a friend. 😊 thanks for this wonderful pattern.
July 4, 2015 at 10:35 am
That’s a great idea, Ankhara! Thank you for taking the time to share it with me. I will update the pattern so that everyone can use your tip. Enjoy making your island play set. Will you share a photo when you are done?
July 6, 2015 at 1:33 am
Gladly 😊 I am almost done with an afghan that I am making for a friend and will be starting it shortly. I was looking for a daffodil pattern and hubby directed me to your site via a Facebook link from a coworker. Lol talk about a convoluted way of finding you. 😉
July 6, 2015 at 3:41 am
How cool! Say a thanks to your hubby for me. 🙂 No matter how you got here, I’m so happy to meet you and to welcome you to the picnic. Enjoy!
August 27, 2015 at 3:43 pm
Finished the project I was working on for my SIL (http://www.ravelry.com/projects/ankhara/the-crocodile-flower) and started this one finally 😊 several ladies at the Texas purls meetup loved your site when I showed them this project and can’t wait to see how mine turns out. I did have some troubles. Your pattern didn’t say if the chain one at the beginning of the rounds on the base part counted as the first sc, and the chain ones left an obvious line in the base parts I made. I think this is more a personal technique issue rather than a pattern flaw, as I have never made that (ch one at start of round) look good in any pattern . I fixed the visual look of the base by eliminating the chain one and working the base as a continuous round. I used the magic circle to start as I want the center tightly closed in case I modify the elements that go on top.
August 27, 2015 at 7:43 pm
Thank you, ankharas, for making an island play set and sharing Squirrel Picnic with your friends. I know how you feel about joined rounds. That obvious line drives me nuts too! But somewhere along the line I think I discovered that it makes the fabric lay flatter (and since you go from sc with the base of the island to dc for the water, I thought doing the whole thing in joined rounds might be easier for people), but you know it might just be time for me to investigate that again and see what the rest of the crochet community thinks. Thanks for inspiring me! I love learning something new!
August 27, 2015 at 9:21 pm
I didn’t see an obvious line in your pictures. I just assumed you knew how to join in a way that hid that. Since I am self taught, there are lots of things that designers (like yourself) know how to do, that I can’t figure out even when I watch YouTube videos. I don’t even know how to write patterns. By the time I finish “winging it” when I make something, I have no idea what all I did.
August 28, 2015 at 4:50 am
Oh, I see what you mean. The island and ocean base is worked in joined rounds but the island top is worked in unjoined (spiral) rounds. Self-taught is awesome! I am self-taught too. It’s amazing what you can learn from the Internet and books. 🙂 Keep doing what works for you, keep winging it, and keep having fun!
August 29, 2015 at 12:24 am
Ok. So I am doing things a bit differently. I made the island base minus the blue rounds. Then I made the top and at end of last round I lined up both pieces and slip stitched the two together (I suck at guestimating yarn lengths) OMG so super easy and I stuffed it with my left over tan yarn. I figure the first blue round will cover the slip stitch join and if the dc don’t, one round of sc (before the dc + inc) should. I would be further along but neighbors kids discovered I make things and wanted me to teach them something. They got spool knitting instructions due to lack of prep time (yikes) no need to post this, lol. I just love that you are so open to chat, even if I am messing with your pattern. I believe someone told me you have to change any pattern you work with (even if it’s just the colors) or it doesn’t get your very own personal touch to it. Okay, so it’s late at night and I know I should never send a message when I’m sleep writing like this, but if there is anything useful in this use it and delete the rest :). Pity the child receiving wouldn’t like a surfer dude and surf board to go with it. Kinda want a second tree and hammock on it, but I don’t get to add anything like that to this set since it is a specific request. Pity.
August 29, 2015 at 3:52 pm
Round 5 of star instructions says repeat from * but there is no * to go to.
August 29, 2015 at 4:12 pm
Oops! Terribly sorry about that. I have updated the pattern with the correction. Thanks for letting me know.
August 29, 2015 at 4:14 pm
Your method sounds really cool! Feel free to adapt my pattern in any way that works best for you. I agree that’s part of the fun of crochet. There are always several ways to do something and doing things your way is a great way to “own” your work. Go for it! You have my blessing. 🙂
September 3, 2015 at 8:17 pm
I finished the play set and can’t find where to send a private message to you via my iPad so, here is a link where I posted the pics and a short comment
https://crochetleo.wordpress.com/2015/09/04/island-play-set-progress/
September 4, 2015 at 3:39 am
Your play set turned out great! I have included it in a feature I run twice a year called You Made This! Look for your play set to be featured in the January edition. If you ever need to private message me, feel free to email squirrelpicnic@gmail.com. Thanks!
July 3, 2015 at 8:41 pm
This is my version of the Crochet Island ! I love to do this ! Thank you very much to share! Hugs from São Paulo, Brazil!
July 4, 2015 at 10:28 am
Thanks so much for taking the time to share your island play set with me. I love it! All of your animals are so adorable, and I really like the yarn you used for the water. Great work, Marcia!
August 1, 2015 at 11:49 pm
Beautiful! I look forward to making this for daycare!
August 3, 2015 at 5:02 am
Enjoy!
August 8, 2015 at 3:52 pm
love this thankyou my little boy is autistic and think he will love this and help with imaginary play x
August 10, 2015 at 4:00 am
You’re welcome, Cecelia! Best wishes to you and your boy. I know he will enjoy his play set!
December 14, 2015 at 9:19 am
Wow so much neat stuff
December 15, 2015 at 4:35 am
Enjoy! Thanks for stopping by, Rose.
February 11, 2016 at 7:47 pm
love this site cant get enough amigurami,it so new to me and i’m loving it..
February 12, 2016 at 5:55 pm
Thanks, Teresa! I’m so glad you are enjoying the website! Thanks for joining us at the picnic. Be sure to subscribe so you won’t miss any new amigurumi patterns. 😊
February 21, 2016 at 4:19 pm
I love this, thank you so much for sharing!!! Cannot wait to explore your page further, you are extremely talented and inspiring!
February 22, 2016 at 4:34 am
Thanks, Samantha! Enjoy!