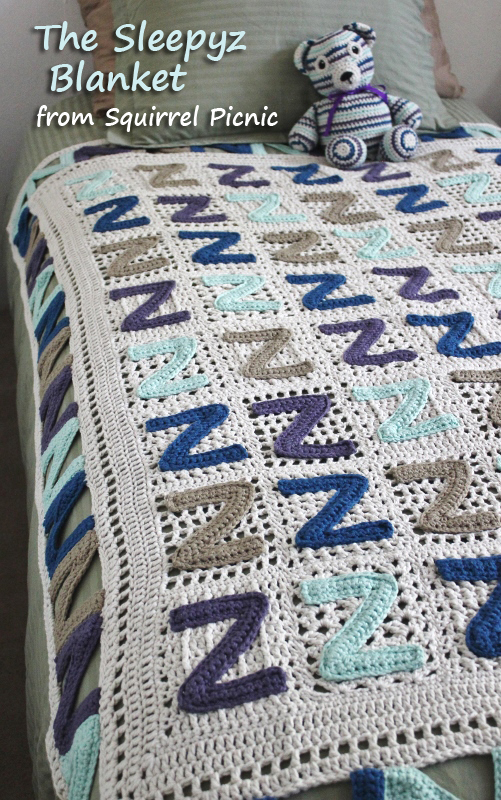
 The Sleepyz Blanket is the very first of what I’d like to call my story patterns — patterns that help to tell a story in both the finished piece and its creation. What I found through this project is that the story behind the piece continues to entertain as you’re crocheting. Each step in the pattern contains little prompts that will delightfully remind you of the story.
The story behind the Sleepyz Blanket, “All Tuckered Out,” is a creative take on why we get progressively sleepier as the day goes on. In this picture story, little creatures called Sleepyz climb up on you throughout the day with the intention of driving you back to bed.
The blanket illustrates the picture story in several ways, first by having you crochet several dozen Zs, the mischief-makers in the tale. The next part of the pattern has you crocheting the blanket and sewing on the Zs, which represents how the Sleepyz join forces by weaving themselves into a blanket. Each stitch in the blanket even corresponds to one of the methods employed by the Sleepyz to send you to dreamland. The resulting super soft and cuddly blanket makes you want to curl up and go to sleep.
This Sleepyz Blanket project has been quite a journey. And I’m so thankful to everyone for following along and having patience as I tried out yarns and tinkered with ways to construct the Zs and join them. Thanks so much for all your support and advice! I hope you enjoyed this series and the finished blanket and story.
Other articles in this series:
“All Tuckered Out”
Joining Forces
Crocheting Zs Everywhere I Go
Playing with Yarn
Making Zs by Trial and Error
Big Decisions to Make
Introducing the Sleepyz Blanket!
The Sleepyz Blanket Crochet Pattern

Finished size of a Z appliqué: 3 1/2″ wide by 4 1/2″ tall
Finished size of blanket: 38” by 56”
Finished size of blanket with optional Sleepy-Z border: 46” by 63”
Gauge
5 sts = 1 inch
Pattern Table of Contents
Materials
Crochet Z Applique Pattern
Blocking the Zs
Crochet Blanket Panels Pattern
Sew Zs to the Blanket
Sew Blanket Panels Together
Crochet Border Pattern
Optional Sleepy-Z Border Pattern
Materials
Note: I can imagine doing this blanket with several different color schemes. You might try a darker background. You might want to make Zs in only one color instead of four. There are no boundaries here. Choose the colors you like and make it your own. If you’d like to make one just like mine, I’ve provided the details about these yarns in parentheses.
For MC: 1500 yds of worsted-weight cotton (10 skeins of Blue Sky Alpacas Worsted-Weight Organic Cotton in Drift, 100 g / 150 yds)
For Zs: 600 yds of worsted-weight cotton (1 skein each of Blue Sky Alpacas Worsted-Weight Organic Cotton in Thistle, Aloe, Stone, and Mediterranean, 100 g / 150 yds)
H-8 (5.00 mm) crochet hook
All-purpose thread to match the yarn you chose for your Zs and the MC (for the bottom bobbin, if you’re using a sewing machine)
Sewing needle or sewing machine (use a heavier duty needle on your machine, size 14 worked well for me)
Yarn needle
Blocking boards (or a flat surface and towels)
Rust-proof straight pins or T-pins for blocking
1/2″ googly eye buttons (optional)
For the Optional Sleepy-Z Border you will need these additional skeins of yarn:
150 yds of worsted-weight cotton in MC (1 skein Blue Sky Alpacas Worsted-Weight Organic Cotton in Drift)
300 yds of worsted-weight cotton in the colors you chose for the Zs (2 skeins of Blue Sky Alpacas Worsted-Weight Organic Cotton) * This yardage takes into account 105 yards you should have leftover from crocheting Zs for the main blanket.
Instructions
STEP 1: Crochet Zs
For Sleepyz Blanket, make 56 Zs. (If you’re doing 4 colors like I did, that would be 14 Zs crocheted in each color.)
For Sleepyz Blanket with the Optional Sleepy-Z Border, make 100 Zs (56 for the blanket and 44 for the border).
 Crochet Z Applique Pattern

Special Instructions:
Dec till you drop over 3: Pull up a loop in next st, sk next st, pull up a loop in next st, yo and pull through all 3 loops on your hook.
Dec till you drop over 5: Pull up a loop in ea of the next 3 sc, sk next st, pull up a loop in next sc, yo and pull through all 5 loops on your hook.
Ch 39.
Row 1: Sc in 2nd ch from hook and in next 10 ch, dec till you drop over 3, sc in next 14 ch, 3 sc in next ch, sc in next 9 ch, ch 1, turn.
Row 2: Sc in next 10 sc, 3 sc in next sc, sc in next 14 sc, dec till you drop over 3, sc in next 10 sc, ch 1, turn.
Row 3: Sc in next 8 sc, dec till you drop over 5, sc in next 13 sc, sc 3 in next sc, sc in next 11 sc. FO and weave in ends.
 STEP 2: Block the Zs
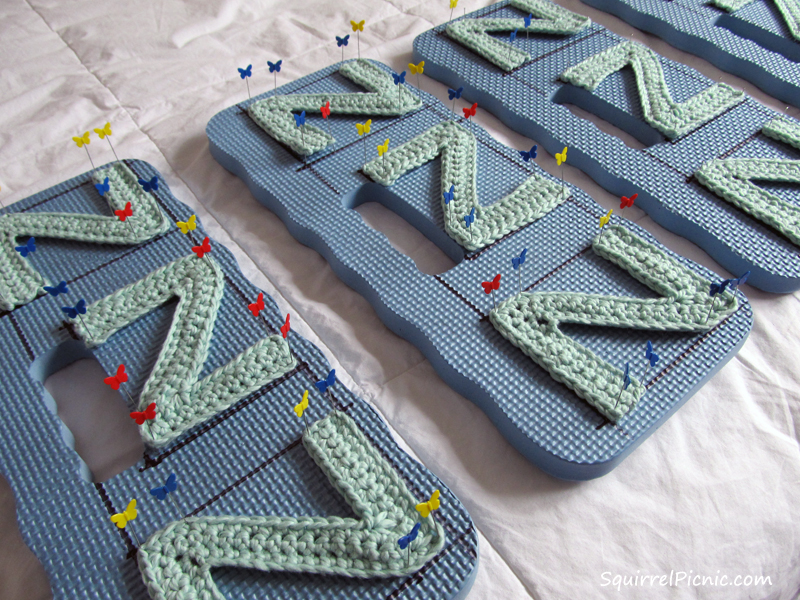
To block all of my Zs, I purchased 4 inexpensive kneeling pads for gardening. With a black marker, I drew 3 1/2″ x 4 1/2″ boxes to indicate the size all my Zs should be blocked too. Then I laid out my Zs, wet them with a spray bottle, and pinned them in place with straight pins to dry overnight.
If you don’t have blocking boards, lay out your Zs on a towel, spray them, pin them, and measure them as you go to ensure they are all relatively the same size.
Reference your yarn’s care instructions before blocking.
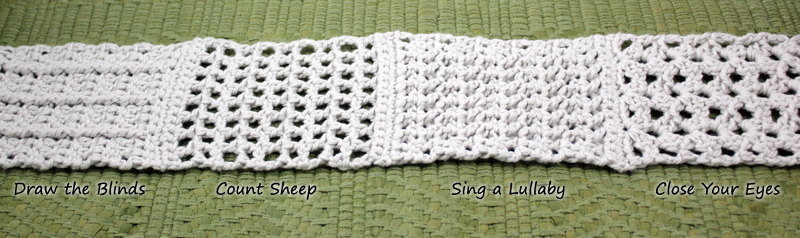
STEP 3: Crochet Blanket Panels (Make 7)
Crochet Blanket Panels Pattern
Special Instructions:
For Sing a Lullaby Stitch, you will need to know how to do a cross double crochet stitch.
For Draw the Blinds, you will need to know how to crochet FPdc and BPdc.
FPdc = Front-post double crochet
BPdc = Back-post double crochet
With MC, ch 17.
Foundation Row: Sc in 2nd ch from hook and ea ch across, turn. (16)
Close Your Eyes
Row 1: Ch 3, sk 1st st and next 2, * (2 dc, ch 3, 2 dc) in next st, sk 3, rep from * until 4 sts remain. Dc in last st, turn.
Row 2: Ch 3, (2 dc, ch 3, 2 dc) in ea ch-sp across, dc in top of turning ch, turn.
Rep Row 2, 7 more times for a total of 8 rows done in Close Your Eyes stitch.
Row 3: Ch 1, sc in ea st and ch-sp across, turn. (16)
Row 4: Ch 1, sc in ea sc across, turn.
Sing a Lullaby
Row 1: Ch 3, sk 1st st, dc in next st. * Sk, dc in next st. Holding working yarn in front, dc in skipped st (A.K.A. cross dc). Rep from * to last 2 sts. Dc in last 2 sts. Turn.
Rep row 1, 9 more times for a total of 10 rows done in Lullaby stitch.
Rows 2-3: Ch 1, sc in ea st across, turn.
Count Sheep
Row 1: Ch 4, sk 1st st, dc in next st. * Ch 1, sk, dc in next st. Rep from * to the end, turn.
Row 2: Ch 4, sk ch-sp, dc in next dc. * Ch 1, sk ch-sp, dc in next dc. Rep from * to the end, dc in 3rd ch of turning ch, turn.
Rep row 2, 8 more times for a total of 9 rows done in Count Sheep stitch.
Rows 3-4: Ch 1, sc in ea st across, turn.
Draw the Blinds
Row 1: Ch 3, sk 1st st, * dc in next 2 sts, FPdc in next st, rep from * to last 3 sts. Dc in last 3 sts, turn. (16)
Row 2: Ch 3, sk 1st st, * dc in next 2 sts, BPdc in next st, rep from * to last 3 sts. Dc in last 2 sts and top of turning ch, turn.
Rep rows 1 and 2 until you have a total of 11 rows done in the Draw the Blinds stitch.
Rows 3-4: Ch 1, sc in ea st across, turn.
Do not FO after first time through. Return to Close Your Eyes Stitch Pattern and repeat pattern for all 4 blocks 1 more time (8 blocks total).
STEP 4: Sew Zs to the Blanket Panels
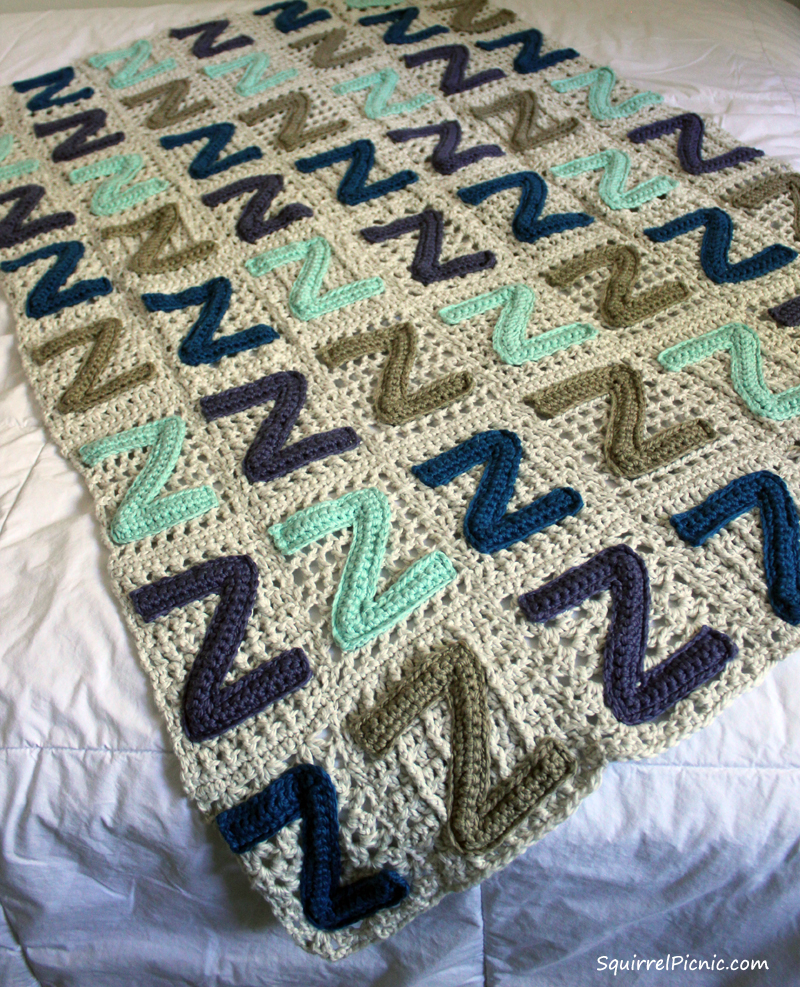
Lay out your 7 blanket panels side by side with RS up. I chose to turn every other panel around so as to create a checkerboard pattern with the blocks of different stitches. You could also orient them in the same direction to get a stripe pattern.
Arrange your Z appliqués, 1 to each block. I’ve provided a few sample layouts for you to consider: stripes, diagonal stripes, and totally random. (In these examples, there are 14 Zs in each color.)

Using thread to match each Z, either hand sew or machine sew a Z to the center of each block on the RS of the panels.
STEP 5: Sew Blanket Panels Together
Arrange the panels side by side as you did in Step 4.
Lay a panel atop another with right sides together. Using MC, whipstitch the panels together. Repeat for the rest of the panels.
STEP 6: Crochet the Border
Note: Count your sts as you go to ensure that you have the same number of sts on top and bottom, and the same number of sts on the sides or your blanket may turn out lopsided. Just for reference, I ended up with 118 sts on the top and bottom and 150 sts on each of the sides.
 With RS facing, attach MC at a corner.
Rnd 1: (Sc, ch 2, sc) in this corner st. Sc in ea st around the blanket and (sc, ch 2, sc) in ea corner st. Join with slst to 1st st.
Rnds 2-3: Ch 3, dc in ea st around and (2 dc, ch 2, 2 dc) in ea corner st. Join with slst to top of ch-3.
Rnd 4: Ch 4, (sk next dc, dc in next dc, ch 1) all the way around and (dc, ch 2, dc, ch 2, dc, ch 2, dc, ch 1) in ea corner ch-sp. Join with slst to top of ch-3.
Rnd 5: Ch 3, dc in ea dc and ch-sp around and (2 dc, ch 2, 2 dc) in ea corner ch-sp.
I recommend wet blocking your blanket before using or giving it as a gift.
Your Sleepyz Blanket is done! Hurrah!

If you would like to add a Z border, please continue with the instructions below.
Optional Sleepy-Z Border
For this border, you will need the 44 additional Zs that you made in Step 1.
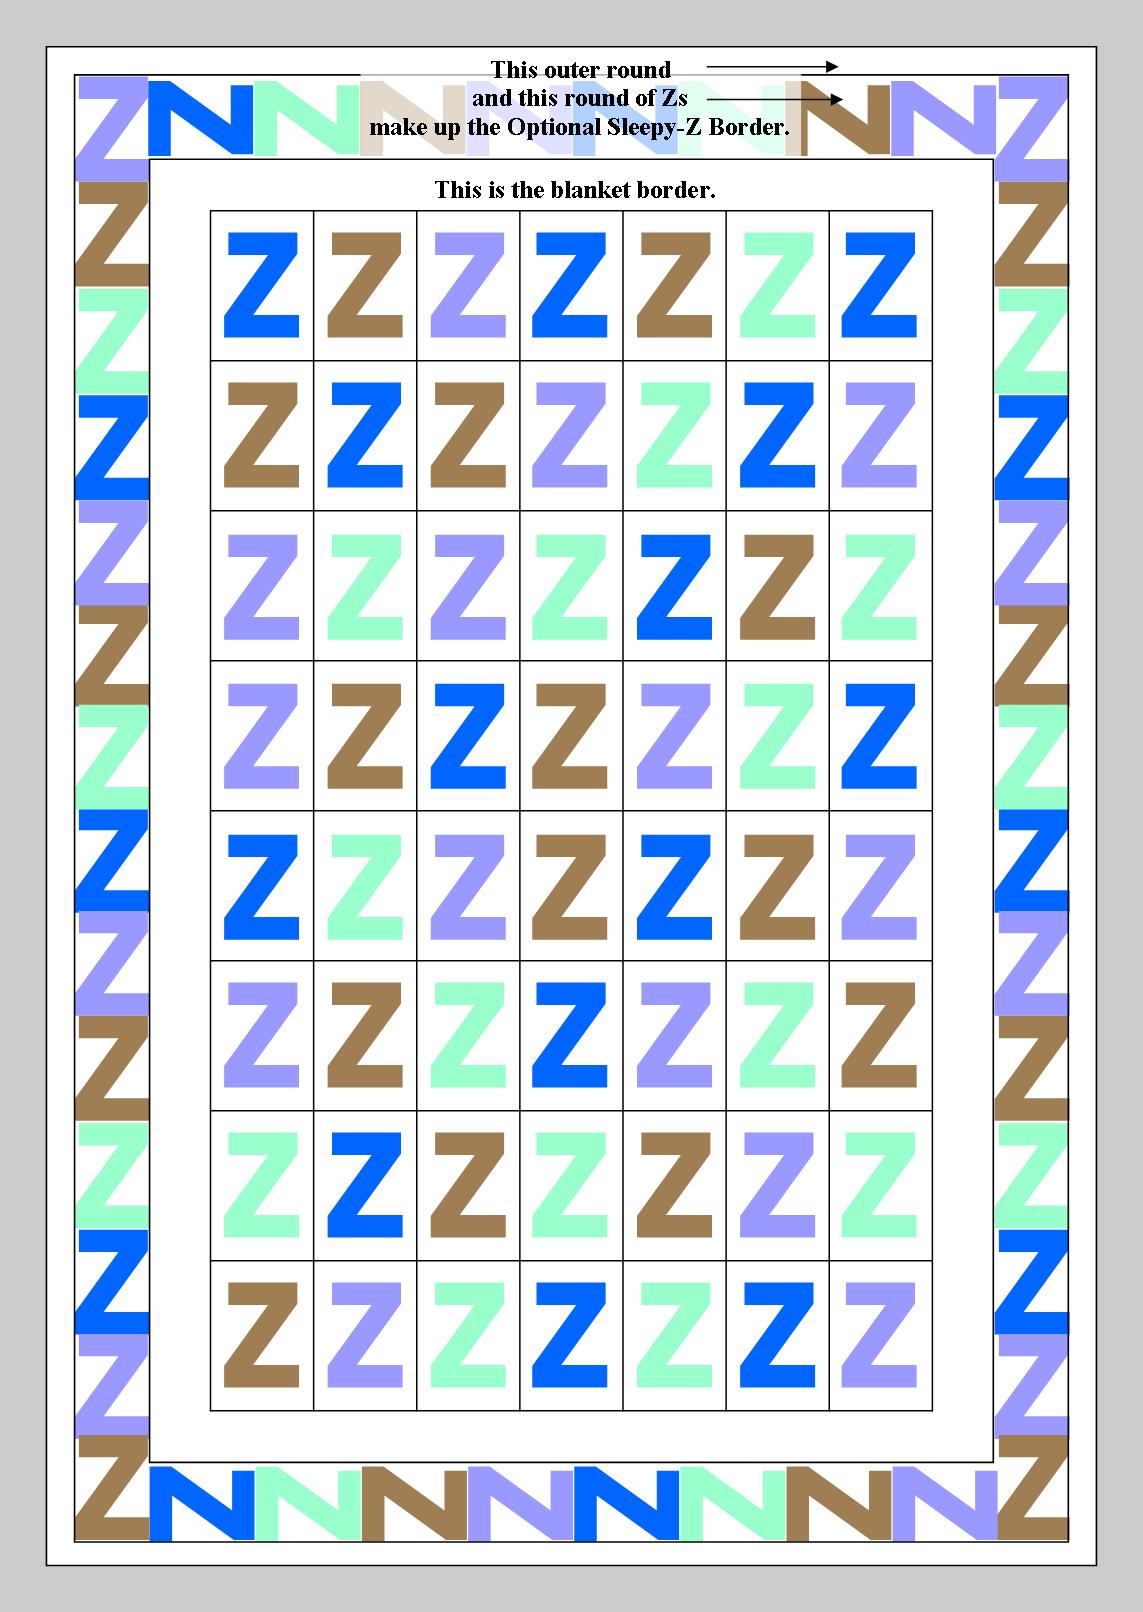
Lay out your blanket RS up and arrange your Zs length-wise (top to bottom) around the perimeter.
Join the Zs to each other, top to bottom, either by hand sewing or machine sewing. I sewed mine using a machine by lining up two Zs next to each other (not overlapping) and zig-zag stitching them together. If you sew them together by hand, I would suggest using any leftover yarn and an invisible join (meaning you arrange them with RS together and whip stitch through the outer loops of each stitch).
Once you have strips of Zs for the top, bottom, and sides, it is time to crochet them onto the blanket.
Laying the blanket face up, arrange the first strip of Zs face down on top of the blanket, along the border. Check to make sure that the strip is aligned correctly. Pin the legs of the Zs to the blanket so that they lay flat and are square. (See image 1 below.)
Rnd 1: Attach yarn to the corner st. Join the legs of the Zs to the blanket by slst. Slst in ea unused st across as well. There should be about 7-8 unused sts between each set of Z legs. (See image 2 below.) Sc 3 in ea corner. Then repeat with the next strip of Zs, and so on all the way around. FO. (See image 3.)
-
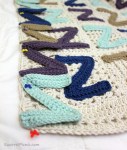
- 1) Pin your strip of Zs to the blanket with RS together.
-

- 2) Slst legs of the Zs to the blanket. Slst in unused stitches too.
-
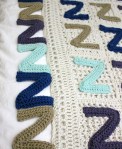
- 3) Unfold, and your Sleepy-Z border should look like this.
Sew the corner pieces together with an invisible join.
Rnd 2: Attach yarn before a corner and ch 3. Dc in ea st and (2 dc, ch 2, 2 dc) in ea corner around. Join with slst to top of ch-3. FO and weave in ends.
Wet blocking your blanket will improve its appearance. It’s especially useful in getting your Z border into shape so that all the Zs are flat. Reference your yarn’s care instructions before blocking.
To really make it look like the Sleepyz Blanket from “All Tuckered Out,” sew googly-eye buttons on each of the Zs!
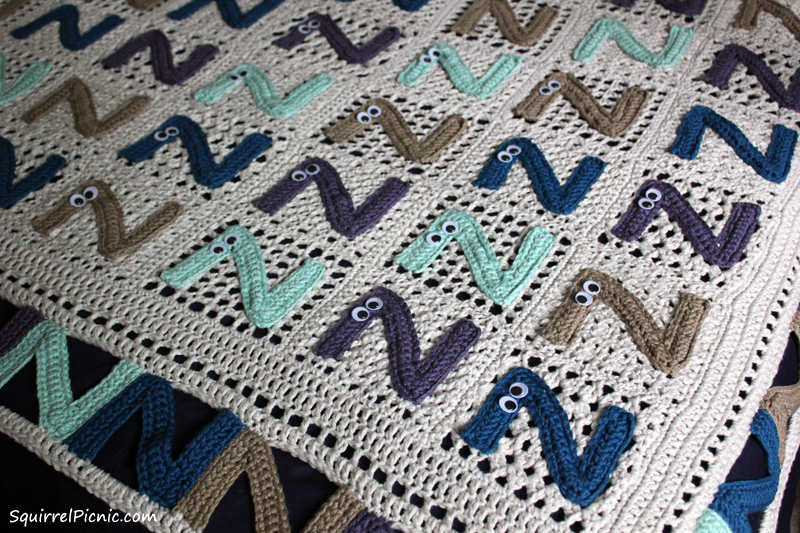
Sweet dreams!


June 12, 2014 at 6:01 am
Oh, it’s perfect! Well done! 🙂
June 12, 2014 at 8:18 am
Thank you, Sheena!
June 12, 2014 at 7:20 am
Wow! That is a lot of work!! You did a fantastic job on your blanket, and I shared! Sandy
June 12, 2014 at 8:18 am
Thank you so much, Sandy! It’s been so nice to have your support throughout this project. It has really meant a lot to me.
June 12, 2014 at 8:56 am
Your welcome!! I was keeping tabs on how hard you worked to get everything just right….it was work along with all the other things we do in life! Lol….great job and your post is doing well!! Sandy
June 12, 2014 at 9:28 am
You’re the sweetest! Thanks again for sharing it with your friends!
June 12, 2014 at 10:55 am
Your welcome!
June 12, 2014 at 7:52 am
It looks awesome! And you sewed googly eyes to each Z?? Amazing! Thank you for sharing the pattern 🙂
June 12, 2014 at 8:17 am
Thank you, Patricia! You’re awesome. I think it looks better with the googly eyes than without. They make me smile. 🙂
June 12, 2014 at 6:07 pm
What can I say in a few words? I will start with “I love it”. Your inexpensive blocking tip was a triumph! I love the way one could use any color scheme or simply use it it as a stash buster. I want to make one! (I am positively itching to!) So generous of you to give the pattern. I have so much on at the moment but why not start a little bag for zees? I rarely have UFO’s but I think I will make an exception. 😀
June 13, 2014 at 12:29 pm
Thanks, Sharon! I am honored that you would fit this into your schedule. That is one of the nice things about this project — it is very portable. The Zs can be made anywhere and the blanket panels travel well too. It isn’t until you have to start sewing things together that it becomes cumbersome. I hope you are having an easy transition into your new work. It sounds like you are having a fun time! Good on ya!
June 13, 2014 at 7:25 am
Jennifer, the blanket is absolutely beautiful! I really, like it very much. It was hard work you’ve done and have no words to thank you enough for your generosity to share this pattern with us.
You are the best! 🙂
Thank you
June 13, 2014 at 12:26 pm
Vanja, I am so glad you like it. You’re right, it was hard work, but knowing that fellow crocheters like you appreciate it makes it all worthwhile!
June 16, 2014 at 7:48 am
YAY – thank you thank you thank you for the pattern – It’s been hilarious to follow your journey towards this AMAZING blanket. I’m ready to follow your next projects, when you are 🙂
June 16, 2014 at 12:20 pm
Thanks, Lene! It means so much that you have followed the journey from the start. I’m very glad that you like how it turned out. And I’ve got plenty more projects up my sleeve that I think you might enjoy. 🙂
June 19, 2014 at 8:13 pm
That is totally awesome! I love it and the story!
June 23, 2014 at 12:13 pm
Thank you so much!
Pingback: Amigurumi Tutorials Free Crochet Patterns – Part 3
May 20, 2015 at 6:55 pm
Reblogged this on cindyzs.