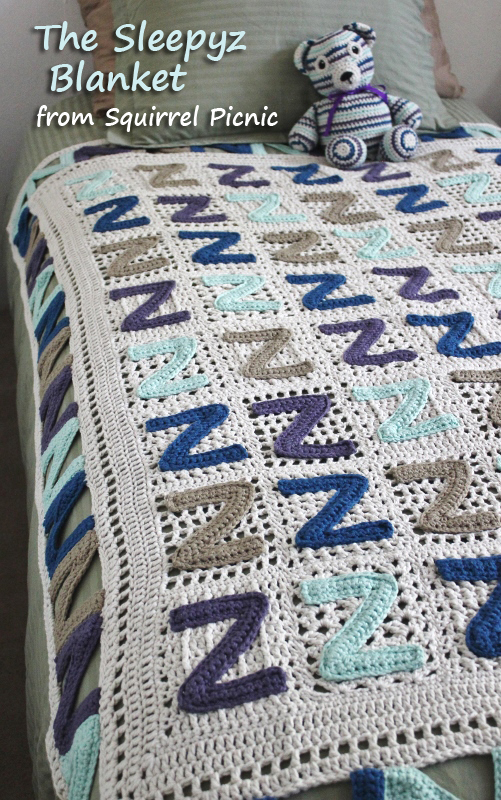
The Sleepyz Blanket is the very first of what I’d like to call my story patterns — patterns that help to tell a story in both the finished piece and its creation. What I found through this project is that the story behind the piece continues to entertain as you’re crocheting. Each step in the pattern contains little prompts that will delightfully remind you of the story.
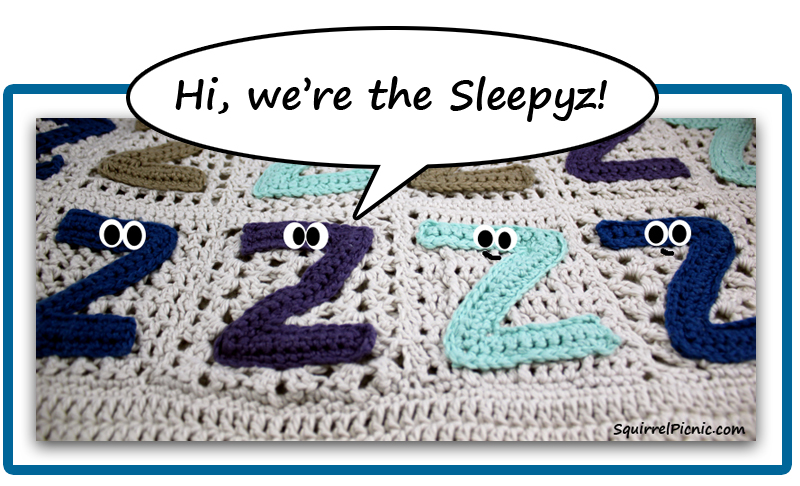
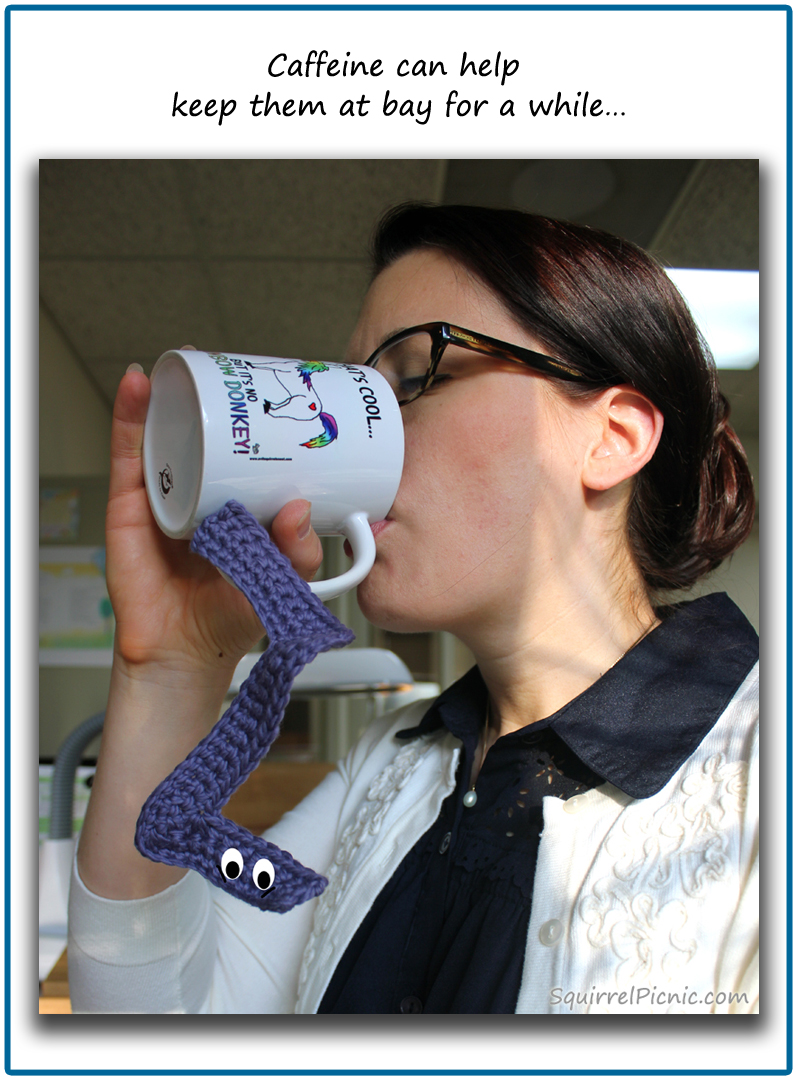
The story behind the Sleepyz Blanket, “All Tuckered Out,” is a creative take on why we get progressively sleepier as the day goes on. In this picture story, little creatures called Sleepyz climb up on you throughout the day with the intention of driving you back to bed.
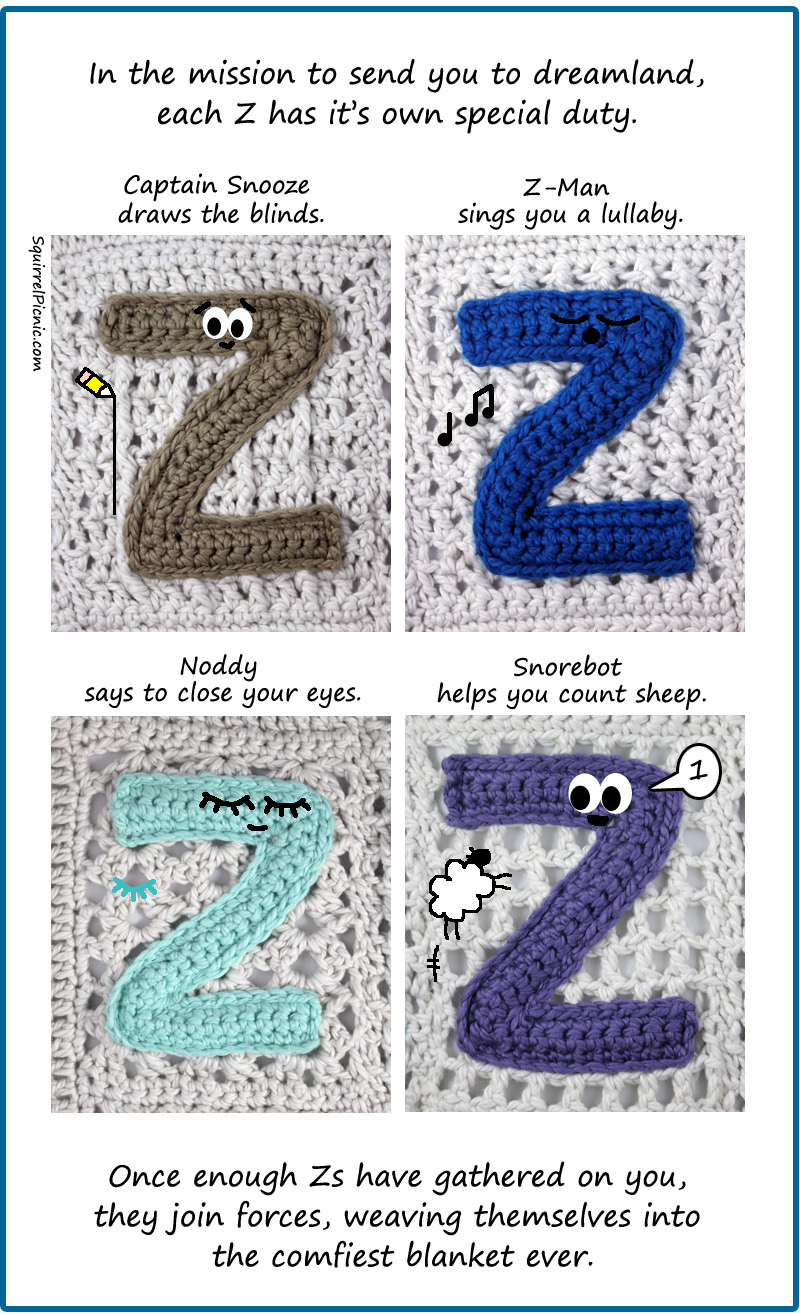
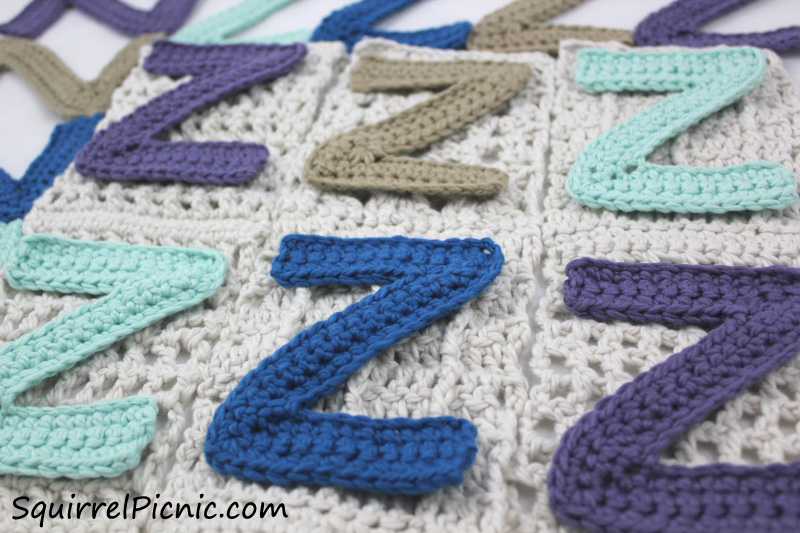
The blanket illustrates the picture story in several ways, first by having you crochet several dozen Zs, the mischief-makers in the tale. The next part of the pattern has you crocheting the blanket and sewing on the Zs, which represents how the Sleepyz join forces by weaving themselves into a blanket. Each stitch in the blanket even corresponds to one of the methods employed by the Sleepyz to send you to dreamland. The resulting super soft and cuddly blanket makes you want to curl up and go to sleep.
This Sleepyz Blanket project has been quite a journey. And I’m so thankful to everyone for following along and having patience as I tried out yarns and tinkered with ways to construct the Zs and join them. Thanks so much for all your support and advice! I hope you enjoyed this series and the finished blanket and story.
Now that I’ve crocheted a ton of Zs, it’s time to join them all together. You may remember from the original story that once the Sleepy Zs get a hold of you, they join forces to take you down (nap time!).
The idea is simple enough, but coming up with a method of joining all those Zs took me months to determine. You probably already know my problem… once again, I had to try things the hard way.
When my husband (the Ideas Man) and I came up with the concept for the Sleepyz Blanket, we had very different ideas in mind. While he said that in the construction of the final blanket it should be obvious that it is made out of Zs, I’ve held a totally different opinion: the Zs should go together to create a completely new design (that may not look like Zs at all). So for months I attempted to connect all these Zs with a join-as-you-go method that would only require two or three FOs. I eventually drew up a chart, decided on an arrangement, and started working on joining them, only to decide in the end that it was just too complicated. Also, the holes in between the Zs were far too big… even by crochet standards. I had to admit that the blanket that this would create would be flimsy and shapeless in the end. Here are some of the design concepts that I explored.
Join-as-you-go.
Staggered Zs.
Block layout.
So it was back to the drawing board and time to consult the Ideas Man again. This time he elaborated on his vision of a blanket with Sleepyz sewn onto it like appliqués. “You’ve got to be kidding me?” I said. “I just spent months crocheting all these Zs and now I have to crochet a blanket for them to go on?!” It took me a while to warm up to this idea, but once I tried it out, I was convinced that it would look better than any of my other options.
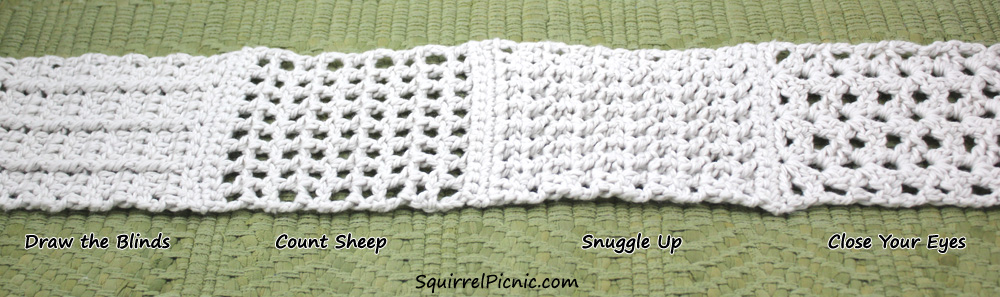
Here’s the plan for the blanket. I came up with four very easy, but also very interesting double-crochet stitches. I’ll crochet long strips made up of blocks done in each of these stitches. Then I’ll sew the strips together and sew on the Zs as well. I might also add a border of Zs and another border in white. What do you think? Could this work?
Best of all, this approach is still in keeping with the original story: the Sleepyz create a blanket in order to wrap you up and send you to dreamland. I’ve even named each of the double-crochet blocks so that I can write them into the story to show how they work together to make you drowsy.
It won’t be long now before it’s all done! I can’t wait to show you the comic that will illustrate the Sleepyz story too. I hope you’re looking forward to the exciting conclusion of this series as much as I am!
It feels like I’ve been crocheting Zs forever! Everywhere I go, I have my yarn and my crochet hook. It’s a great way to keep my hands busy and to pass the time. I find needlecrafts to be very calming, especially when I’m cramped on a bus after a long day at work. So I guess it’s a good thing I have a lot of Zs to crochet! Does crocheting and knitting have a soothing effect on you too?
It’s been about a month since I started crocheting these Zs. Every night when I get home, I toss the Zs I made that day into a box to be wet blocked later. When I finally took a look at my Z stash the other day, I was floored by the number I’ve already made! I almost have the 155 Sleepyz I’ll need to make a standard size afghan, and seeing them all together was a little overwhelming. I found myself getting sleepier and sleepier in their presence. It shouldn’t be that surprising, but crocheting Sleepyz will wear you out!
In the park, on the bus, in my office while at lunch. Crochet here, crochet there. I crochet Zs everywhere!
When I last left you I had just figured out how to crochet a Z. It seems I was so excited about sharing how I made a Z that I totally forgot to tell you about all the fun I had winding up the yarn. I must’ve been super sleepy that day. I hope you don’t mind if I backtrack a bit.
Winding yarn is one of my favorite things to do. It ranks right up there with popping bubble wrap and watching videos of baby animals. So one morning, as soon as hubby was gone and the coast was clear, I whipped out my ball winder and swift and set to work winding up ball after ball of my beautiful new cotton.
It’s not that I don’t want Shelby around. He doesn’t mind my taking up the entire kitchen table with yarn. In fact, he’s very helpful. Last time I had a lot to wind, he noticed how I held the yarn to help feed it onto the ball winder. He offered to hook me up with something that would do that for me. I looked at him like he was crazy and said, “But you don’t understand, that’s the best part. I get to feel the yarn as it winds into a ball. It’s so soft and luxurious, and I can just imagine what fun it will be to work with it and turn it into something wonderful!” He, understandably, looked at me like I was crazy.
I’ve decided, I guess, that people are welcome to watch, but I’m finding it’s more of a thrill if I just wind my balls in private. For those who have never tried it, here’s how the process works. Often the yarn you purchase is in skeins. That just means that it is looped around and around in one big coil (like a garden hose). This isn’t much fun to work with as is. It’s easier to use if it’s in a ball. I used to use the back of a chair to hold the yarn and wind it up by hand. But now that I have my handy-dandy swift and ball winder, it is much easier. You load the skein onto the swift and thread a loose end of the yarn through the guide on the ball winder and into the slot on the top of the post around which it wraps. Then you just turn the crank on the ball winder and the swift gets to going, feeding the yarn to the ball winder. You can get them to go really fast! (I guess that’s the thrilling part.) Before you know it, you have a ball of yarn that feeds from the center. That’s the best kind, in my opinion.
Well, time to get back to crocheting those Zs. I hope that when we meet again I have lots of Sleepy Zs to show you.
Blue Skies Alpaca Worsted Cotton for the Sleepyz Blanket
A swift gets the job done swiftly. He-he.
The swift feeds the yarn from the skein to the ball winder.
I usually do things the hard way. Remembering this whenever I am struggling with a design has often helped me to stop and look for an easier solution. Still, it usually takes many attempts and a significant amount of frustration before I see the easier path open up before me.
There are a few things in particular I strive for when creating a pattern: (1) I really do try to make it as easy as possible, (2) I hate having to cut and reattach yarn and weave in ends, so I try really hard to limit the number of FOs there are in a pattern, and (3) I also hate having to sew things together, mostly because it creates more ends to weave in, so I try to create designs that can be crocheted in one piece.
Taking all that into consideration, here is the process I went through to create the Z-motif pattern for the Sleepyz Blanket. I was really perplexed by this task for some reason. It took me a whole day to figure it out. It didn’t seem to matter what angle I approached it from, it just wasn’t working. But one of the great things about crochet is that there are usually several ways to achieve any one look. It all depends on the approach. If one thing isn’t working , just try something else.
So I looked at the Z from several different angles. I started off thinking of the shape as a “7” with a leg on the bottom. I started with a chain and single crocheted about three quarters of the way up the chain, put 3 single crochets in one stitch to turn around the corner, and then single crocheted in each chain along the top. But that meant I would have to go around and back down to create the other leg and that would give the legs an uneven thickness. Plus I was having trouble wrapping my brain around how to do an interior bend (the opposite of the 3-scs-in-1 stitch). So I gave that up pretty quickly.
Next I thought of the shape as 2 Vs that connect at the center. I found a pattern in one of my books that made a V by doing a decrease that skips one st in the center. First you insert your hook and pull up a loop, sk 1 sc, pull up a loop in the next sc, yo and pull through the 3 loops on your hook, and ta-da, you have a V! This created a nice V, but putting them together to form a Z was really silly. I even felt the need to sew them together with a contrasting yarn, thinking that maybe it could double as the Z’s mouth… and eyes!
What if I crochet a 7 with a leg at the bottom? Nope.
What if I make 2 Vs with the 3-in-1 method? Nope.
I don’t even know what I was doing here.
What if I make 2 Vs with the dec-sk-1-in-the-middle method? Nope.
What if I just sew them together with a smiley face? Nope.
Finally my husband came home and saw what a mess I had made with these Zs and said, “Why can’t you just make it one piece?” I started to answer, “Because I can’t do the corner the same way on both sides… wait — Eureka!!! I learned how to do both turns today, I just hadn’t put it all together until now!”
So I ran into the other room, pulled out my graph paper and drew out the Z, with 3-sc-in-1 turns at the top and decreases that sk 1 in the center at the bottom. After that, the pattern just came right together. After making a few more Zs I discovered that changing the decrease at the bottom to “pull up 1 loop in ea of the next 3, sk, pull up 1 loop” creates a tighter angle that does a better job of holding the lower leg perpendicular.
And that’s how I came up with my Z. I can’t believe that it took me so long to come to such a simple conclusion, but I told you… I always have to do things the hard way first.
Stay tuned and I’ll reveal the Z pattern when I publish the complete Sleepyz Blanket pattern in April.
 The Sleepyz Blanket is the very first of what I’d like to call my story patterns — patterns that help to tell a story in both the finished piece and its creation. What I found through this project is that the story behind the piece continues to entertain as you’re crocheting. Each step in the pattern contains little prompts that will delightfully remind you of the story.


You must be logged in to post a comment.