Sleepy Bear has long been one of my favorite patterns, and from the number of Sleepy Bears you all have made, I’d say he’s one of your favorites too! It always makes my day when someone shares a photo of a Sleepy Bear they’ve made. Each one has such a unique personality. I love it!
When fellow picnickers Nelle Helleur and Janette Vanzanen shared photos of their Sleepy Bears decked out in pajamas and nightcaps, I knew that I just had to create some accessories for my bears too. Any nap really wouldn’t be complete without a nightcap and a blanky, after all. Thank you both for the inspiration!
And finally I’m ready to share these patterns with you. Continue reading →
We had one of our customary spring snowfalls this past week in Colorado. It melted quickly, leaving behind greener grass, which the robins enjoy plucking through in their search for worms. I love to watch them hop about. There’s something very comforting about seeing the robins return. Perhaps it means that the snows have finally passed and we can look forward to warmer weather.
I want to share a favorite poem of mine with you, written by Louisa May Alcott when she was just 8 years old. Its welcoming of spring and the robin is so dear. I hope you enjoy it too.
To the First Robin
Welcome, welcome, little stranger,
Fear no harm, and fear no danger;
We are glad to see you here,
For you sing “Sweet Spring is near.”
Now the white snow melts away;
Now the flowers blossom gay:
Come dear bird and build your nest,
For we love our robin best.
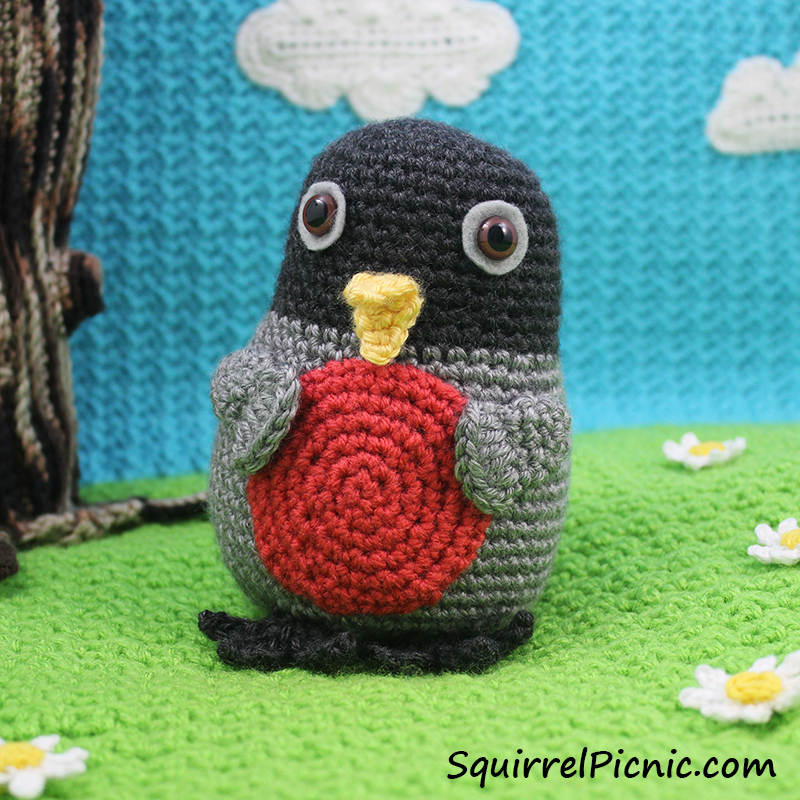
Celebrate spring with a robin of your own. Roly-Poly Rosa Robin is a dear little one with her charming expression and a plump belly (full of worms, I imagine). This easy crochet fatimal pattern will whip up quickly and delight the bird lover in your life.
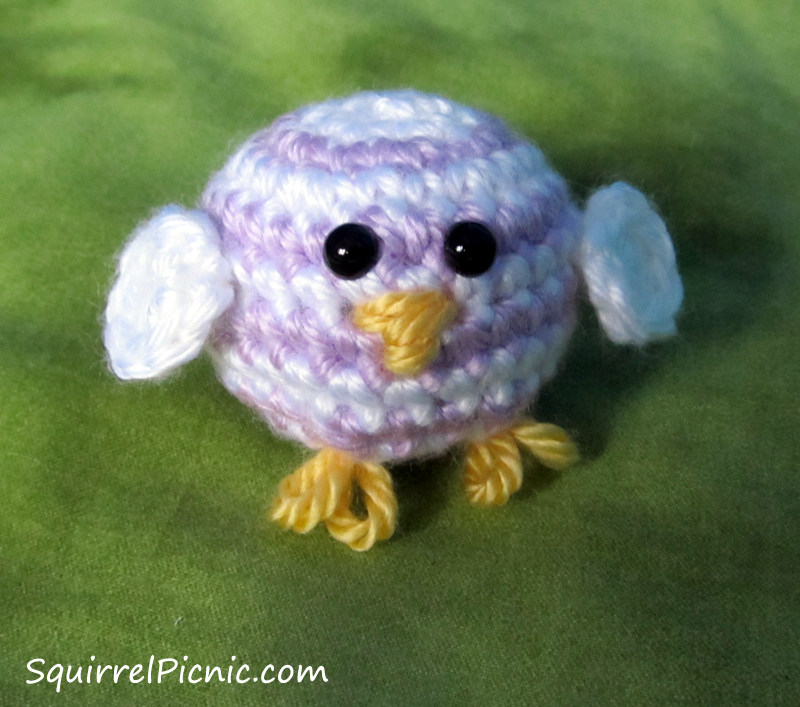
Baby rainbow chicks are just about the cutest creatures on the planet. Each spring, a rainbow chicken will lay between six and twelve pastel-colored eggs. These eggs are often mistaken for candy, so the female rainbow chicken must guard her nest very diligently against sweet-toothed woodland critters.
Baby rainbow chicks are very rambunctious. They hop around like bouncy balls on a sugar high. But they’re ridiculously adorable, so most everyone puts up with them.
They whip up super quick, so you can crochet a dozen in no time flat. They fit comfortably in plastic Easter eggs too.
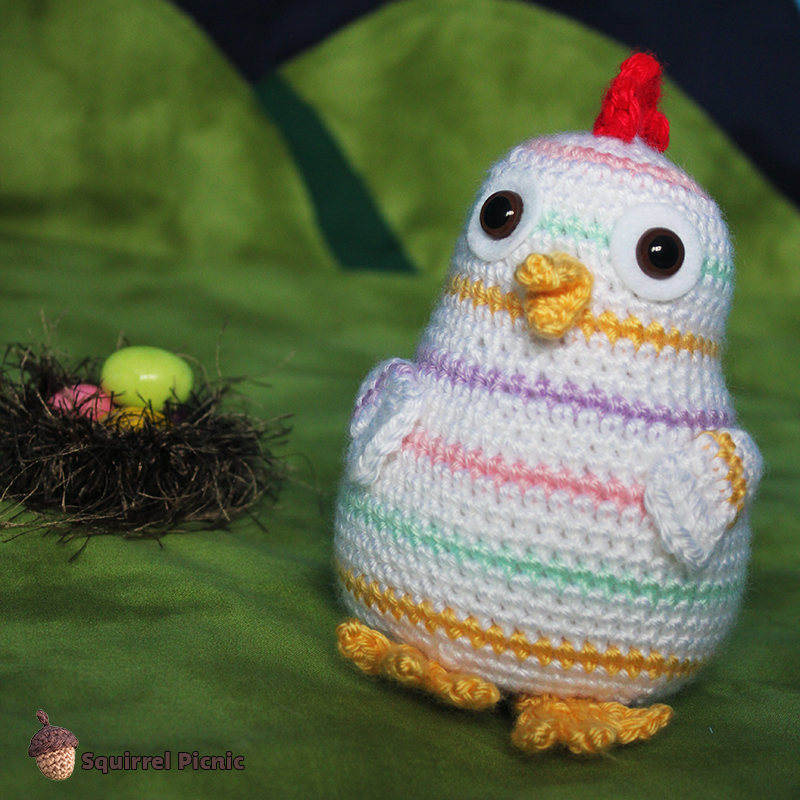
I think we’ll call this one Pepito. Thanks to Sheena (NotAPunkRocker) for the name!
Baby Rainbow Chick Crochet Pattern
Finished size: 1 1/2″ tall and 5″ around at the widest point
Materials
small amount of worsted-weight yarn in white (Caron Simply Soft in White, 6 oz [170 g] / 315 yds [288 m])
small amount of worsted-weight yarn in purple (Caron Simply Soft in Orchid, 6 oz [170 g] / 315 yds [288 m])
small amount of worsted-weight yarn in yellow (Caron Simply Soft in Sunshine, 6 oz [170 g] / 315 yds [288 m])
F-5 (3.75 mm) crochet hook
1 set of size 6 mm safety eyes (if you are making this for a child, please embroider eyes)
Polyester Fiberfill
Tapestry needle
Gauge
5 sts = 1″
5 rows = 1″
Instructions
Body
Note for changing color: This chick is crocheted in joined rounds in order to create almost perfect jogless stripes. In other words, each round ends with “join with slst, ch 1.” On the rounds with a color change, join with slst as usual, but use the next color to ch 1.
Of course, you could always fasten off each color and reattach the new color. This will give you a more precise stripe, but you’ll have to weave in some ends (or just tie them on the inside), which could be annoying… unless it’s your favorite part, then by all means, knock yourself out!
With white, ch 2
Rnd 1: 6 sc in 2nd ch from hook. (6)
Rnd 2: 2 sc in ea sc around, join with slst, switch to purple, ch 1. (12)
Rnd 3: * Sc, inc, rep from * 5 more times, join with slst, switch to white, ch 1. (18)
Rnd 4: * 2 sc, inc, rep from * 5 more times, join with slst, switch to purple, ch 1. (24)
Rnd 5: Sc in ea sc around, join with slst, switch to white, ch 1.
Rnd 6: Sc in ea sc around, join with slst, switch to purple, ch 1.
Rnds 7-8: Rep rnds 5-6.
Rnd 9: * 2 sc, dec, rep from * 5 more times, join with slst, switch to white, ch 1. (18)
Insert posts of safety eyes between stitches in Rnds 5 and 6 and pop on the backs to secure. Stuff chick firmly.
Rnd 10: * Sc, dec, rep from * 5 more times, join with slst, switch to purple, ch 1. (12)
Rnd 11: Dec 6 times, join with slst. FO, leaving a long tail. Using tapestry needle, thread this tail through the remaining sts and pull tight to close the hole. Weave in end.
Wings (Make 2)
With white, ch 2.
Rnd 1: In 2nd ch from hook: sc, hdc, 4 dc, hdc, sc. Join with slst. FO, leaving a long tail for sewing.
Sew wings to sides of the body.
Beak
Using yellow yarn, embroider a beak.
I made my beak by embroidering the outline of a triangle that points down. Then I threaded through the two bottom sides of the triangle twice to fill it in and hid the end inside the bird.
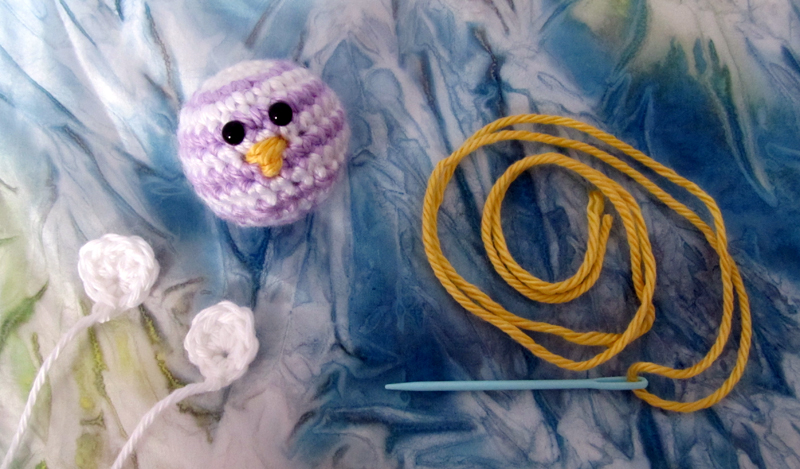
Feet
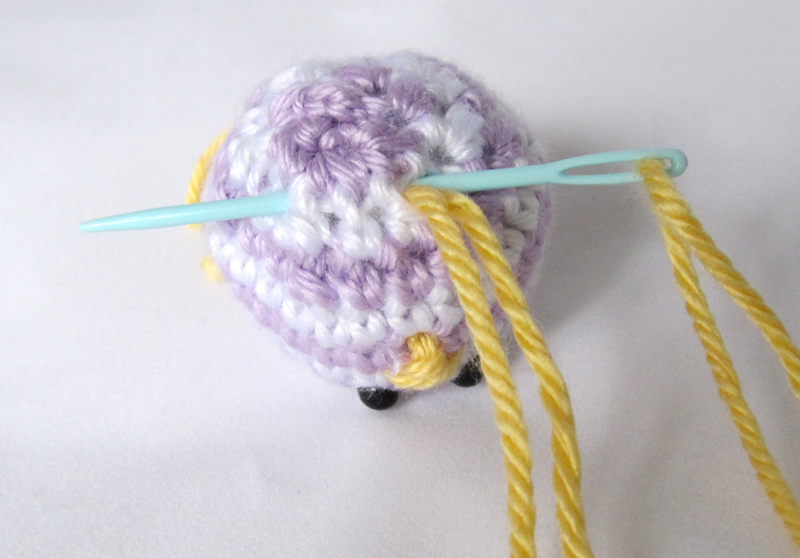
Thread tapestry needle with yellow yarn again and double it up. Insert the needle through the back of the bird (anywhere is fine) to a spot on the bottom (toward the front) where you want to position a foot. Pull the yarn so there’s only a few inches sticking out the back (we’ll take care of those in a bit).
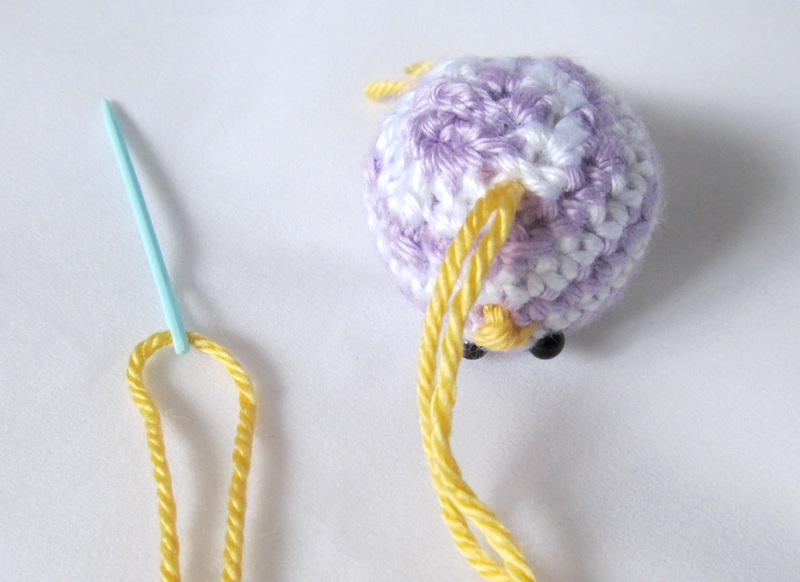
Insert the needle back through this same hole in the bottom front of the bird and out through a corresponding hole on the other side at the bottom of the bird.
Pull through until the two loops are about a 1/4″ long.
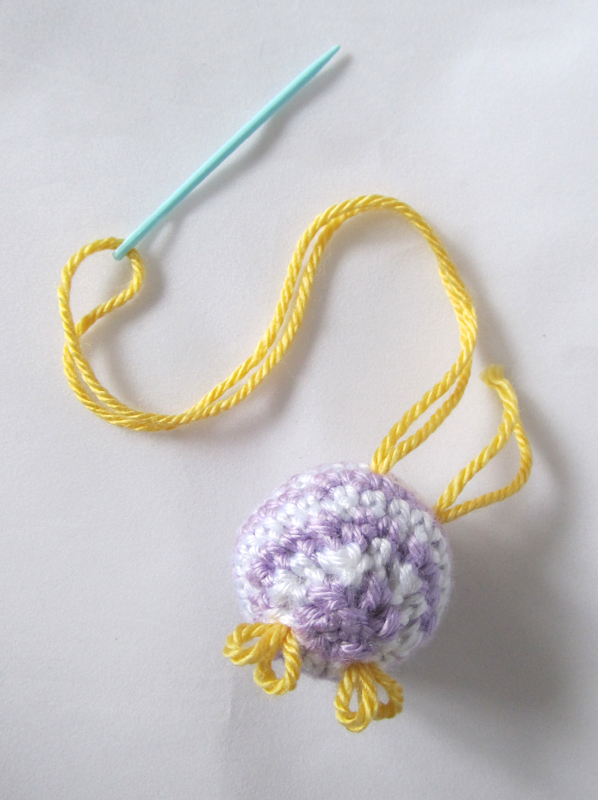
Insert your needle back through the same hole you just came out of and thread it through to the back of the bird again (anywhere is fine). Pull through until the two loops on this side are about the same size as your first two loops.
Trim your yarn and push the ends inside the bird.
Every rainbow chick needs a mama.
Crochet a Mama Rainbow Chick with the free pattern here at the picnic.
Rainbow Chicken is just your average, ordinary, everyday chicken, except that she developed a striped pastel pattern to her plumage after a rainbow fell on her one day. Can you imagine that? I want a rainbow to fall on me too!
She lives in the woods near the picnic and lays pastel-colored eggs in springtime. These eggs look a lot like candy. But are they? You’ll have to stayed tuned for Part 2 of “The Mystery of the Rainbow Chicken” to find out! In the meantime, crochet a rainbow chicken. She’d look super cute in someone’s Easter basket.
About a month ago, my friend Vanja published a crochet pattern for a very cute Mooshka Doll on her AmigurumiBB blog. To be honest, I had never seen a Mooshka Doll before. I thought surely this was a doll that Vanja had made up or one that came from Croatia where she lives. They are irresistibly adorable and undeniably huggable. I had to make one!
For those of you who already know what a Mooshka is, I should explain: when I made my own, I got caught up in crocheting the doll and I forgot about some of the key “Mooshka” elements like the big, round eyes and colorful striped stockings. Now that I look at her, I think she really needs some colorful hosiery.
It wasn’t until after I was finished that I decided to research the origins of the Mooshka. It was a little disappointing to find that the doll didn’t originate in Eastern European folklore, but instead with MGA Entertainment (the makers of Bratz), but she’s still really adorable and she has a good message. According to the website, their story goes like this: a group of paper dolls joined hands and, by the power of friendship, became real girls. They can be bought at Target in the US or made using AmigurumiBB’s fantastic and free pattern.
I would, of course, recommend making one of your very own using Vanja’s pattern. My favorite part was making the hair! It’s crocheted in one separate piece, done in rows that part around the face. You add two little buns to the sides after you sew the hair on. It’s quite cute!
The only trouble I had was with the placement of the arms, but in talking it over with Vanja, we were able to work it out. If after you are done with the head and ready to start the arms, you notice that you are at the front of the body (the head will be horizontal like a flat sewn doll), instead of continuing with the pattern, fasten off your yarn. Then flatten the chest so that you can find the side center stitch. Count 7 stitches back from this, and reattach your yarn there. Count 15 stitches forward (including the stitch where you attached your yarn), and single crochet those 2 stitches together. Continue with the pattern in rounds to create the arm. Repeat for the opposite arm.
The pattern will completely impress you. The hands are elegantly simple. The body is beautifully shaped. And I’ve already mentioned how much I love the hair. You can embroider the facial features as I did or use Vanja’s pattern for those big, beautiful Mooshka eyes.
I have a feeling every little girl is going to want one. Vanja, you really have your finger on the pulse of the American toy industry! Kudos for that and especially for providing this wonderful pattern. Have fun making your Mooshka dolls, everyone!
 Sleepy Bear has long been one of my favorite patterns, and from the number of Sleepy Bears you all have made, I’d say he’s one of your favorites too! It always makes my day when someone shares a photo of a Sleepy Bear they’ve made. Each one has such a unique personality. I love it!


You must be logged in to post a comment.