Squirrel Picnic

Handmade with Love and Stuff


2 Comments

How to Add Faces to Your Amigurumi: Easy Chill Eyes

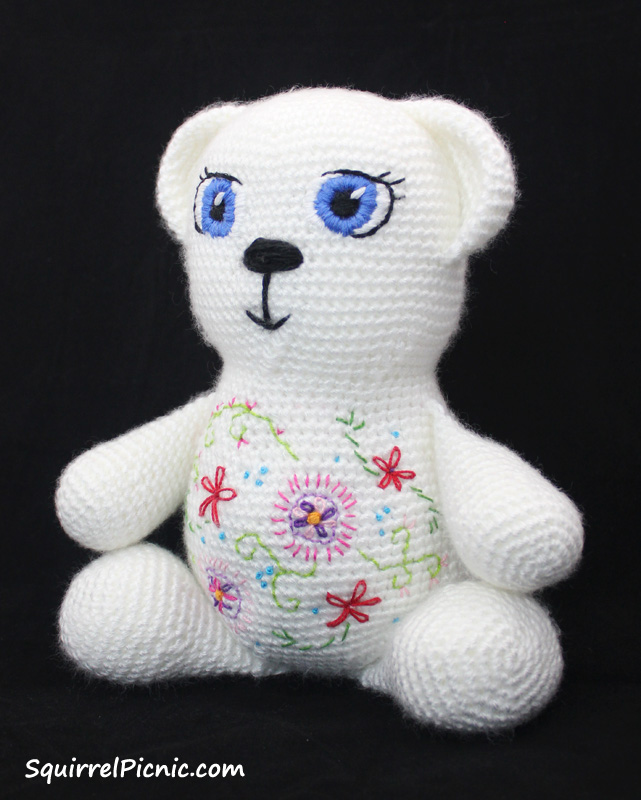
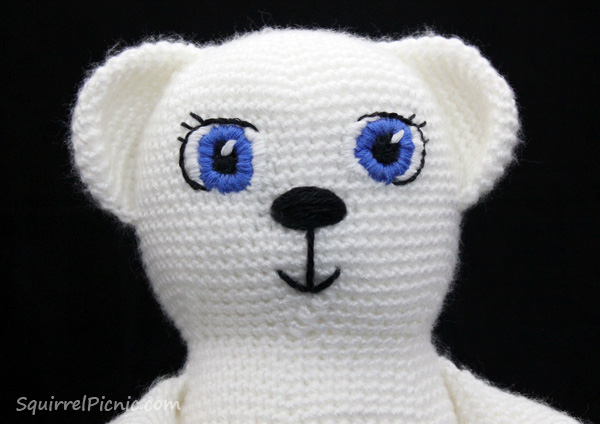
Last week I shared with you my new amigurumi pattern the “Chill Snowman,” which can be found in the Winter 2020 issue of Interweave Crochet. I thought this would be a good opportunity to add another tutorial to my series: How to Add Faces to Your Amigurumi. Lucky for us, the Chill Snowman has a pretty simple face. It’s one of the things I love most about him, aside from his extreme cuteness.

Even though I’ve been making amigurumi for over a decade now, I still feel a certain twinge of anxiety when it’s time to embroider the face. It’s just that it can seem so daunting when the blank canvas of the ami’s face is staring up at you. I’ve developed a few tricks over the years to help me get it right and stitch a face that’s accurate as well as cute. One of the keys to a cute face is to get it centered and my favorite trick is to use landmarks. By this I mean you can use stitches in the body or head, as well as the parts that have already been attached or even the ami’s accessories as guides to where the face should be placed.

Let’s take a look at this with the Chill Snowman. Continue reading

Advertisement


1 Comment

How to Add Faces to Your Amigurumi: Simple Eyes with Felt and French Knots

Ultra Easy Amigurumi Eyes Tutorial by Squirrel PicnicI’m back with another tutorial on how to add faces to your amigurumi. This time I wanted to show you what I do when I just need a simple pair of child friendly eyes and I need them fast. As I’ve mentioned in previous episodes in this series, whenever I’m making a toy for a kiddo, I try to use embroidery instead of safety eyes or buttons.

These eyes use a common embroidery technique: French knots. I used to be really intimidated by this stitch, but just like anything in life, the more you practice, the easier it will get. Making amigurumi eyes is a great way to get in your practice.

If you’re like me and find that it’s hard to achieve consistency with your French knots, you will love this technique. With these eyes, you’re doing one eye at a time (breaking your thread between each eye), so you can pull the knot as tight as you like without having to worry about the slack at the back of your work. We’ll be tying the tails at the back, so the knot will stay in place as well.

So let’s get started… Then, next week, I’ll share with you a pattern that incorporates this technique and double bonus… it’s the next Make It! Challenge.
Continue reading


11 Comments

Creative Wedding Idea! Invite Guests to Decorate Squares for a Quilt

Mixed Media Quilt Square for the Bride by Squirrel PicnicAt the end of February, I received a letter from my aunt whose daughter, the middle child of three, would be married in late June of this year. The mother-of-the-bride had a great idea that she needed the help of the entire wedding guest list to pull off. She was sending to each of us a 6 1/2″ square of fabric with the instruction to decorate it in any fashion we chose. We could embroider it, paint it, scrawl a simple message on it with a fabric pen, just to name a few ideas. The resulting square was to be sent back to her by mid-April so that the squares could all be sewn together to make a quilt — a wonderful keepsake for the bride and groom.

Taking a pleasant Monday off from work, I hit the craft store and purchased cotton batik fabric in two different shades and a white cotton fabric too. I was thankful I was able to find everything else in my own stash.

So armed with a pile of craft supplies and a notion of a design cooking in my imagination, I got to work. Continue reading


24 Comments

Let’s Doodle Stitch!

Doodle Stitch BearI hope you enjoyed the tutorial last Friday on how to use satin stitch embroidery to give your amigurumi some spectacular looking eyes. I had a lot of fun stitching it, and to tell you the truth, I didn’t stop with the face. In this post I’ll tell you more about how stitch-crazy I went with this bear, and I’d like to also address all of you who asked me about where you can go to get lessons in embroidery. Continue reading


22 Comments

How to Add Faces to Your Amigurumi: Satin Stitch Embroidery

Satin Stitch Amigurumi Face Tutorial by Squirrel PicnicI love the look  of satin stitch embroidery, but I don’t use it very often for my amigurumi because, I have to warn you, it does take longer to do than any of the methods I have shown you so far. It also takes a lot of focus, because you have to repeat the same stitch over and over again until an area is filled in. You will probably notice in this tutorial that by the time I got to the white part of the eyes, I had gotten a lot less picky about the straightness of my stitches. Looking back, I wish I would have taken a break halfway through or put the project aside for a day or so. Then I would have been able to come back to it fresh: fresh eyes, fresh mind. In the least, I hope you might learn from my mistake. If you find yourself growing frustrated or impatient, feel free to take a break. You certainly have my permission.

That aside, I think you will be pleased with the results you achieve by using satin stitch embroidery to add details to the faces on your amigurumi. I always think it looks very professional, as this is the technique most often used by large toy companies to manufacture stuffed animals for young kids. Satin stitch embroidery is a great choice for toys that will be used by children of all ages, because you don’t need to worry about any small parts that might present a choking hazard. While the big companies use machines to do all the work, I will show you how to do it by hand. After all, it’s the time and love that you put into it that makes a hand-embroidered stuffed animal so special.

Let’s begin! Continue reading


20 Comments

How to Add Faces to Your Amigurumi: Sleepy Eyes

How to Add Faces to Your Amigurumi: Sleepy Eyes / SquirrelPicnic.comMy series on how to add faces to your amigurumi continues with one of my favorites: the sleepy face. It doesn’t require many materials — all you need is yarn, a needle, scissors, and your crochet or knit toy. In just a few quick steps your adorable toy will have an equally adorable face. Let’s begin… Continue reading