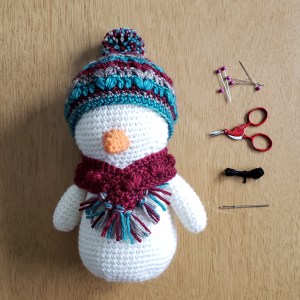
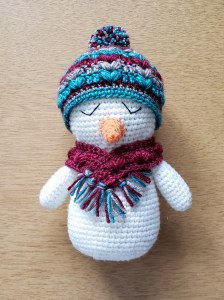
 Last week I shared with you my new amigurumi pattern the “Chill Snowman,” which can be found in the Winter 2020 issue of Interweave Crochet. I thought this would be a good opportunity to add another tutorial to my series: How to Add Faces to Your Amigurumi. Lucky for us, the Chill Snowman has a pretty simple face. It’s one of the things I love most about him, aside from his extreme cuteness.
Even though I’ve been making amigurumi for over a decade now, I still feel a certain twinge of anxiety when it’s time to embroider the face. It’s just that it can seem so daunting when the blank canvas of the ami’s face is staring up at you. I’ve developed a few tricks over the years to help me get it right and stitch a face that’s accurate as well as cute. One of the keys to a cute face is to get it centered and my favorite trick is to use landmarks. By this I mean you can use stitches in the body or head, as well as the parts that have already been attached or even the ami’s accessories as guides to where the face should be placed.
Let’s take a look at this with the Chill Snowman.
If you haven’t sewn the arms and carrot nose onto your snowman yet, now is the time (before stitching the face). The Chill Snowman is worked with increases and decreases spaced evenly around, so you should notice 6 lines of decrease stitches that slightly bend from the middle of the head down to the neck. Use three of these lines to determine the center of your snowman’s face. Rotate your snowman so that one line is on either side, and one line is facing dead center. Pin the top of one arm to round 24 of the body (technically this is the neck) so that the front of the arm falls at the bottom of one of the lines. Repeat for the other arm. Then sew each arm to the body using a whipstitch.
To sew on the carrot nose, place the hat on the snowman’s head. Rotate the snowman so that he is facing forward with the center line in front. Sew the carrot nose so that it is centered between the arms and about 3-4 rows up from the neck. There should be more space between the nose and the hat than between the nose and the neck.
Now you are ready to sew on some chill eyes!
For this tutorial you will need the following:
6 sewing pins
scissors
embroidery floss in black
1 yarn needle
your amigurumi
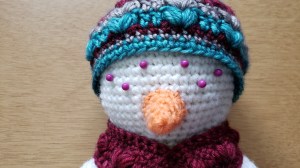
(keeping his hat on for the first step will help you determine the placement of the eyes)
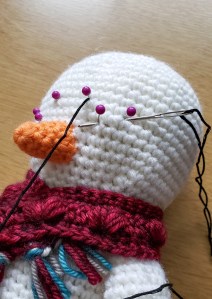
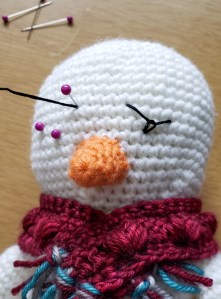
My preferred method for embroidering closed eyes is to use a variation of the detached chain (also known as daisy stitch) because it gives you more flexibility in shaping the line. First I like to mark out where I want my stitches to go with sewing pins before I actually begin stitching. This gives you the chance to map things out and consider the placement of your ami’s features before you begin stitching. Feel free to use the photo below to place your pins. Once you have the pins in place, you can take the hat off your snowman.
Next thread your length of embroidery floss onto your yarn needle. Insert the needle into the back of the snowman (anywhere will do) and come out the front of the snowman at one of the pins at the top edge of your snowman. Leave a long tail at the back of your snowman. You will use this to tie off your ends when you are finished.
-
- Insert needle into back of snowman.
-
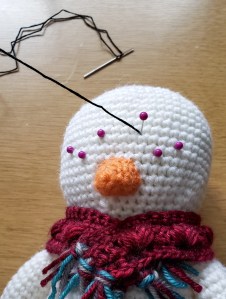
- Come out the front at one of the uppermost pins.
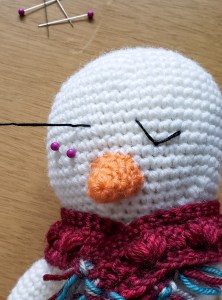
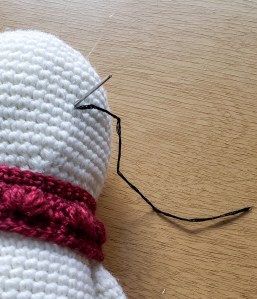
Next insert your needle into the stitch marked by the pin on the farthest side of the first eye. Come up through the stitch marked by the bottom pin.
Pull through, but let the thread from the first stitch be somewhat slack. Your working thread should come out above the loop created with your first stitch.
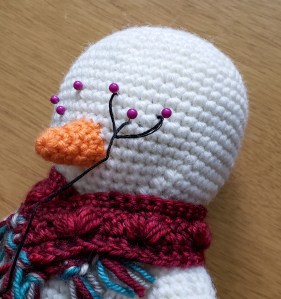
You can take out this set of pins now. At this point, your eye should look like this.
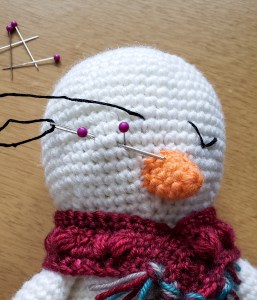
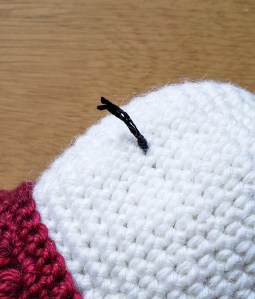
Now insert your needle into the same stitch you just came out of, careful to insert it below the first stitch. This will lock the stitch and keep it in place. Come out at the stitch marked with the closest pin on the other eye.
Pull gently to secure the stitch. The nice thing about the detached chain stitch is that it allows you to play with the “droopiness” of the eye a bit before moving on to the next eye. So if your eye is too loose or too tight, drop your yarn needle but leave it threaded. You can leave it where it is. You don’t have to pull out or undo the stitch you just made. Instead, loosen the last stitch you made (the one that anchors the eye line) just a bit. Then loosen or tighten the eye line. Pull gently on the working thread to close the anchor stitch and lock the line in place.
Let’s complete the opposite eye. Insert your needle into the stitch marked by the pin on the farthest side of the eye. Come up through the stitch marked by the bottom pin. Pull the yarn through gently, leaving a bit of slack. Go ahead and remove the marker pins as well.
Now insert your needle into the same stitch you just came out of, making sure that the thread loops around the eye line stitch. This will lock the stitch and keep it in place.
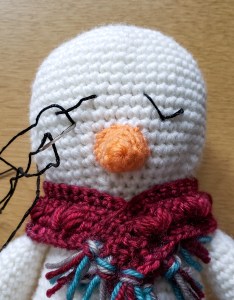
Come out at the back of the snowman, through the same stitch you used at the start (where the long tail is). Make any adjustments to the second eye, again pulling the anchor stitch loose first, then adjusting the eye line. Pull on the working thread to lock the anchor stitch.
When your snowman’s face is just how you want it, tie the two ends in an overhand knot and trim. Use the end of your yarn needle to poke the ends into the snowman.
And there you have it! Your amigurumi is now super chill, and I hope you are too.
For more tutorials on How to Add Faces to Your Amigurumi, visit my Resources page.


December 12, 2019 at 11:40 am
Not sure who’s cuter, the Snowman or the Model 🙂
So very cute
December 15, 2019 at 9:04 am
Aw, thanks Margie! So sweet of you to say. 🙂