Squirrel Picnic

Handmade with Love and Stuff


22 Comments

How to Add Faces to Your Amigurumi: Satin Stitch Embroidery

Satin Stitch Amigurumi Face Tutorial by Squirrel Picnic
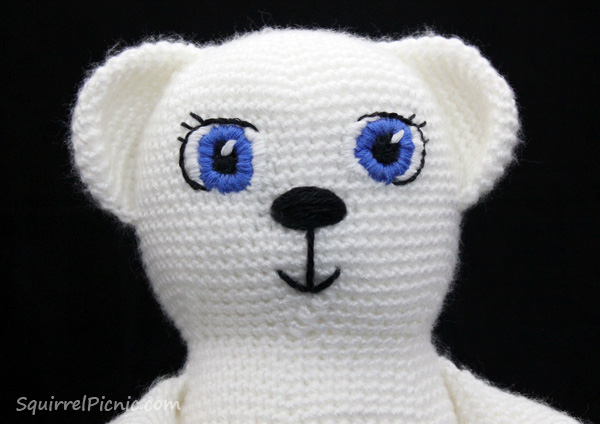
I love the look  of satin stitch embroidery, but I don’t use it very often for my amigurumi because, I have to warn you, it does take longer to do than any of the methods I have shown you so far. It also takes a lot of focus, because you have to repeat the same stitch over and over again until an area is filled in. You will probably notice in this tutorial that by the time I got to the white part of the eyes, I had gotten a lot less picky about the straightness of my stitches. Looking back, I wish I would have taken a break halfway through or put the project aside for a day or so. Then I would have been able to come back to it fresh: fresh eyes, fresh mind. In the least, I hope you might learn from my mistake. If you find yourself growing frustrated or impatient, feel free to take a break. You certainly have my permission.

That aside, I think you will be pleased with the results you achieve by using satin stitch embroidery to add details to the faces on your amigurumi. I always think it looks very professional, as this is the technique most often used by large toy companies to manufacture stuffed animals for young kids. Satin stitch embroidery is a great choice for toys that will be used by children of all ages, because you don’t need to worry about any small parts that might present a choking hazard. While the big companies use machines to do all the work, I will show you how to do it by hand. After all, it’s the time and love that you put into it that makes a hand-embroidered stuffed animal so special.

Let’s begin! Continue reading


8 Comments

You Made This!

It’s so cool to see projects from people all over the world. Thank you all for choosing my patterns and for taking the time to share your finished projects with me.

I’d like to extend a special thanks to these awesome folks, whose projects are featured below: Virginie Homemade, Marta of Hama Style & Amigurumi, Flo, Astrid Der Kinderen, Amanda Thorpe, Jenny McCoy, Sarah Fuller, Beth Turner, Elsa, Theresa Pearson, Anne Hanson, Heike Röhserxxcatalopexxregenbogengarne, Linh Do Khanh, Marina Walker, KleinDari, Louna, alovelygorilla, CowSaysMoo, and curlyfro.

If you’ve made something awesome with one of my patterns, I’d love to include you in a future installment of You Made This! And if there’s anyone I missed, I’m terribly sorry. Let me know and I’ll include you in the next edition. Please send a photo of your project to squirrelpicnic{at}gmail{dot}com. Continue reading


16 Comments

Spring Meadow Rug Crochet Pattern

After a thorough cleaning of my bedroom/studio this spring, I decided to crochet a lively rug to cover my very blah carpet. When it came to picking the yarn for this project I knew I wanted a soft cotton, but I also wanted to try something new. I was really curious what a variegated yarn would look like in a chevron stitch pattern and I was ready to experiment.

I always love seeing the magic that happens with yarn of variegated colors. You never know quite what to expect. Sometimes, as with striping yarn, fun bands of color will appear. Other times you will get pools of color. It all depends on the yarn and the stitch pattern. So I was really pleased when this well-known and inexpensive cotton yarn created a mottled look when done up in a chevron stitch pattern.

Despite my breaking the rule against using variegated yarn with an intricate stitch pattern (I think that’s why most people use solid colors in this instance), I discovered with variegated yarn the chevron stitch pattern isn’t totally lost in the play of color. In the end, I think it creates a vibrant effect that you wouldn’t be able to achieve with solid color or stripes.

And now my floor is covered and the cotton feels divine under my bare feet, rather like a soft patch of spring grass.

Spring Meadow Rug Crochet Pattern

Continue reading


6 Comments

Charm Exchange: Final Thoughts on Mini-Crochet

You Adore You Necklace Charms Materials (504x504)It has been quite an honor to be a part of a charm exchange with such talented artists. I have learned a lot about both small-scale crochet and about jewelry making. Most of all I learned that practice does make perfect. If there’s a skill you want to improve, there is one well-trodden path to success — you simply must keep doing it… over and over again. It’s the same as when we were little and our parents nagged us about practicing our musical instruments or our times tables.

With jewelry making, I have had to learn how to make wrapped loops over a dozen times, because I will learn it one day and then not even pick up my pliers for months. Having this charm exchange has given me an excuse to practice and I really think I may have gotten it this time!

The same is true for tiny crochet. I had to really practice and practice. It takes time and patience, but in the end I was rewarded with a new skill and a broader understanding of crochet. If you are interested in taking up mini-crochet, I’d like to help get you started. Let’s take a trip down memory lane and see how far I’ve come, while I share with you what I have learned. Continue reading