Squirrel Picnic

Handmade with Love and Stuff


6 Comments

Charm Exchange: Final Thoughts on Mini-Crochet

You Adore You Necklace Charms Materials (504x504)It has been quite an honor to be a part of a charm exchange with such talented artists. I have learned a lot about both small-scale crochet and about jewelry making. Most of all I learned that practice does make perfect. If there’s a skill you want to improve, there is one well-trodden path to success — you simply must keep doing it… over and over again. It’s the same as when we were little and our parents nagged us about practicing our musical instruments or our times tables.

With jewelry making, I have had to learn how to make wrapped loops over a dozen times, because I will learn it one day and then not even pick up my pliers for months. Having this charm exchange has given me an excuse to practice and I really think I may have gotten it this time!

The same is true for tiny crochet. I had to really practice and practice. It takes time and patience, but in the end I was rewarded with a new skill and a broader understanding of crochet. If you are interested in taking up mini-crochet, I’d like to help get you started. Let’s take a trip down memory lane and see how far I’ve come, while I share with you what I have learned. Continue reading

Advertisement


2 Comments

Charm Exchange Part 3: Coming Together

Our group of fabulous jewelry-making artists met at Axios Estiatorio in Denver on a rainy October Sunday to exchange charms and enjoy some really fantastic Greek food.

Annie started us off by showing the eye and heart charms she made for Sylvie’s “Eye Adore You” necklace. Using mixed media that includes beaded embroidery, felt, hand-stitching, and some very unique statement beads, Annie’s charms are truly eye-catching (excuse the pun).

Sylvie's Necklace October

Sylvie’s charms for my Coral Reef bracelet included a mermaid and a jellyfish. A tiny model mermaid rests inside one of Sylvie’s signature “deviled eggs” – miniature dioramas that are truly delightful! The jellyfish was made with long plumes of yarn in a variety of colors and textures that really capture the look of tentacles.

Jennifer's Bracelet October

For Annie’s Birds & Flowers necklace, I crocheted two small birds based on a pattern I found at Attic 24. Using DMC floss and a size 10 steel hook, I crocheted three rounds, then added a tail before fastening off. After folding the bird in half with the tail at the back, I sewed up the bottom. Then I added a crocheted beak and stitched on the eyes and wings. The large flowers at the bottom are made from felt buttons (the same ones I use in Podge’s hair).

Annie's Necklace October

Alexandra explained that she experimented with new tools to work with fimo on her charms for Rosalind’s Garden of Earthly Delights bracelet, adding that she loves using the tiny ballpoints on the tool to make the pieces stick. She was surprised at how the rose head didn’t cause too much trouble — she made the head, stuck on the hair, and added petals around where needed.

Rosalind's Bracelet October

Our charm bracelets and necklaces are really starting to come together. Don’t they all look great! Join me next month to see how I go about crocheting a kokeshi doll for Alexandra’s bracelet. It should be a lot of fun!

Check out previous posts in this series:

Part 1: Make Jewelry, Make Friends

Part 2: Working on a Small Scale Poses a Big Challenge


12 Comments

Itty Bitty, Teeny Weeny Crochet

A recent invitation to participate in a charm exchange has brought me the opportunity to explore the wonderful world of miniature amigurumi. An exchange like this brings artists together to collaborate in the making of each other’s charm necklace or bracelet. Our group includes artists in a variety of mediums: ceramic, mixed media, felt, beads, metal, and found objects. And I get to contribute crochet to the mix! Each of us gets to pick a theme for our jewelry piece, and I chose coral reefs. Imagine all the colorful things we could do with that! But first I have to make a charm myself to get my bracelet started. What reef creature could I make?

crochet-picnic-basket1First things first, I’ve never crocheted anything this small. I think the smallest piece I’ve done is the picnic basket that is about 2” tall. Just to practice, I tried making an urchin, thinking it was a simple shape… but it was too simple and it just looked like a ball. After trying a few more sea creatures, I decided to make a starfish. First I attempted to convert a life-sized starfish pattern to this scale by using DMC floss and the smallest size hook I could find. But no matter what I tried I couldn’t get it small enough. It made me realize that miniature crochet has its own tricks and rules! I do have a lot to learn.

I needed extra-small materials and extra-small patterns. I went to my local craft store with all my crochet hooks in hand to try to complete my set of steel hooks. I love how inexpensive steel hooks are! For under $20 I was able to get all the hooks I needed, from size 00 to size 14. I was also able to find crochet thread and 100% Pearl Cotton Thread in Size 5. My friend Annie let me borrow her Size 8 thread to try. Now I feel sufficiently equipped for this challenge.

Itty Bitty Crocheted Critters by Erin ClarkMini Amigurumi  by Sara ScalesI also found some books about miniature crochet that are bound to help. Mini Amigurumi by Sara Scales includes patterns for a wide variety of cute little gems from birds to babies to fruits and vegetables. Some are as small as 1/2”! Itty Bitty Crocheted Critters by Erin Clark includes patterns for some really interesting creatures like a flamingo, gecko, and crocodile. I’ve seen works from fellow crocheters done from these patterns and I can’t wait to try them out too.

We’ll be making charms for this exchange and meeting every other month over the next year. It will be exciting to see if I can improve my skills over this time. And I can’t wait to see what everyone else makes too!

I’ll share with you more in the coming week about how the charm exchange works. Until then, here’s the crochet pattern for the starfish I made for my own bracelet. I’m wondering if any of you have tried miniature amigurumi. What’s the smallest thing you’ve ever crocheted?

Starfish Charm

Starfish Charm Crochet Pattern

(Inspired by the work of Julia Kolbaskina)

Continue reading


10 Comments

Field Trip: Beading with Sylvie

Hodge and Podge and Beads

Hodge and Podge help me pick out beads for my necklace.

Earlier this month, Hodge and Podge and I went on a field trip to visit my friend Sylvie Abecassis who was kind enough to teach us how to make a rosary link necklace. Sylvie and I had attended the Rocky Mountain Bead Show last April, where I came upon the mother load of vintage Bakelite beads and buttons. I couldn’t help myself from buying as much as I could carry. A lot of the beads were rather large and I was having trouble visualizing what I would make from them. As much as I love big jewelry, I wasn’t really keen on looking like Wilma Flinstone either.

Sylvie had the perfect solution: rosary links. So I showed up with squirrel friends, cheesecake, and beads, and we set out to tackle my necklace. Sylvie, always the generous artist, gave me the flat yellow beads from her collection. They’re so pretty!

Rosary Wire Technique

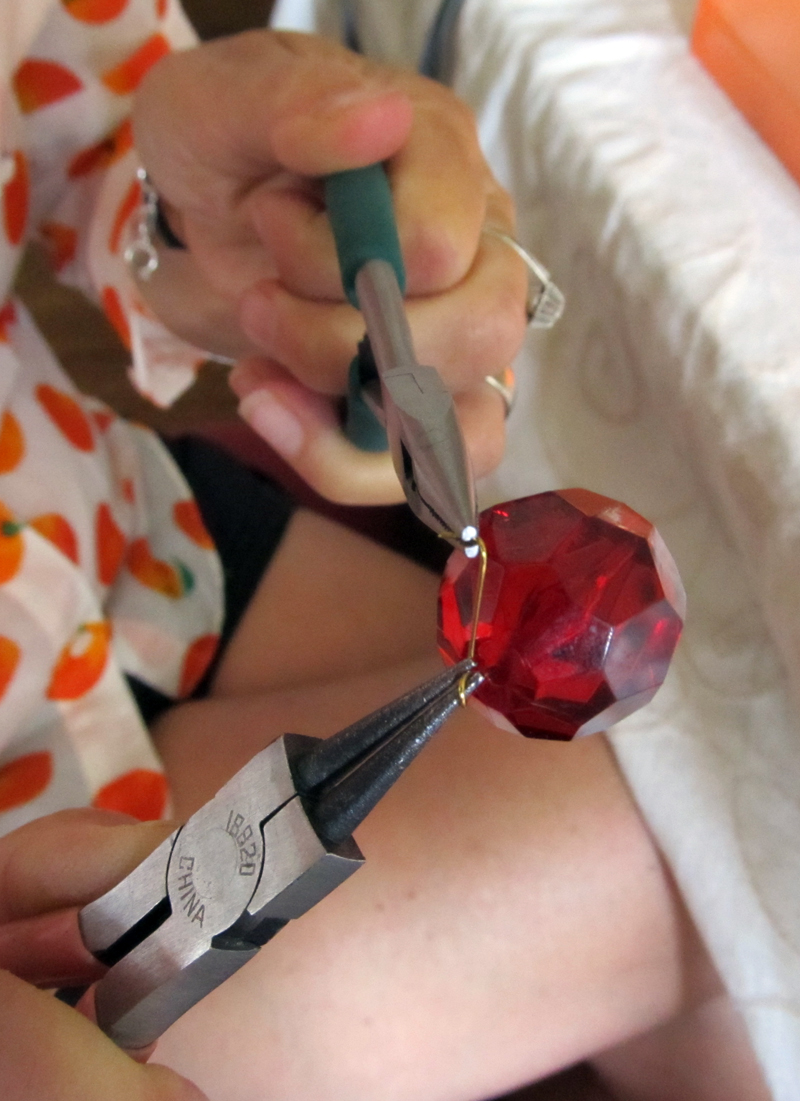
Sylvie shows me how to wrap the wire.

After we had the beads picked out and arranged, Sylvie began to show me how to string them together using the rosary chain link method. The tools you need are jewelry wire, round-nose pliers, flat-nose pliers, and flush wire cutters. You start by cutting a piece of wire an inch or so longer than the length of your bead. About an inch from one end, fold the wire at a 90-degree angle. Using the round-nose pliers, curl the shorter end of the wire up and around to form a loop. Then you change your hand position so that you are grasping the loop with one pair of pliers, and with another pair, coil the end of the short length under and around the longer wire two or three times. Trim any excess as close as you can. Then you add your bead and repeat on the other side. The tricky part comes with your next loop: I kept forgetting to link the new loop to the loop on the bead I had just completed. I ended up with a lot of empty chains! I called them practice chains. I’ll leave the demonstration of this technique to the experts: here’s a fabulous tutorial by Kathy of Katalina Jewelry.

Hodge and Podge mind the beads while I work on my wire-wrapping skills.

Hodge and Podge mind the beads while I work on my wire-wrapping skills.

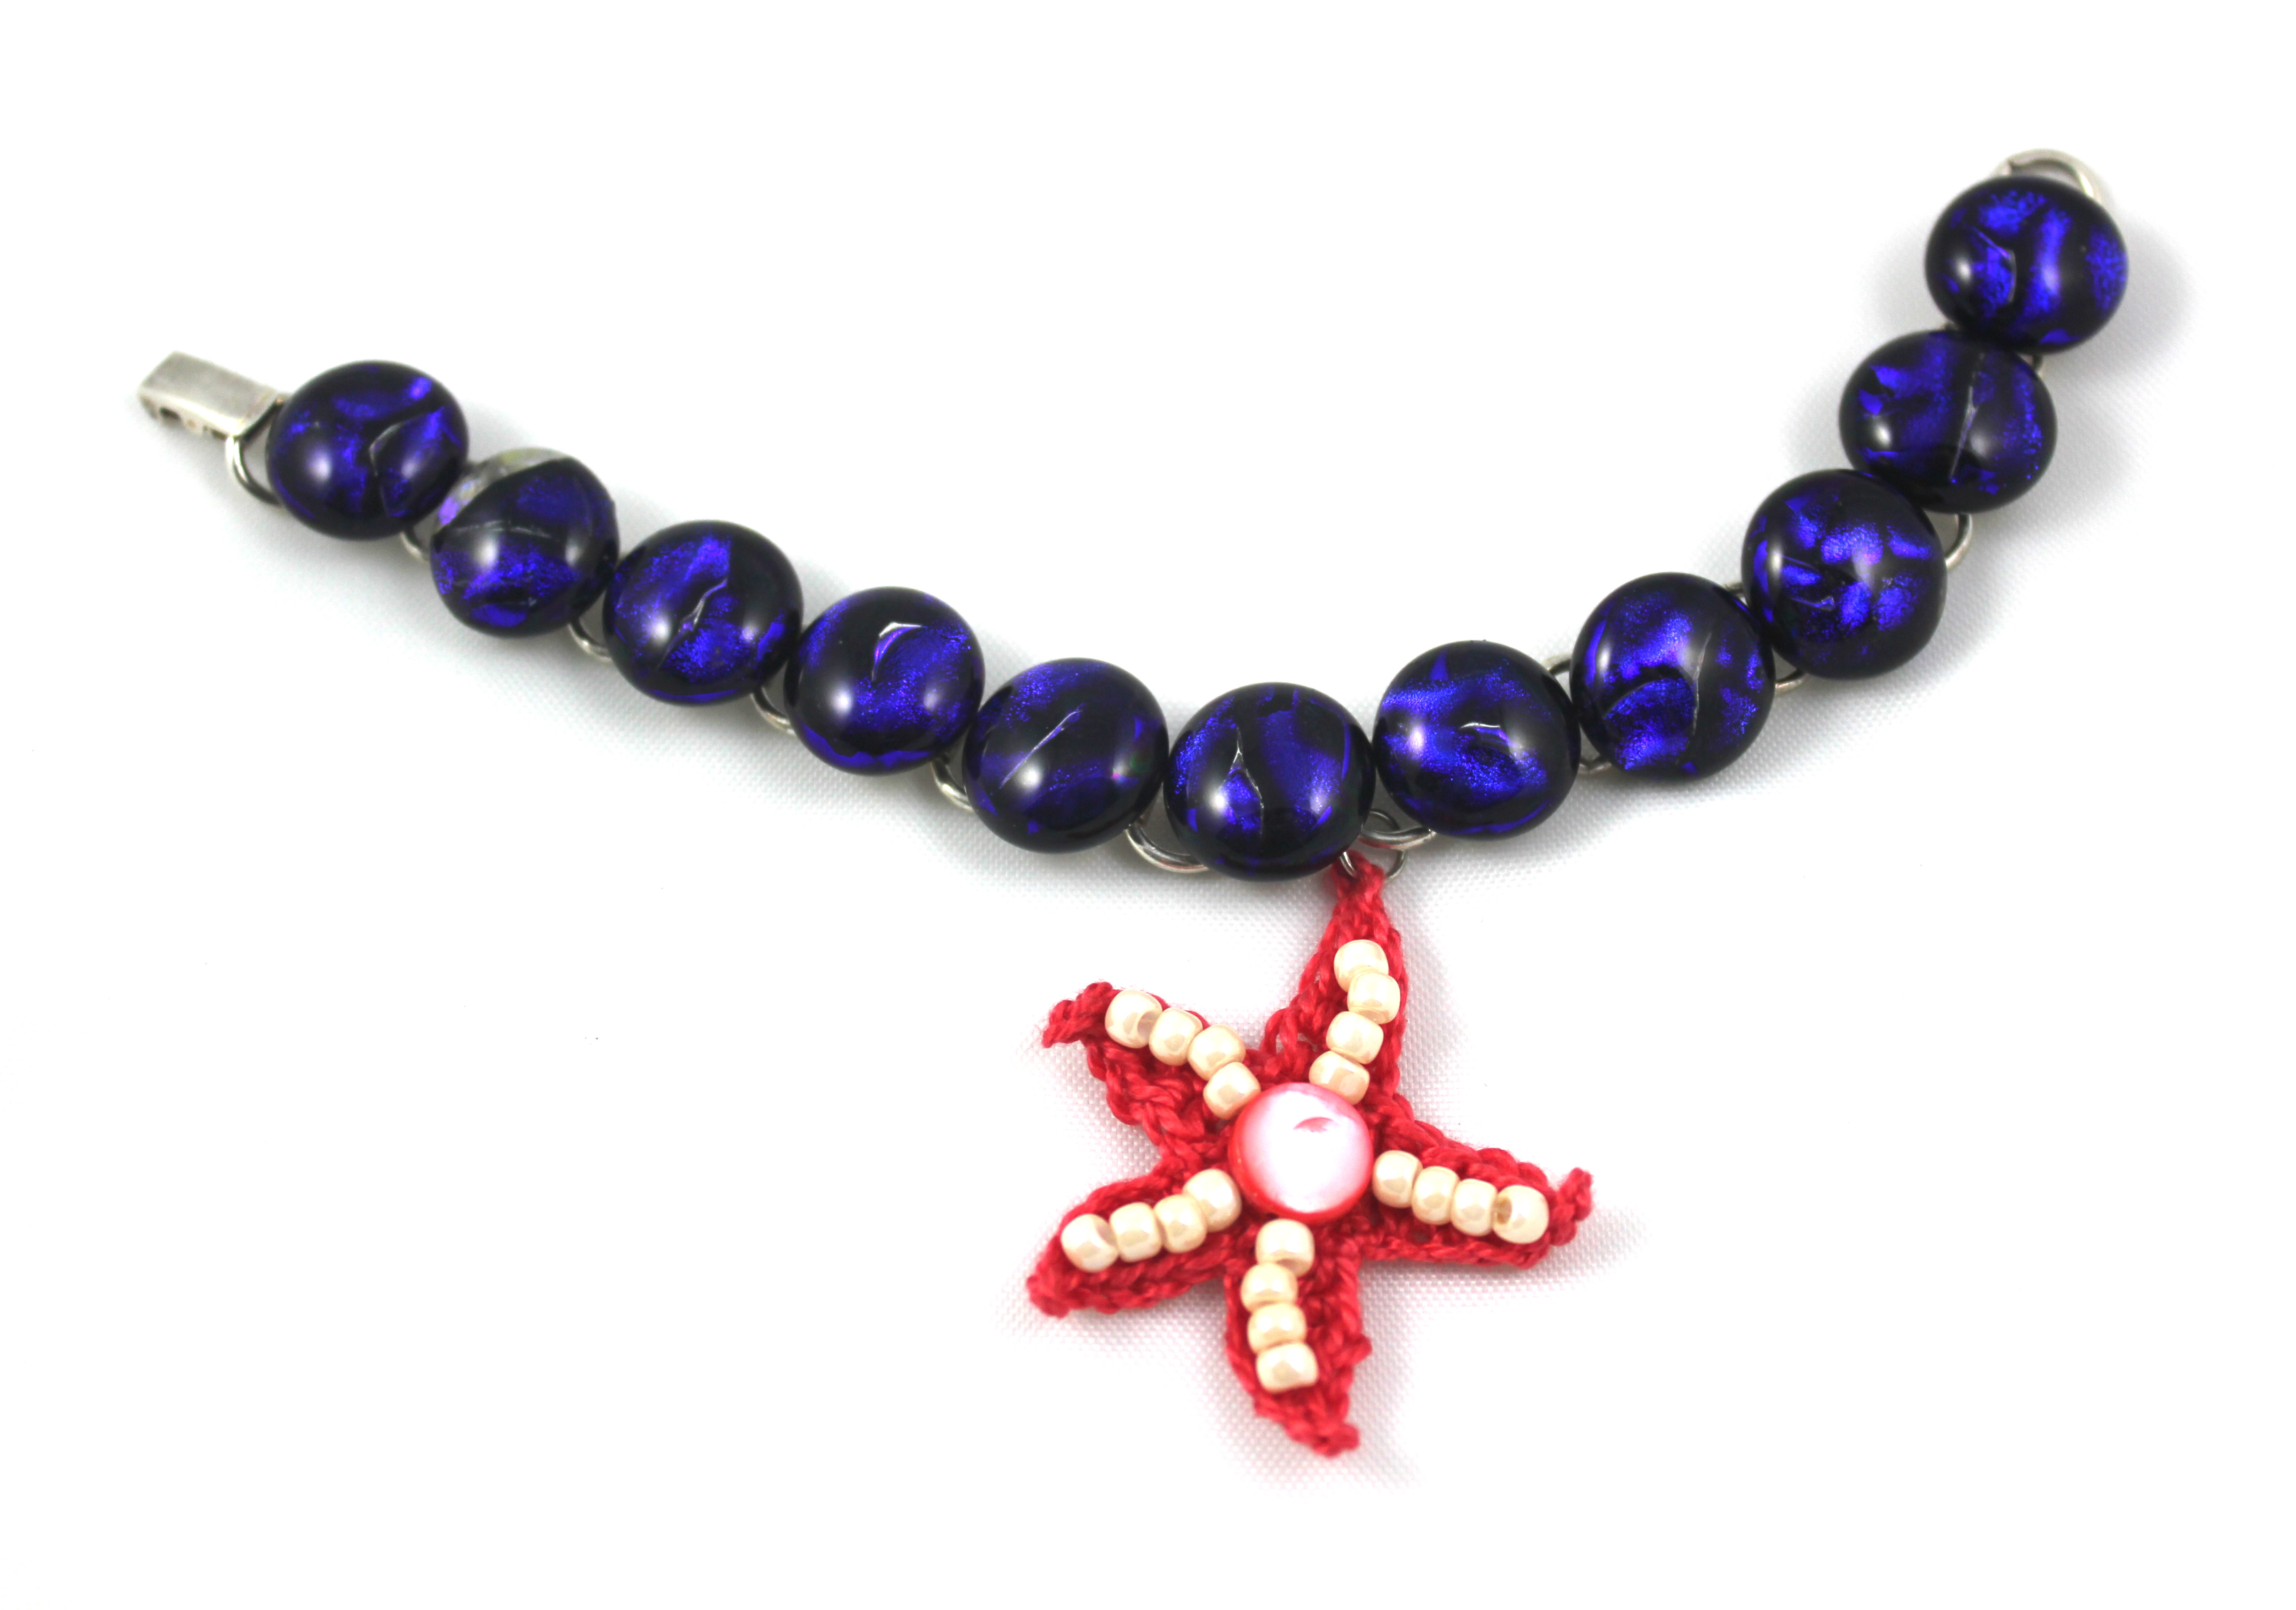
Unfortunately, using all of these beads together created a really heavy necklace, so I decided to make a rosary chain with round black glass beads for either side of the necklace. I used a single loop rosary link on these instead of the wrapped rosary link I used on the larger beads. Time will tell whether or not this is strong enough.

I ended up making a pretty substantial necklace, didn’t I? I reserve the right to revisit this project later, when I’ve become better at these techniques. I may take off some of the larger beads. Maybe I’ll add some of the smaller beads. Maybe I’ll just start over. Or maybe in time, I’ll decide that this necklace is perfect just the way it is. That seems to be one of the great things about this technique. If you want to change something later on, it’s as simple as clipping off the unfavorable portion and connecting a new bead. You don’t have to take apart an entire strand.

The finished necklace.

The finished necklace.

Do you ever pull out your old projects and redo parts of them as you get better at a skill?  I take it as a sign of growth to be able to go back to something and make it better. It’s all part of the learning process, and it’s one of the elements of crafting that I love most. The more that you create and the more that you practice, the better you get at it. Even if you mess up, it’s virtually impossible not to learn from the experience.

I encourage everyone to try different crafts now and then, and never shy away from learning new things. I wonder how I will use what I’ve learned through jewelry making in my crochet and knitting. I don’t know, but I can’t wait to find out!

Above all else, I feel very blessed to have great friends like Sylvie to teach me new skills and guide me along the way. Thanks, Sylvie, for a wonderful afternoon!
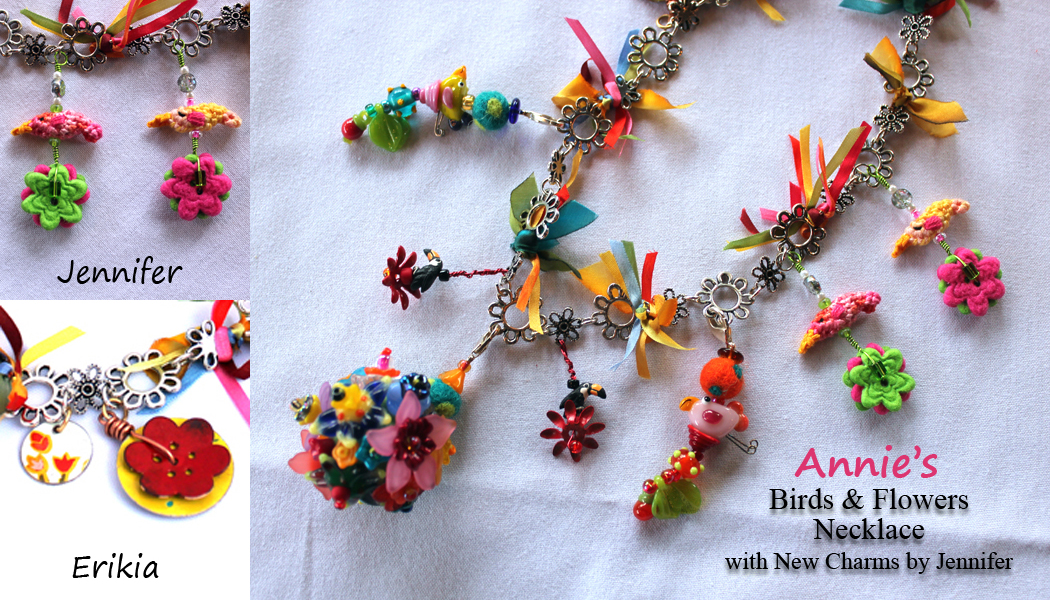