Squirrel Picnic

Handmade with Love and Stuff


10 Comments

Welcome Back, Spring! Squirrel Picnic’s Banner Diorama Explained

SquirrelPicnic.com

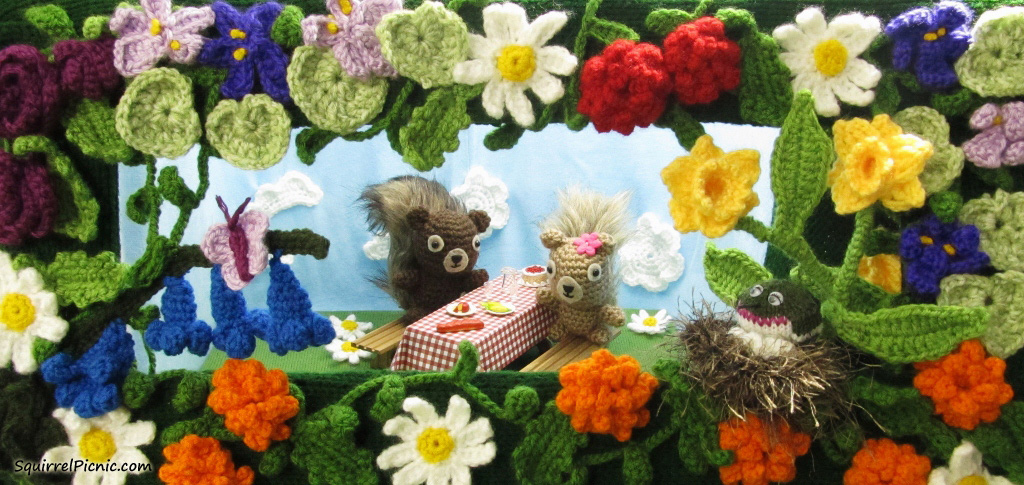
Spring, how we have missed you! I put the spring banner back up forĀ the blog header a whole month early because the snow and cold temperatures were starting to depress me. I hope that, wherever you are — even if it is warm there — you have enjoyed the image of Hodge and Podge having a little picnic in their garden.

I get a lot of requests from people around the world for the patterns to make the items in this banner. What better time than the first day of spring to share with you where you can find the patterns to make some lovely flowers, birds, and butterflies. Continue reading


8 Comments

St. Patrick’s Day Leprechaun Hat for Your Squirrel Friend

St. Patrick's Day Leprechaun Hat by Squirrel PicnicHodge and Podge are wishing you a very happy and festive St. Patrick’s Day. To celebrate they crocheted leprechaun hats for themselves. Don’t they look dapper?

Now with my free pattern, your squirrel friend can join the fun.Ā As an added bonus, if you don’t have anything green to wear today,Ā let your squirrel wear it for you and take themĀ with you everywhere that you go. I bet they’d look really cute with just their head and giant green leprechaun hat poking out from the breast pocket of your shirt or peeking out from a pocket on your backpack or purse.

Share photos ofĀ your squirrel friendĀ all decked out for St. Patty’s Day at squirrelpicnic(at)gmail(dot)com or on social media. We’d love to see them! Continue reading


84 Comments

Sleepy Bear Crochet Pattern

Sleepy Bear by Squirrel PicnicI’d like to introduce you to a friend of mine. His name is Sleepy Bear.

“Hey, Sleepy Bear, wake up. There’s someone here who would like to meet you. Sleepy Bear?”

Well, you’ll have to excuse him. He’s a really sound sleeper. Since he can’t be disturbed, I’ll just tell you all about him.

I’ve been working on this pattern for almost a year now. I don’t think I’ve ever fiddled withĀ a pattern that long! And I’ve made almost a dozen bears in the process. The first one I ever made I gave to a friend who had been hit by a car while riding his bike to work. He said the bear, which he named Buster, brought him a lot of comfort while he was recovering. I made another for my cousin’s first child and another for a friend out of yarn she had given me. The rest I plan to donate to the Children’s Hospital of Denver where they can bring some comfort to the patients.

This bear pattern is unique in one key way: the head and body are crocheted together. I have trouble sewing on heads, especially on larger animals like this one. It’s really hard to get them on perfectly straight. Do you have that trouble too? So with this pattern, you crochet the head, do a round in the front loops only to create the neck and then continue with the body. I think you’ll really like this detail.

Another distinguishing feature of this pattern is the way the appendages are sewn on. Each includes instructions to close up the end. By crocheting the arms and legs and ears closed, you are able to sew them on through that row ofĀ single crochet loops. It’s easy! I like for my bears arms and legs to face forward when they are sitting down, so I sew the legs on at an angle on the bottom and the arms on the sides so that they point forward. I’ve included photos to show this placement in case you want to make your bear like mine, but feel free to play around with the placement to find the positioning you like best.

I hope you enjoy making a Sleepy Bear.

This slideshow requires JavaScript.

Sleepy Bear’s Naptime Accessories

Any nap just wouldn’t be complete without a nightcap and blanky.

Check out these new free crochet patterns for Sleepy Bear accessories.

Sleepy Bear's Naptime Accessories Crochet Patterns

Sleepy Bear Crochet Pattern

Sleepy Bear Crochet Pattern by Squirrel Picnic Continue reading


20 Comments

How to Add Faces to Your Amigurumi: Sleepy Eyes

How to Add Faces to Your Amigurumi: Sleepy Eyes / SquirrelPicnic.comMy series on how to add faces to your amigurumiĀ continues with one of my favorites: the sleepy face. It doesn’t require many materials — all you need is yarn, a needle, scissors, and your crochet or knit toy. In just a few quick steps your adorable toy will have an equally adorable face. Let’s begin… Continue reading


19 Comments

Make It! Challenge #11: Thumb Wrestling World Championship

World Champion Thumb Wrestlers by Squirrel PicnicWhen I held my call for submissions last year, IĀ received two suggestions thatĀ happened to coincide. Sharon and Shane from Melbourne, Australia, challenged me to make a ninja,Ā andĀ Vanja from Osijek, Croatia, challenged me to make a sumo wrestler. After musing on what a ninja vs. sumo match might be like, I decided we must find out, and so the first ever joint Make It! Challenge was born.

Luchador vs Ninja Crochet Thumb WrestlingFor Make It! Challenge #11, I crocheted contestants to compete in a Thumb Wrestling World Championship. In addition to the ninja and sumo wrestler, the contestants include a luchador and Hulk Hogan, the famous WWF personality.

To play, you simply pop one of these contestants onto your thumb, lock hands with your opponent, say ā€œOne, two, three, four, I declare a thumb war,ā€ and wrestle thumbs until someone’s thumb is pinned or the crochet thumb wrestler falls off. Whoever is left ā€œstandingā€ with their crochet thumb wrestler intact is the winner.

If you get really good at it, try holding two matches at once.

I hope you enjoy crocheting these and holding a Thumb Wrestling World Championship of your own.

Make It! Challenge #11: Thumb Wrestling World Championship

Continue reading


4 Comments

Charm Exchange Part 4: Community

Our bracelets and necklaces are nearing completion asĀ my friends and I met for anotherĀ round of the charm exchange. I really admire how each artist has chosen to address the different themes, and it’s been really interesting to see how the variety of mediums used workĀ together in each collection.

One of the things I have enjoyed most about this experience is the sense of community. Most artists spend a lot of time working on their craft alone in their studio orĀ workshop or craft space. Collaborations like a charm exchange allow us to meet up with other artists, share our talents and expertise, learn about new mediums and techniques, and be inspired by the work of others… in addition to chatting about life and enjoying a good meal together.

Have you started a charm exchange like ours? Do you get together regularly with friends for craft nights? Let me know how you have developed a community around your craft and I’ll share your experience next time when we wrap up this series with our final charm exchange. Stay tuned for photos of ourĀ completed jewelry pieces and more information about how to start an exchange of your own. Until then, hereĀ are the newest additions to our charm bracelets and necklaces. Continue reading