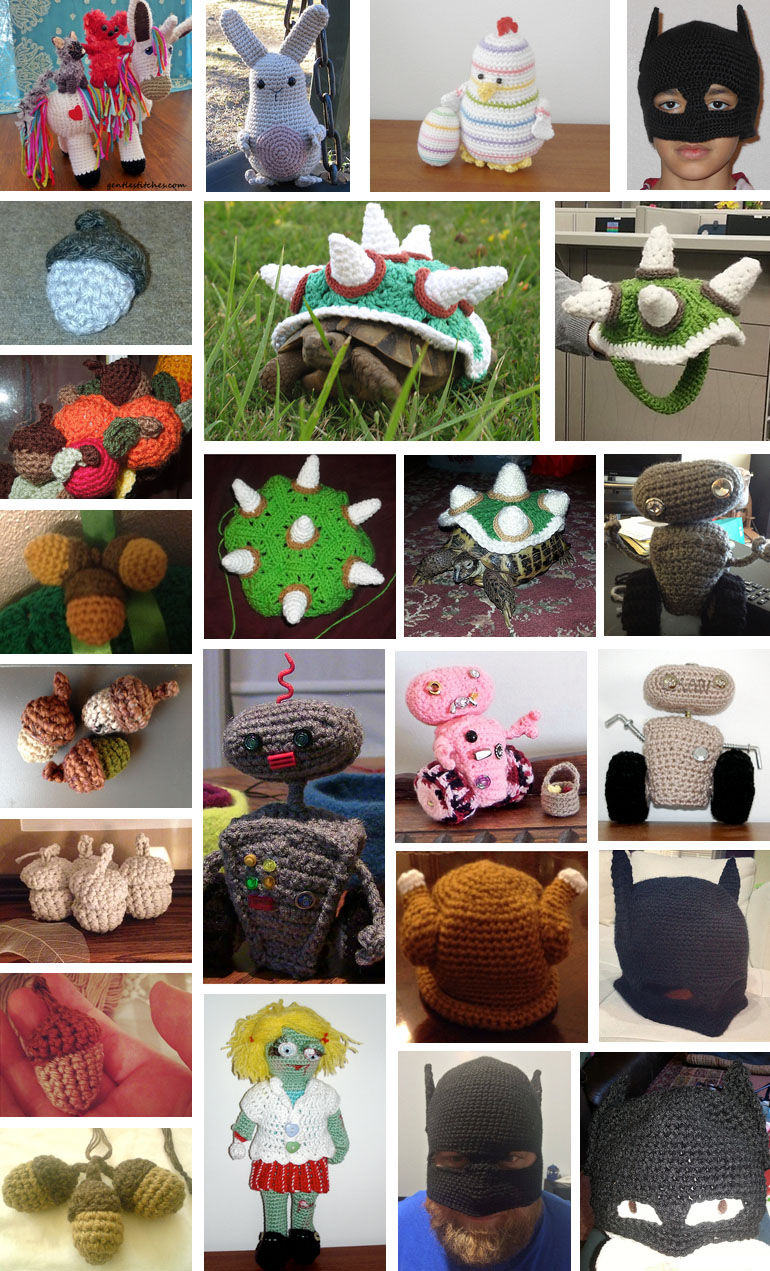
Today’s blog post is dedicated to all of you who have taken the time to try out one of my patterns. I’m simply blown away by all the hard work you’ve done and all your imagination and creativity. I feel so honored and blessed that you stopped by the picnic and saw something you liked enough to try. You are all so talented!
Some of these photos were sent to me, but most were collected from over the Internet. If I missed yours, I’m really sorry. Please feel free to email photos of your work to squirrelpicnic{at}gmail{dot}com. I would love to see them and include them in a future post.
My grandma receives a knitting lesson from my great-grandmother.
Ask any knitter or crocheter where they learned their skills, and the vast majority will tell you from their mother or grandmother.
I remember when I first moved to Colorado, my mother flew out to visit me for a week. I was living in a studio apartment with nothing but a couch in my living room and not much to entertain us. My mom taught me how to crochet a granny square that week. (That’s all the entertainment we needed!) I really took to it, and before long I was crocheting granny blankets for everyone I knew.
My grandmother was also an avid and prolific knitter. I think she knit a sweater for every one of her grand kids. My brother got a sweater with a really cool dinosaur on it, and I got a Southwest-inspired one that I still have today. In most of my memories of her, she is knitting. Grandma even took her projects with her on all of the long, cross-country trips that she and Grandpa loved to take. I feel like she and I have so much in common. I am very thankful that I inherited her love of fiber arts as well as her abundant yarn stash.
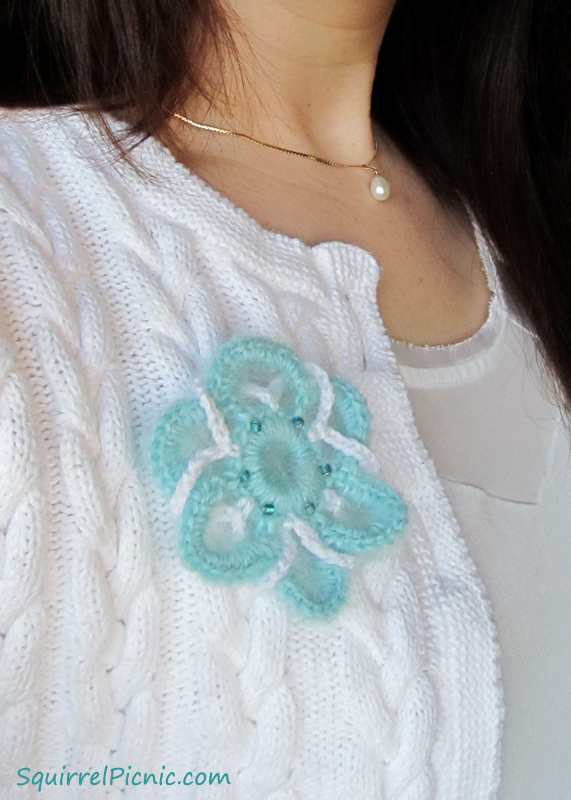
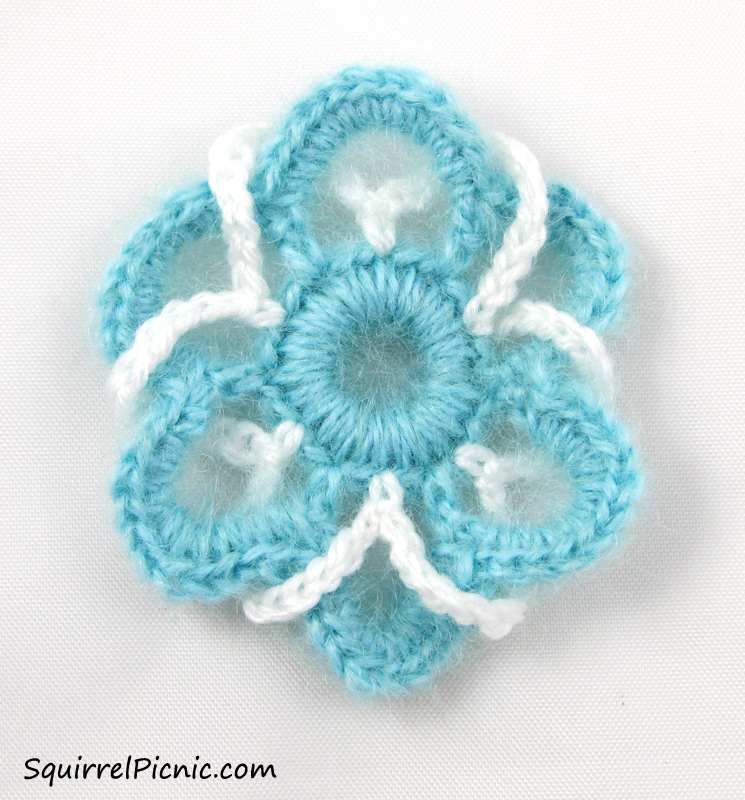
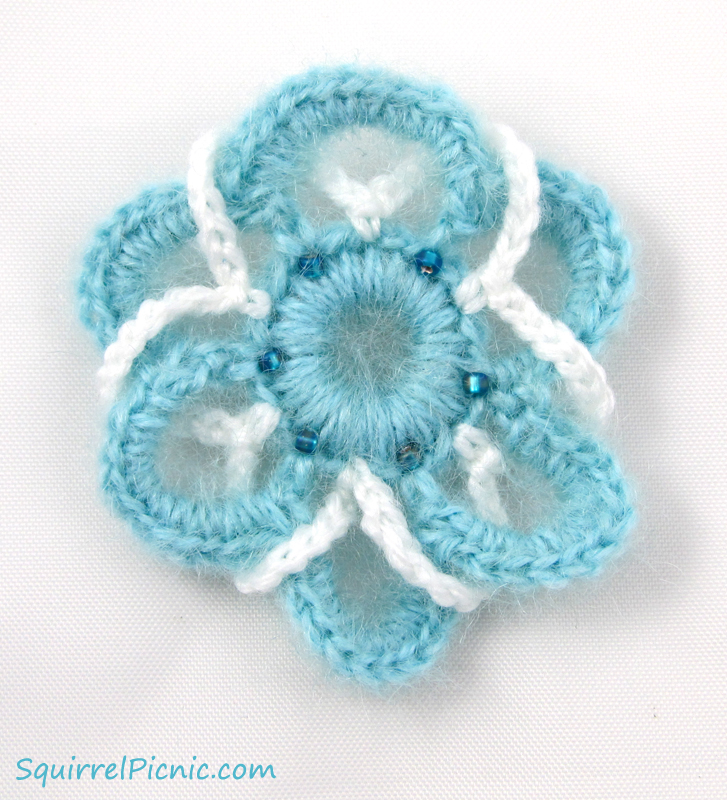
In celebration of my mom and grandmother and all that they taught me, this Mother’s Day I thought I’d crochet a brooch out of vintage mohair yarn that once belonged to Grandma.
In keeping with the vintage motif, I designed a brooch that’s reminiscent of the filigree knot jewelry that was popular in the 1950s and 60s. I guess there is a chance that this mohair could be from that time period too!
Mother’s Day is just around the bend, but you still have time to make something for your mom. Maybe a brooch in her favorite color would do nicely. And don’t forget to thank your mom for everything she’s taught you, especially if one of those things was knitting or crochet.
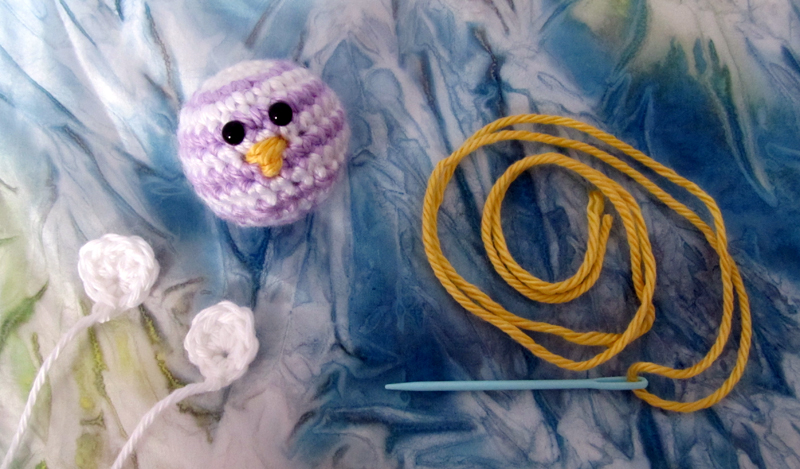
Crochet Mohair Brooch
Materials
Small amount of fingering weight mohair yarn in light aqua (ArtYarns Silk Mohair in Aqua, 60% mohair, 40% silk, 0.88 oz [25 g] / 312 yds [285 m])
Small amount of fingering weight yarn in white (Bernat Baby in White, 90% acrylic, 10% nylon, 1.75 oz [50 g] / 191 yds [175 m])
C-2 (2.75 mm) crochet hook
Yarn needle
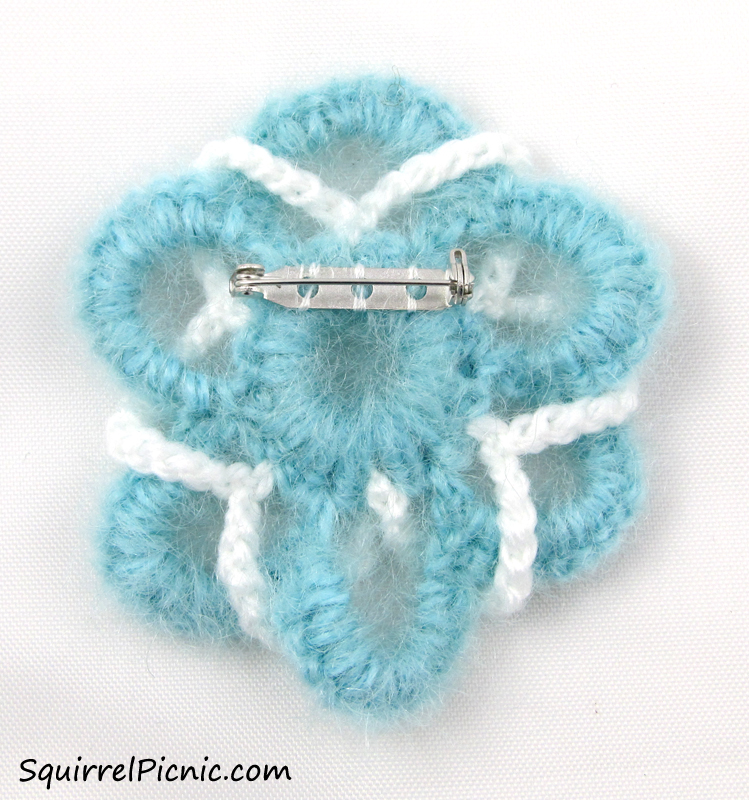
1” bar pin
Sewing needle and thread
Beads (optional)
Instructions
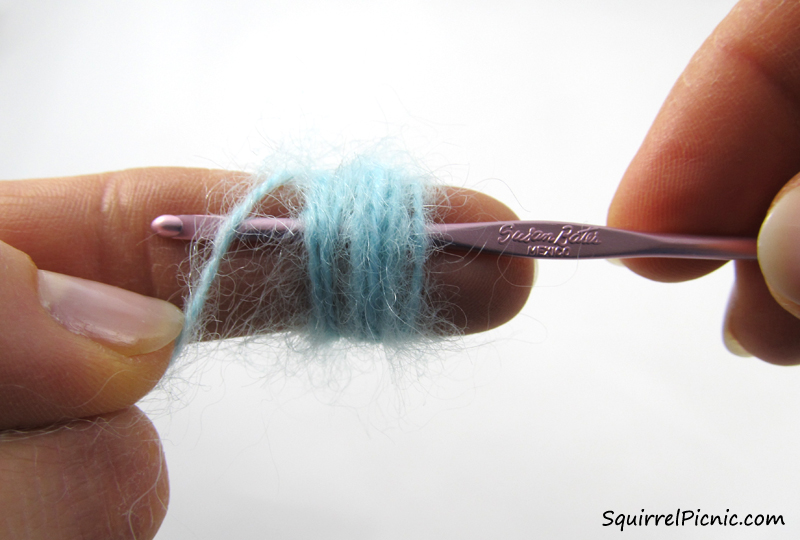
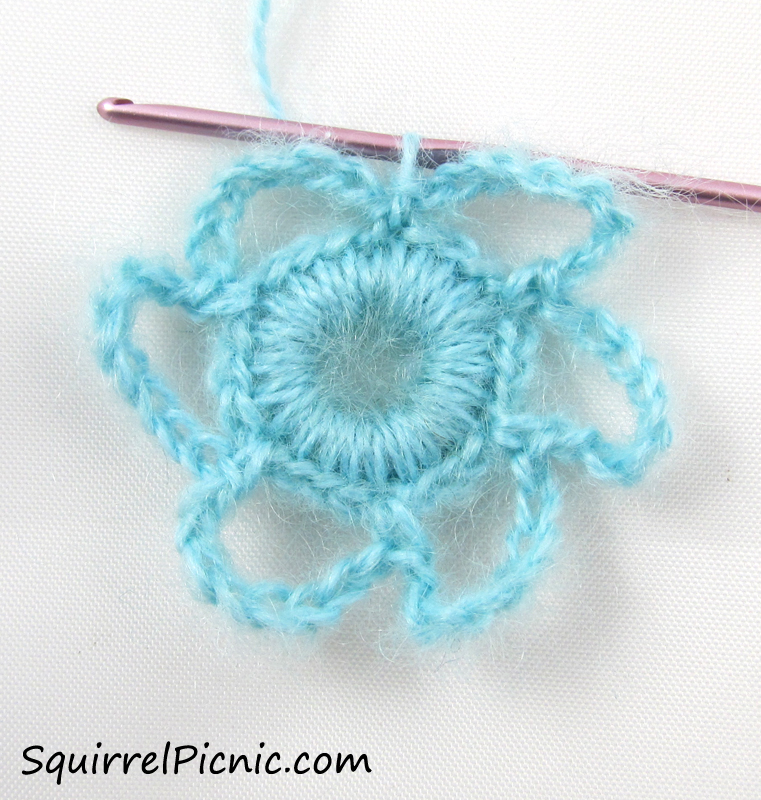
Wrap aqua yarn around index finger 10 times to form a ring. Insert crochet hook, yo, and pull through all the loops. Slst to secure.
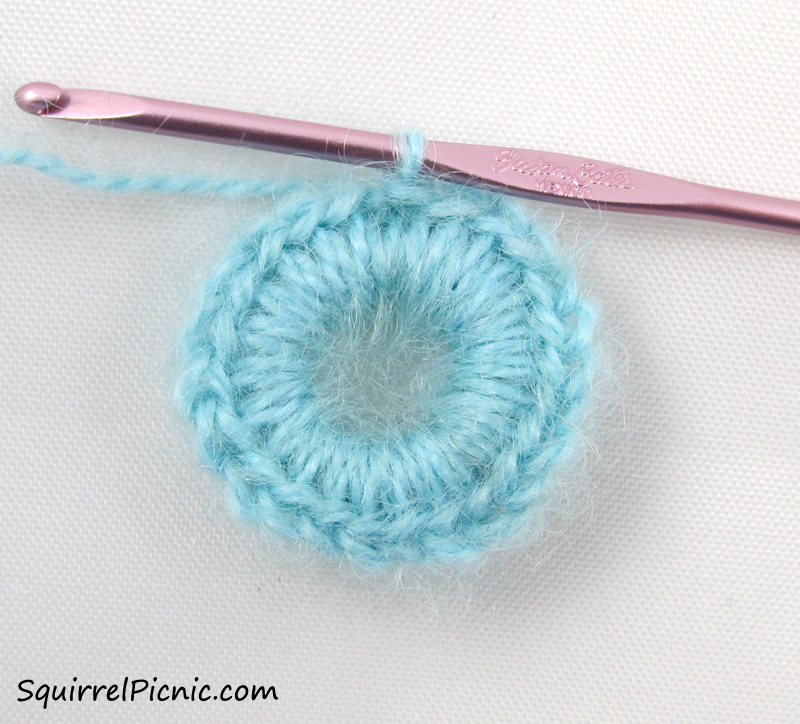
Rnd 1: 24 sc into center of the ring. It’s easier if you sc a few before taking the ring off your finger.
Join with slst to 1st sc.
Rnd 2: (Ch 8, sk 3, sc) 5 times. Ch 8, sk 3, join with slst to 1st sc.
Rnd 3: Sc 11 in ea ch-8 sp. BO
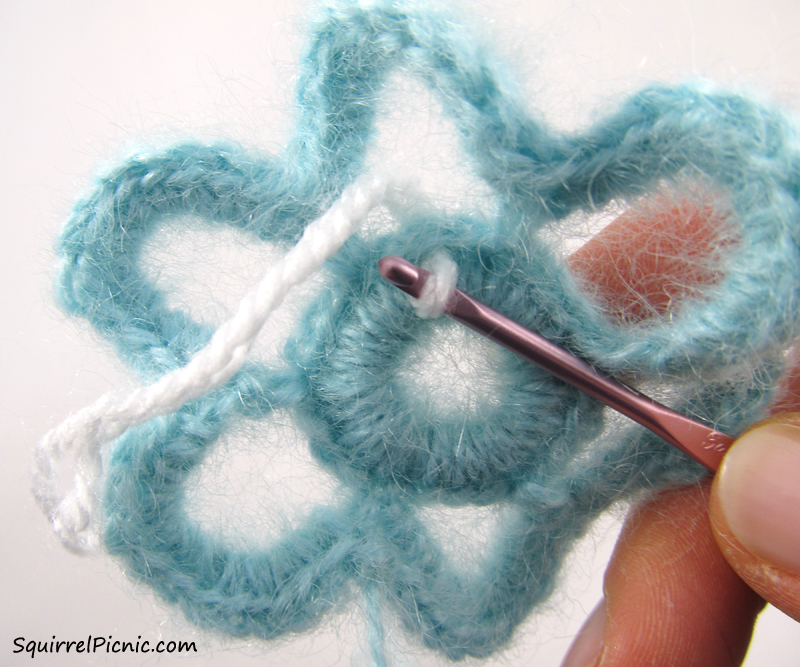
Rnd 4: Hold the brooch with RS facing. Ensuring that your yarn is in front of the brooch, attach white yarn in any center sc of the 3 skipped in Rnd 2.
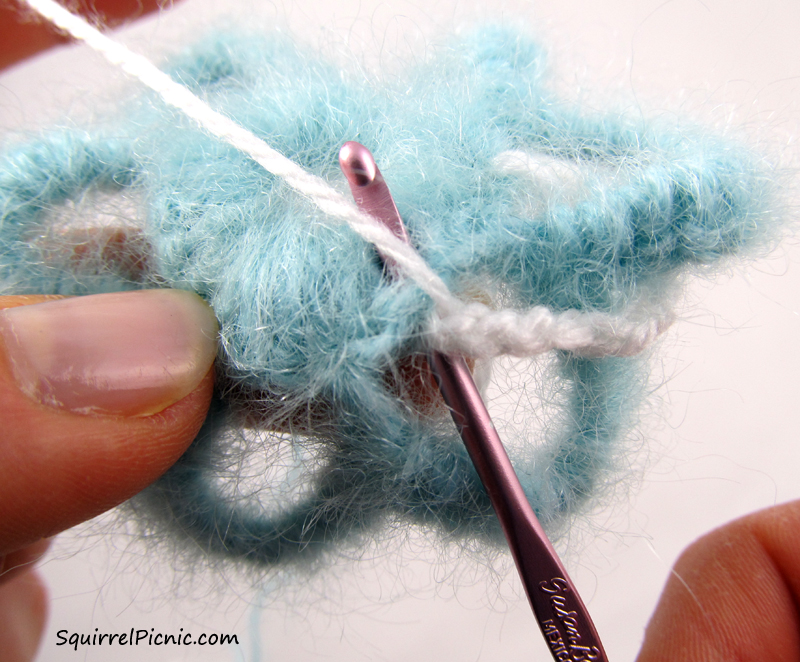
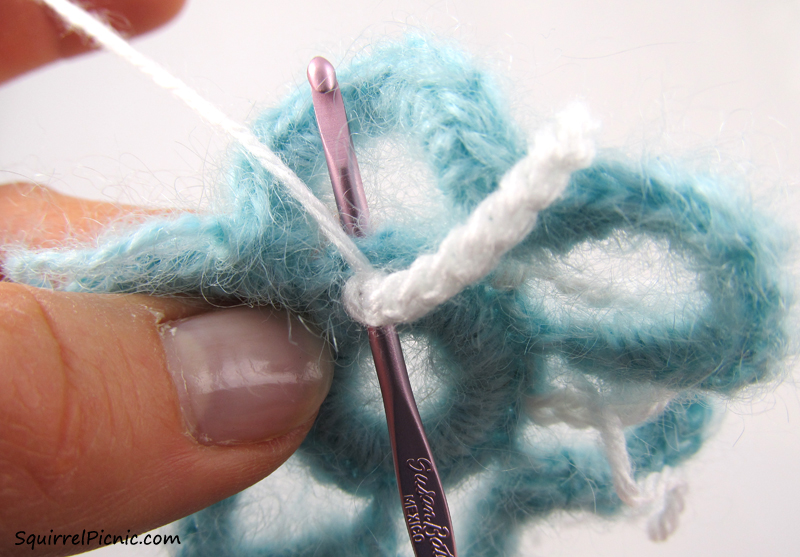
* Ch 12. Hold the next aqua loop forward. Working behind the loop, sc in the next center st by inserting your crochet hook from front to back.
Ch 12. Hold the next aqua loop backward. Working in front of the loop this time, sc in the next center st.
Rep from * to the end. BO. Weave in ends.
Sew on beads if desired.
Position the bar pin at the top of the center ring created in Rnd 1. Make sure that you can’t see it from the front. Sew bar pin on.
It feels like I’ve been crocheting Zs forever! Everywhere I go, I have my yarn and my crochet hook. It’s a great way to keep my hands busy and to pass the time. I find needlecrafts to be very calming, especially when I’m cramped on a bus after a long day at work. So I guess it’s a good thing I have a lot of Zs to crochet! Does crocheting and knitting have a soothing effect on you too?
It’s been about a month since I started crocheting these Zs. Every night when I get home, I toss the Zs I made that day into a box to be wet blocked later. When I finally took a look at my Z stash the other day, I was floored by the number I’ve already made! I almost have the 155 Sleepyz I’ll need to make a standard size afghan, and seeing them all together was a little overwhelming. I found myself getting sleepier and sleepier in their presence. It shouldn’t be that surprising, but crocheting Sleepyz will wear you out!
In the park, on the bus, in my office while at lunch. Crochet here, crochet there. I crochet Zs everywhere!
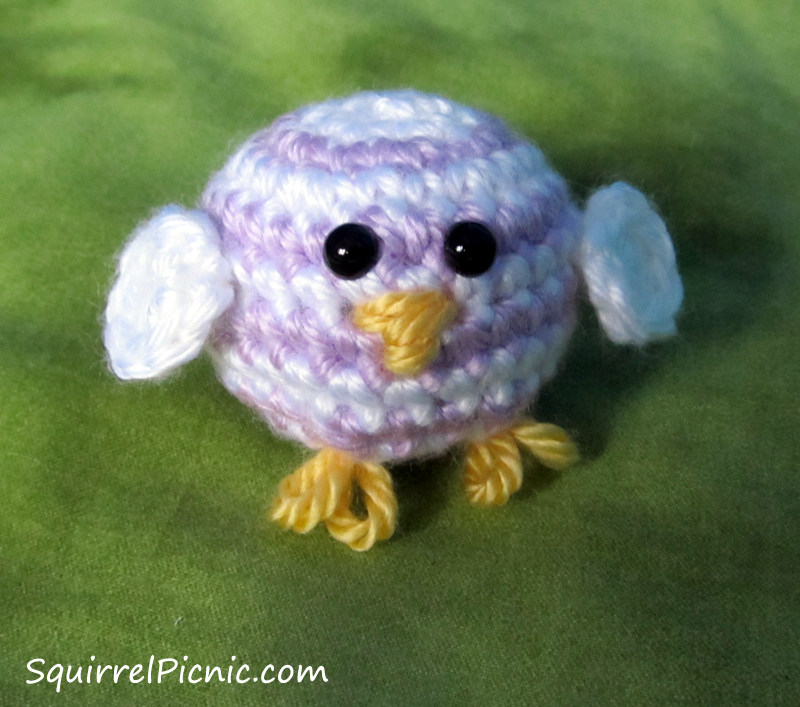
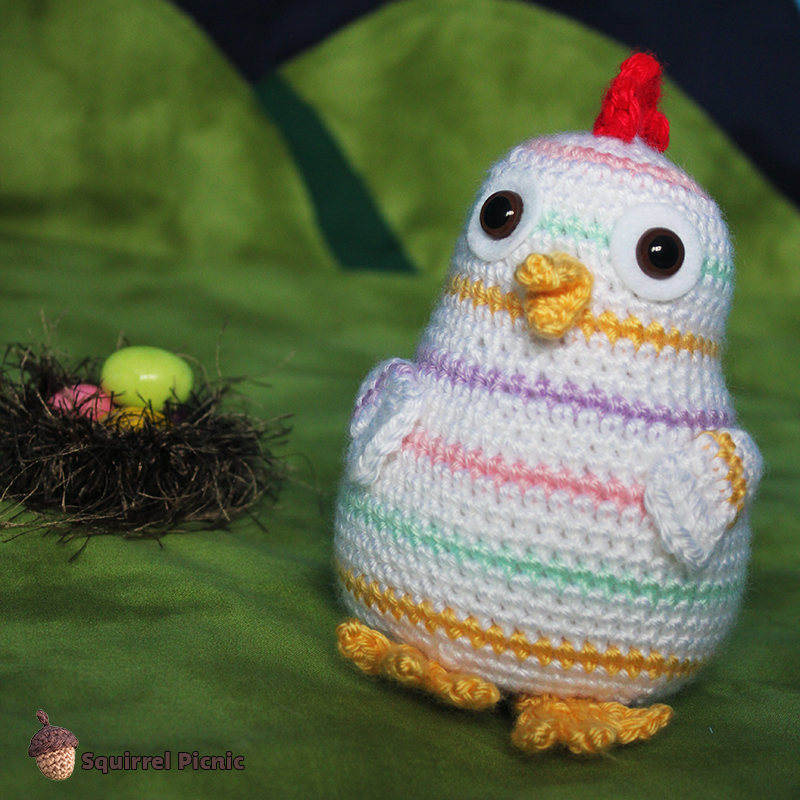
Baby rainbow chicks are just about the cutest creatures on the planet. Each spring, a rainbow chicken will lay between six and twelve pastel-colored eggs. These eggs are often mistaken for candy, so the female rainbow chicken must guard her nest very diligently against sweet-toothed woodland critters.
Baby rainbow chicks are very rambunctious. They hop around like bouncy balls on a sugar high. But they’re ridiculously adorable, so most everyone puts up with them.
They whip up super quick, so you can crochet a dozen in no time flat. They fit comfortably in plastic Easter eggs too.
I think we’ll call this one Pepito. Thanks to Sheena (NotAPunkRocker) for the name!
Baby Rainbow Chick Crochet Pattern
Finished size: 1 1/2″ tall and 5″ around at the widest point
Materials
small amount of worsted-weight yarn in white (Caron Simply Soft in White, 6 oz [170 g] / 315 yds [288 m])
small amount of worsted-weight yarn in purple (Caron Simply Soft in Orchid, 6 oz [170 g] / 315 yds [288 m])
small amount of worsted-weight yarn in yellow (Caron Simply Soft in Sunshine, 6 oz [170 g] / 315 yds [288 m])
F-5 (3.75 mm) crochet hook
1 set of size 6 mm safety eyes (if you are making this for a child, please embroider eyes)
Polyester Fiberfill
Tapestry needle
Gauge
5 sts = 1″
5 rows = 1″
Instructions
Body
Note for changing color: This chick is crocheted in joined rounds in order to create almost perfect jogless stripes. In other words, each round ends with “join with slst, ch 1.” On the rounds with a color change, join with slst as usual, but use the next color to ch 1.
Of course, you could always fasten off each color and reattach the new color. This will give you a more precise stripe, but you’ll have to weave in some ends (or just tie them on the inside), which could be annoying… unless it’s your favorite part, then by all means, knock yourself out!
With white, ch 2
Rnd 1: 6 sc in 2nd ch from hook. (6)
Rnd 2: 2 sc in ea sc around, join with slst, switch to purple, ch 1. (12)
Rnd 3: * Sc, inc, rep from * 5 more times, join with slst, switch to white, ch 1. (18)
Rnd 4: * 2 sc, inc, rep from * 5 more times, join with slst, switch to purple, ch 1. (24)
Rnd 5: Sc in ea sc around, join with slst, switch to white, ch 1.
Rnd 6: Sc in ea sc around, join with slst, switch to purple, ch 1.
Rnds 7-8: Rep rnds 5-6.
Rnd 9: * 2 sc, dec, rep from * 5 more times, join with slst, switch to white, ch 1. (18)
Insert posts of safety eyes between stitches in Rnds 5 and 6 and pop on the backs to secure. Stuff chick firmly.
Rnd 10: * Sc, dec, rep from * 5 more times, join with slst, switch to purple, ch 1. (12)
Rnd 11: Dec 6 times, join with slst. FO, leaving a long tail. Using tapestry needle, thread this tail through the remaining sts and pull tight to close the hole. Weave in end.
Wings (Make 2)
With white, ch 2.
Rnd 1: In 2nd ch from hook: sc, hdc, 4 dc, hdc, sc. Join with slst. FO, leaving a long tail for sewing.
Sew wings to sides of the body.
Beak
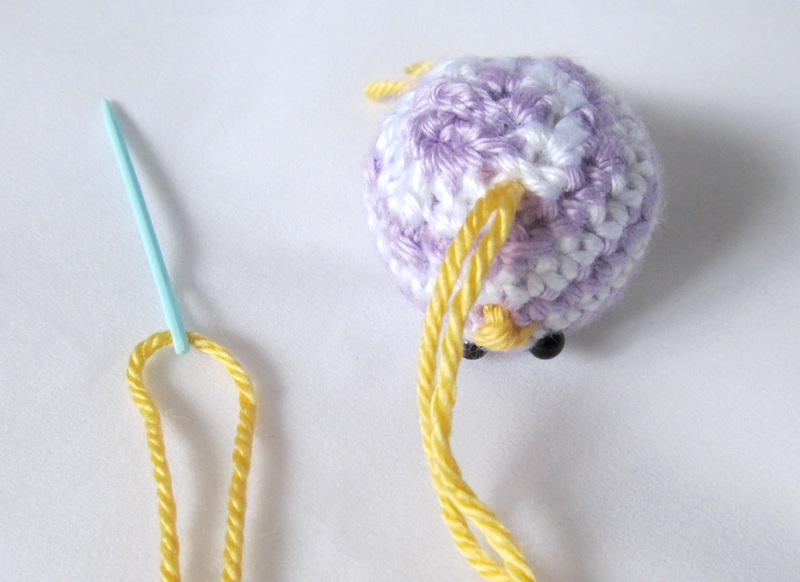
Using yellow yarn, embroider a beak.
I made my beak by embroidering the outline of a triangle that points down. Then I threaded through the two bottom sides of the triangle twice to fill it in and hid the end inside the bird.
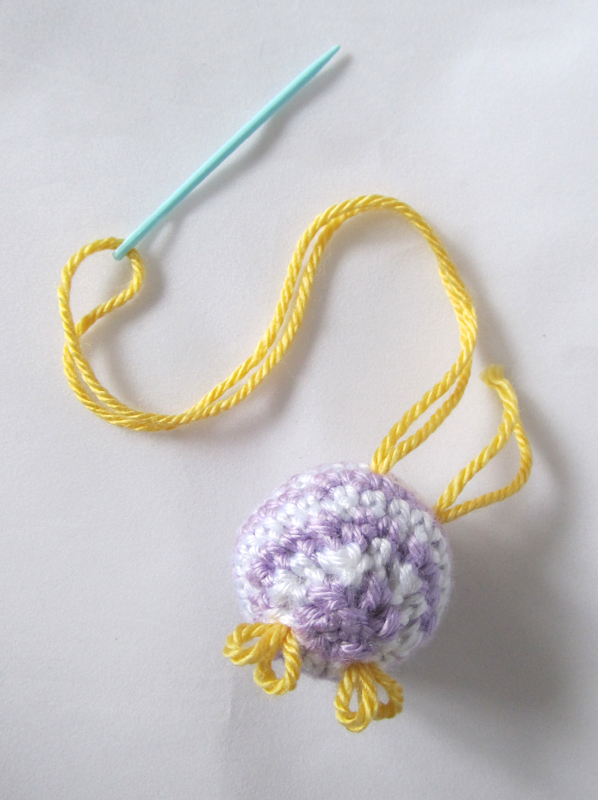
Feet
Thread tapestry needle with yellow yarn again and double it up. Insert the needle through the back of the bird (anywhere is fine) to a spot on the bottom (toward the front) where you want to position a foot. Pull the yarn so there’s only a few inches sticking out the back (we’ll take care of those in a bit).
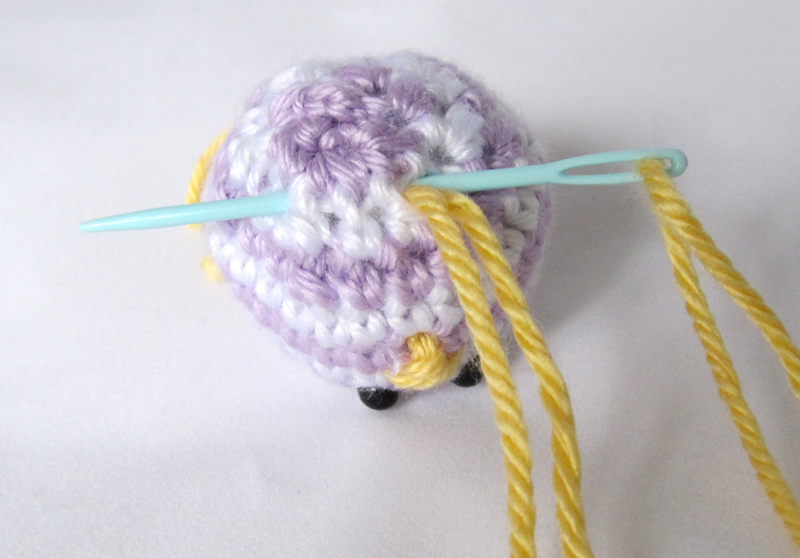
Insert the needle back through this same hole in the bottom front of the bird and out through a corresponding hole on the other side at the bottom of the bird.
Pull through until the two loops are about a 1/4″ long.
Insert your needle back through the same hole you just came out of and thread it through to the back of the bird again (anywhere is fine). Pull through until the two loops on this side are about the same size as your first two loops.
Trim your yarn and push the ends inside the bird.
Every rainbow chick needs a mama.
Crochet a Mama Rainbow Chick with the free pattern here at the picnic.
Rainbow Chicken is just your average, ordinary, everyday chicken, except that she developed a striped pastel pattern to her plumage after a rainbow fell on her one day. Can you imagine that? I want a rainbow to fall on me too!
She lives in the woods near the picnic and lays pastel-colored eggs in springtime. These eggs look a lot like candy. But are they? You’ll have to stayed tuned for Part 2 of “The Mystery of the Rainbow Chicken” to find out! In the meantime, crochet a rainbow chicken. She’d look super cute in someone’s Easter basket.
When I last left you I had just figured out how to crochet a Z. It seems I was so excited about sharing how I made a Z that I totally forgot to tell you about all the fun I had winding up the yarn. I must’ve been super sleepy that day. I hope you don’t mind if I backtrack a bit.
Winding yarn is one of my favorite things to do. It ranks right up there with popping bubble wrap and watching videos of baby animals. So one morning, as soon as hubby was gone and the coast was clear, I whipped out my ball winder and swift and set to work winding up ball after ball of my beautiful new cotton.
It’s not that I don’t want Shelby around. He doesn’t mind my taking up the entire kitchen table with yarn. In fact, he’s very helpful. Last time I had a lot to wind, he noticed how I held the yarn to help feed it onto the ball winder. He offered to hook me up with something that would do that for me. I looked at him like he was crazy and said, “But you don’t understand, that’s the best part. I get to feel the yarn as it winds into a ball. It’s so soft and luxurious, and I can just imagine what fun it will be to work with it and turn it into something wonderful!” He, understandably, looked at me like I was crazy.
I’ve decided, I guess, that people are welcome to watch, but I’m finding it’s more of a thrill if I just wind my balls in private. For those who have never tried it, here’s how the process works. Often the yarn you purchase is in skeins. That just means that it is looped around and around in one big coil (like a garden hose). This isn’t much fun to work with as is. It’s easier to use if it’s in a ball. I used to use the back of a chair to hold the yarn and wind it up by hand. But now that I have my handy-dandy swift and ball winder, it is much easier. You load the skein onto the swift and thread a loose end of the yarn through the guide on the ball winder and into the slot on the top of the post around which it wraps. Then you just turn the crank on the ball winder and the swift gets to going, feeding the yarn to the ball winder. You can get them to go really fast! (I guess that’s the thrilling part.) Before you know it, you have a ball of yarn that feeds from the center. That’s the best kind, in my opinion.
Well, time to get back to crocheting those Zs. I hope that when we meet again I have lots of Sleepy Zs to show you.
Blue Skies Alpaca Worsted Cotton for the Sleepyz Blanket
A swift gets the job done swiftly. He-he.
The swift feeds the yarn from the skein to the ball winder.


You must be logged in to post a comment.