Squirrel Picnic

Handmade with Love and Stuff


27 Comments

Make It! Challenge #12: Unlikely Friends Crochet Parrot and Penguin Patterns

Unlikely Friends HeaderWelcome to the finale of the Make It! Challenge series! Sheena from Virginia challenged me to make unlikely friends amigurumi, meaning animals that don’t normally hang out together. We talked about a few different examples before we decided that a penguin and a parrot would make an unlikely pair. Where would they meet? A penguin in the Amazon would be a sweaty mess and a parrot in Antarctica would shiver his feathers off. Maybe they should meet on a mild September day in Colorado, like today.

Crochet Unlikely Friend Bird by Squirrel Picnic 12Pondering the theme of unlikely friends as I was brainstorming the construction for this Make It! Challenge led me to origami. The art of using intricate folds to turn a two-dimensional surface into a three-dimensional object seems about as far away from crochet as you can get.

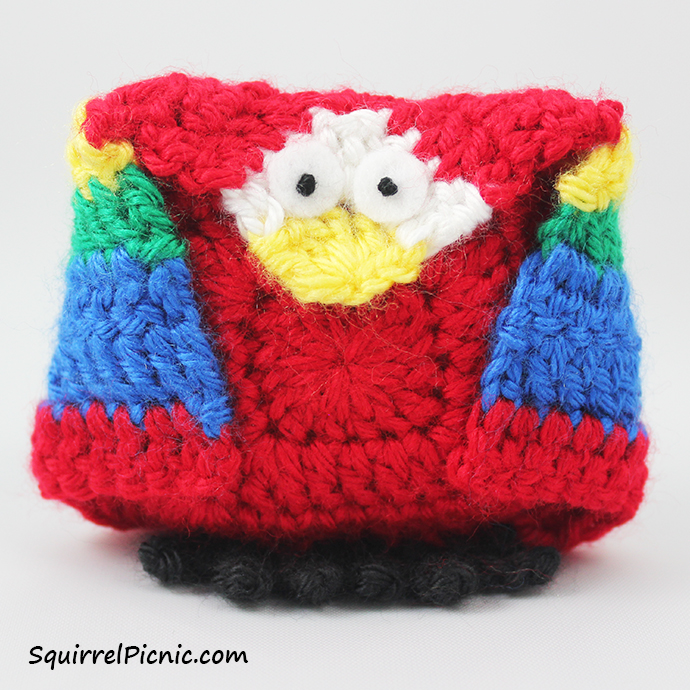
Usually an amigurumi is created by working in the round (crocheting in a spiral to create spheres). I wondered what would happen if I started instead with a flat surface, like a granny square. I decided to start at the corner of a square to create a beak, and then working out from there, I could create a striped pattern that would mimic the bird’s coloration. The tough part was determining how to fold this one square so that it took a form that would stay together and do it in a way that would be easy for others to duplicate. Despite multiple trials, it never quite worked. In the end, sewing a second smaller square on the front and folding the head and wings forward and the tail back was the easiest answer. All in all, I am really pleased with this origami-inspired amigurumi. I hope you enjoy it too. 

Continue reading


1 Comment

How to Add Faces to Your Amigurumi: Simple Eyes with Felt and French Knots

Ultra Easy Amigurumi Eyes Tutorial by Squirrel PicnicI’m back with another tutorial on how to add faces to your amigurumi. This time I wanted to show you what I do when I just need a simple pair of child friendly eyes and I need them fast. As I’ve mentioned in previous episodes in this series, whenever I’m making a toy for a kiddo, I try to use embroidery instead of safety eyes or buttons.

These eyes use a common embroidery technique: French knots. I used to be really intimidated by this stitch, but just like anything in life, the more you practice, the easier it will get. Making amigurumi eyes is a great way to get in your practice.

If you’re like me and find that it’s hard to achieve consistency with your French knots, you will love this technique. With these eyes, you’re doing one eye at a time (breaking your thread between each eye), so you can pull the knot as tight as you like without having to worry about the slack at the back of your work. We’ll be tying the tails at the back, so the knot will stay in place as well.

So let’s get started… Then, next week, I’ll share with you a pattern that incorporates this technique and double bonus… it’s the next Make It! Challenge.
Continue reading


14 Comments

Big Acorn Race Update: Time to Test the Patterns

Tall n Fast Flower Pillow (Kate)

Tall n Fast Flower Pillow (Kate)

Working with pattern testers for the first time has been a wonderful, eye opening, humbling, and gratifying experience. Continue reading


17 Comments

The Big Acorn Race Update: New Beginnings

Podge's ApronThese past two months have been such a whirlwind for me. I had the goal to get all the patterns for the book to the pattern testers by the middle of July and to get all the preliminary text files and photos for most of the patterns  to my wonderful friend, the super talented Sylvie by the end of last week. It was a tall order, but somehow I did it! Continue reading

How to Make Your Amigurumi’s Head Turn: A Video!

12 Comments

How to Make Your Amigurumi's Head Turn by Squirrel PicnicI have a wonderful surprise for you today! I recently discovered an inexpensive and super fast way to give your squirrel amigurumi a head that turns. The problem with amigurumi is that they are so small. I haven’t been able to find commercially made doll joints in the right size. But what is a doll joint really? It’s just a post with a fixed head and a washer that pops on to the other end. If you look around the Internet, you’ll find doll makers who have come up with all sorts of solutions: buttons and thread, screws and washers, and my personal favorite — safety eyes!

Let’s use safety eyes to make our squirrel’s heads turn! The concept is pretty simple. Just work the head section of my squirrel pattern through the last round, leaving 6 stitches remaining and a little hole. Fasten off your stitch, leaving a long tail. Thread this tail through the remaining stitches. You do the same thing with the opening at the neck of the body. You’ll insert the head (eye) of a safety eye into the hole on the head of your squirrel and pull the tail tightly to close the hole around the post of the safety eye. Then snap on the washer and fit the hole on the body around the washer. Pull that tail tight to close it around the post and ta-da you have a movable head. If that didn’t make sense, you’re in luck… I made a funny little video to demonstrate. Enjoy! Continue reading