 I’m back with another tutorial on how to add faces to your amigurumi. This time I wanted to show you what I do when I just need a simple pair of child friendly eyes and I need them fast. As I’ve mentioned in previous episodes in this series, whenever I’m making a toy for a kiddo, I try to use embroidery instead of safety eyes or buttons.
These eyes use a common embroidery technique: French knots. I used to be really intimidated by this stitch, but just like anything in life, the more you practice, the easier it will get. Making amigurumi eyes is a great way to get in your practice.
If you’re like me and find that it’s hard to achieve consistency with your French knots, you will love this technique. With these eyes, you’re doing one eye at a time (breaking your thread between each eye), so you can pull the knot as tight as you like without having to worry about the slack at the back of your work. We’ll be tying the tails at the back, so the knot will stay in place as well.
So let’s get started… Then, next week, I’ll share with you a pattern that incorporates this technique and double bonus… it’s the next Make It! Challenge.
Materials
Felt
Needle (Any needle that is sharp enough for felt and with an eye large enough for your embroidery floss. I like to use chenille needles.)
Embroidery Floss or Perle Cotton Thread
Scissors
Instructions
1: Cut 2 squares of felt 3/8” x 3/8”.

2: Turn one square into a circle by using your scissors to round the corners.

3: Repeat for the other square.

4: Thread your needle with embroidery floss. Come up with your needle through the center of the felt circle.

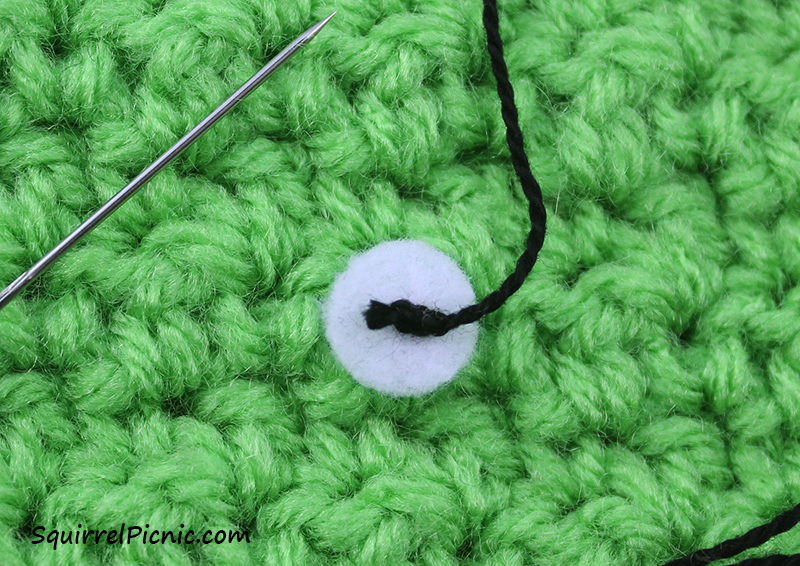
5: Make a French knot by wrapping the working thread around the needle three times. Make sure that everything stays taut.

6: Push the needle back down through the felt a slight distance away from where you came up.

7: Lightly pinch the thread wrapped around your needle to hold the wraps in place. It helps to hold the free yarn (the end closest to your wraps) taut as well.

8: Push the needle down through the wraps and out the back of the felt. Pull the thread through, continuing to pinch the wraps slightly to keep them together.

9: Secure the two ends of thread by tying them at the back in a square knot and trim the tail end close to the knot so that it won’t show from the front.
10: Repeat steps 4-9 for the other eye.

11: Sew the eyes to your amigurumi’s head.
Your homework is to practice this technique so you can use it to make the eyes for next week’s new Make It! Challenge. I can’t wait to show you what I’ve discovered by blending amigurumi with origami.


Pingback: 50 Fabulous Crochet Tutorials for Learning to Crochet |