
My husband, Shelby, is the best. Since the start of Squirrel Picnic, he’s had to put up with crochet squirrels coming on vacation with us, weekends sacrificed to endless crochet craziness, and a living room that is almost always covered in yarn. He’s also been my best adviser, weighing in on everything from yarn color to construction. He has a very good mechanical mind. For these and so many other reasons, I am very pleased to be able to dedicate Make It! Challenge #8 to him — it’s well deserved and long overdue. And, yes, he advised me on everything for this project, even coming with me to the yarn shop to pick out zombie colors.
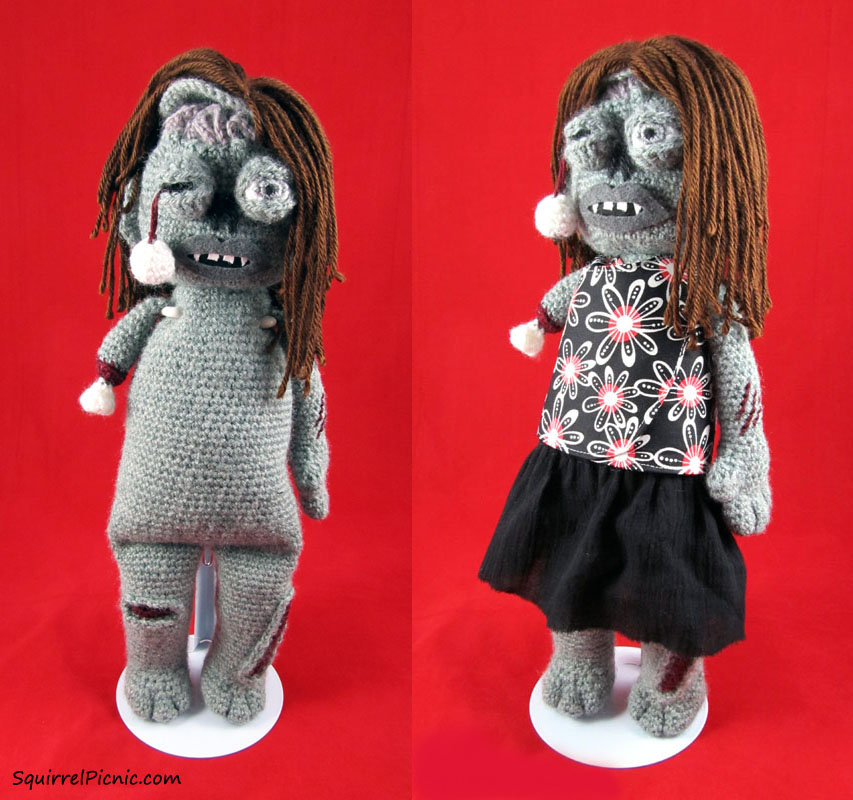
As you could probably already guess, for this challenge Shelby asked me to make him a zombie version of myself (a zombie self-portrait if you will). I set my heart on a few details from the start: an exposed brain with a flap of scalp, an eye that could pop out of the socket, and an arm that’s been cut off at the elbow. Of those three details, the eyes were the hardest, and I’m still not thrilled with how bug-eyed my zombie looks. So when I decided to make a zombie version of my husband to accompany the zombie version of me, I chose to simplify the construction of some of the details. Before I knew it, I had two very different patterns. The bodies and appendages are basically the same, but details like the eyes, brain opening, hair, and limbs are more complicated on the girl zombie. Have fun picking and choosing which details you like between the girl and boy zombies to make your zombie uniquely your own.
As a final note, I should mention that this pattern doesn’t include how to make clothing for your zombie. However, at the end of each pattern, I’ve listed links to the free sewing patterns I used to make my zombies’ clothes. Most 16” to 18” doll clothes patterns will fit your zombie, but do a fitting with the pattern before you start. There are a lot of free American Girl Doll clothes patterns online, and from what I could tell, most of them will fit your zombie with minimal tweaking.
As I type this, our zombies look very cute sitting on the couch together and holding hands. I’d love to see pictures of your zombies too! Send them to squirrelpicnic{at}gmail{dot}com or share them on Facebook.
Zombies in Love Crochet Patterns
 Zombie Girl Crochet Pattern

 Zombie Boy Crochet Pattern

Zombie Girl
For this pattern, you will need to be familiar with simple colorwork techniques. Regarding this, I have not included a chart or written where the wounds should go in the pattern because it will look more natural if you are allowed to make these decisions on your own. It isn’t hard to do, but I wanted you to be prepared. In general, the body, arms, and legs are all pretty straightforward, but the details may require some patience.
Finished size: 15 1/2″
Links to the free doll clothes patterns I used for my zombie are listed at the end of this pattern.
Materials
(A) 240-280 yds DK-weight yarn in gray-green (Plymouth Yarn Encore® in Light Green Frost, 75% Acrylic, 25% Wool, 50 g/150 yds)
(B) 10-50 yds DK-weight yarn in red (Cascade Ultra Pima Cotton in Wine, 100% Pima Cotton, 100g/220yds) * The amount will vary depending on the quantity and size of the wounds you give your zombie.
(C) 35-50 yds worsted-weight yarn in gray-purple (Plymouth Yarn Encore® in Zinc Heather, 75% Acrylic 25% Wool, 100 g/200 yds)
(D) 3-5 yds worsted-weight yarn in gray (Caron Simply Soft in Grey Heather, 100% Acrylic, 142 g/250 yds)
(E) 3-5 yds worsted-weight yarn in white (Caron Simply Soft in White, 100% Acrylic, 142 g/250 yds)
(F) 2 yds worsted-weight yarn in black (Caron Simply Soft in Black, 100% Acrylic, 170 g/315 yds)
(G) 100-200 yds worsted-weight yarn in hair color of your choice (Caron Simply Soft in Chocolate, 100% Acrylic, 142 g/250 yds) * The amount will vary depending on hair length.
D-3 (3.25 mm) crochet hook
F-5 (3.75 mm) crochet hook
G-6 (4.00 mm) crochet hook
Place marker or waste yarn (PM)
35 mm doll joint set
Polyester Fiberfill
Tapestry needle
Straight pins
Sewing needle
Felt in black, white, and gray (you’ll need less than half of a 9” x 12” square of each)
Hot glue or fabric glue
Thread to match G (Coats & Clark Dual Purpose Color 8890)
Scissors
Gauge
6 sc = 1 inch
6 rows = 1 inch
Abbreviations
beg = beginning
BL = back loop
ch = chain
ch-sp = chain space
dc = double crochet
dec = decrease by single crocheting 2 together
ea = each
FL = front loop
FO = fasten off
hdc = half double crochet
inc = increase with 2 sc in next st
rep = repeat
rnd = round
sc = single crochet
sk = skip
slst = slip stitch
st(s) = stitch(es)
tr = treble crochet
Instructions
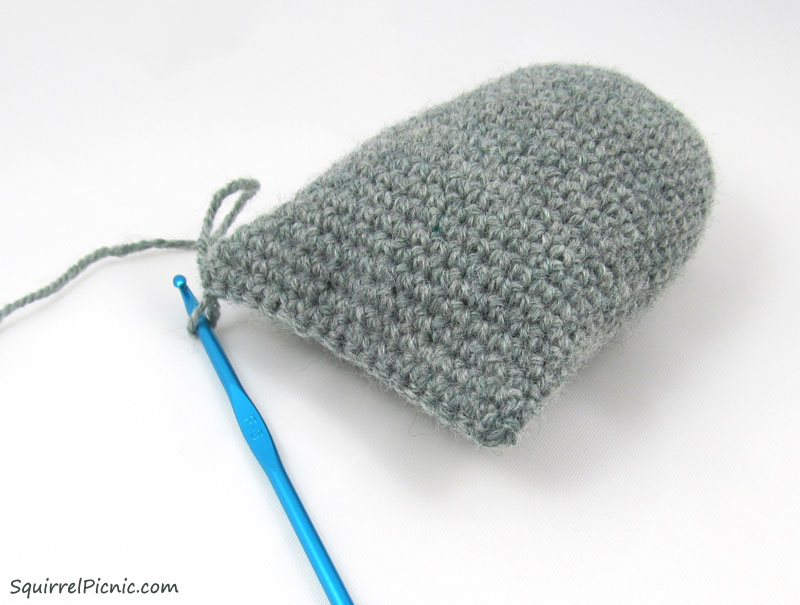
Body
With A and F-5 crochet hook, chain 2.
Rnd 1: 6 sc in 2nd ch from hook.
Rnd 2: 2 sc in ea sc around. (12)
Rnd 3: * Sc, inc, rep from * 5 more times. (18)
Rnd 4: * 2 sc, inc, rep from * 5 more times. (24)
Rnd 5: * 3 sc, inc, rep from * 5 more times. (30)
Rnd 6: * 4 sc, inc, rep from * 5 more times. (36)
Rnd 7: * 5 sc, inc, rep from * 5 more times. (42)
Rnd 8: * 6 sc, inc, rep from * 5 more times. (48)
Rnd 9: * 7 sc, inc, rep from * 5 more times. (54)
Rnd 10: Sc in ea sc around.
Rep Rnd 10 until body measures 7 inches from beginning.
Place male part of doll joint through the hole at the top of the body. Stuff body.
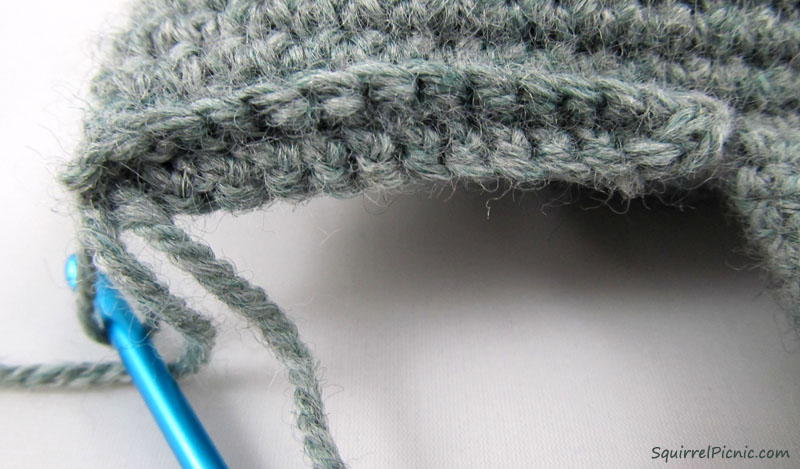
Flatten the last row at the bottom of the body and sc it closed with 28 scs. Ch 1 and turn. Do not FO. You will proceed to the first leg next.
First Leg
(Continue using A and F-5 crochet hook.)
(Switch to B wherever you choose to add a wound as you work down the length of the leg.)
Rnd 1: Sc in FL of the next 14 scs, turn and sc in the unused loops of those 14 scs. Join with slst to 1st sc. (28)
Rnds 2-14: Sc in ea sc around. (28)
Rnd 15: * Sc 5, dec, rep from * 3 more times. (24)
Rnds 16-25: Sc in ea sc around. (24)
FO, weave in end.
Second Leg
(Continue using A and F-5 crochet hook.)
(Switch to B wherever you choose to add a wound as you work down the length of the leg.)
Insert hook into FL at the outer edge of the bottom of the doll.

Pull up a loop, ch 1.
Rnd 1: Sc in FL of the next 14 scs, turn and sc in the unused loops of those 14 scs. Join with slst to 1st sc. (28)
Rnds 2-14: Sc in ea sc around. (28)
Rnd 15: * Sc 5, dec, rep from * 3 more times. (24)
Rnds 15-25: Sc in ea sc around. (24)
FO, weave in ends.
Feet (Make 2)
With A and F-5 crochet hook, ch 5.
Rnd 1: Sc in 2nd ch from hook, sc in BL of ea of next 2 chs, sc 3 in last ch. Sc in unused loops of foundation ch, 3 sc in last ch, join with slst to first sc. (12)
Rnd 2: Ch 1, sc in next 3 sc, 2 sc in next 3 sc, sc in next 3 sc, 2 sc in next 3 sc, join with slst. (18)
Rnd 3: Ch 1, sc in next 3 sc, [2 sc in next sc, sc in next sc] 3 times, sc in next 3 sc, [2 sc in next sc, sc in next sc] 3 times, join with slst. (24)
Rnd 4: Ch 1, sc in next 3 sc, [2 sc in next sc, sc in next 2 sc] 3 times, sc in next 3 sc, [2 sc in next sc, sc in next 2 sc] 3 times, join with slst. (30)

Rnd 5: Ch 1, sc in BL only of ea sc around. (30)
Rnds 6-7: PM. Sc in ea sc around.
Rnd 8: Move PM. Sc 3, [dec, sc in next sc] 3 times, sc in next 18. (27)
Rnd 9: Move PM. Sc 2, [dec, sc in next sc] 3 times, sc in next 16. (24)
FO, leaving a long tail for sewing.

Stuff a leg and foot. Pin and sew together using tail from foot. Repeat with opposite leg.
With D, embroider foot using the Cabbage Patch method (scroll down to step 9 of her doll pattern instructions).
Bottom Half of Head
With A and F-5 crochet hook, ch 2.
Rnd 1: 6 sc in 2nd ch from hook.
Rnd 2: 2 sc in ea sc around. (12)
Rnd 3: * sc, inc, rep from * 5 more times. (18)
Rnd 4: * 2 sc, inc, rep from * 5 more times. (24)
Rnd 5: * 3 sc, inc, rep from * 5 more times. (30)
Rnd 6: * 4 sc, inc, rep from * 5 more times. (36)
Rnd 7: * 5 sc, inc, rep from * 5 more times. (42)
Rnd 8: * 6 sc, inc, rep from * 5 more times. (48)
Rnd 9: * 7 sc, inc, rep from * 5 more times. (54)
Rnds 10-21: Sc in ea sc around.
Rnd 22: * 7 sc, dec, rep from * 5 more times. (48)
Rnd 23: * 6 sc, dec, rep from * 5 more times. (42)
Rnd 24: * 5 sc, dec, rep from * 5 more times. (36)
Rnd 25 (Making jagged edge of skull): Sc in ea sc around while placing picots (sc, ch 1, 2, or 3, sc in one stitch) of varying heights in random scs. Join with slst. FO, leaving a long tail.

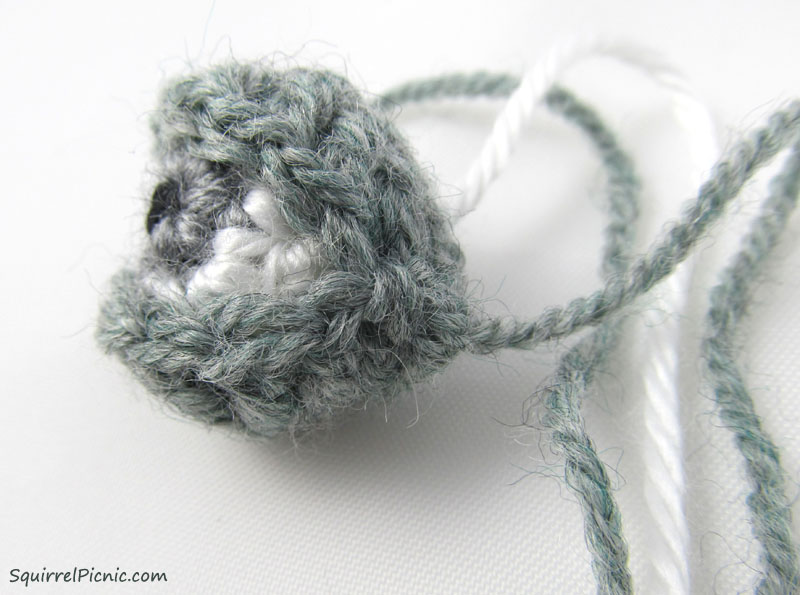
Eyes (Make 2)
With D and size D-3 crochet hook, ch 2.
Rnd 1: 6 sc in 2nd ch from hook.
Switch to E.
Rnd 2: 2 sc in ea sc around. (12)
Rnds 3-4: Sc in ea sc around.
Rnd 5: * Sk, sc, rep from * 5 more times. Join with slst. (6)
FO, leaving a long tail.
Thread tail through last 6 sts and pull together. Don’t trim tail yet.
With F, embroider a black pupil at the center of the gray iris.
Cut a length of B about 2 feet long. Double it up and thread the loop through the back of one eye. Pull the tail ends through the loop to secure. On this eye only, weave in white tail end and trim.

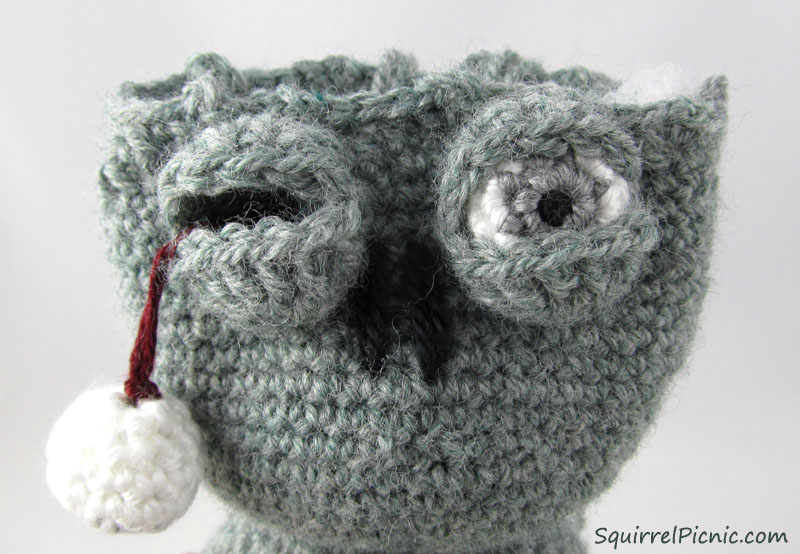
Eyelids (Make 4)
With A and D-3 crochet hook, ch 4.
Row 1: Tr 11 in 3rd ch from hook.
BO, leaving a long tail for sewing.

Arrange two eyelids, one on top of the other with RS facing out. Sew together through the last three trs on each eyelid. Repeat on the other side.
For the eye with the nerve at the back (red thread): Position the eye about where you want it to go on the head. Thread the red strands through and secure to the inside of the head with a few knots, leaving enough slack so that the eye will be able to droop a few inches if you pulled it out of the socket. Position the eye between the eyelids, threading the tail through the hole at the back of the joined eyelids. Using the long tail from the eyelids, sew the eyelids to the head.
Repeat for the eye without the nerve. Instead of threading the nerve through, thread the white tail end through the front of the head and secure.

Nose
Thread a tapestry needle with F, double up the yarn and embroider two lines for the holes where the nose would normally be.
Mouth
Use the bottom half of this PDF pattern to cut out the mouth, lips, and teeth: Pattern for Zombie Parts
Glue the teeth to the mouth piece. Glue the mouth with teeth to the zombie’s head. Be sure to cut out the hole in the center of the lips. Then glue the lips onto the mouth.

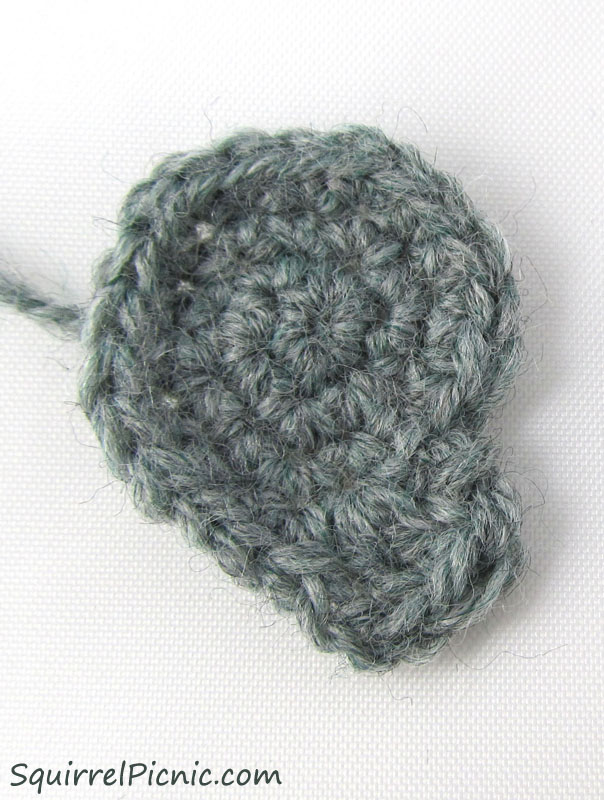
Right Ear
With A and F-5 crochet hook, ch 2.
Rnd 1: 6 sc in 2nd ch from hook.
Rnd 2: 2 sc in ea sc around. (12)
Rnd 3: * Sc, inc, rep from * 5 times. (18)
Rnd 4: * 2 sc, inc, rep from * 2 more times. This will take you halfway around the circle. Ch 2, dc 3 in next sc. Slst, FO, leaving a long tail for sewing.
Left Ear
With A and F-5 crochet hook, ch 2.
Rnd 1: 6 sc in 2nd ch from hook.
Rnd 2: 2 sc in ea sc around. (12)
Rnd 3: * Sc, inc, rep from * 5 times. (18)
Rnd 4: Slst, ch 2, dc 3 in next sc, * sc 2, inc, rep from * 2 more times. Slst, FO, leaving a long tail for sewing.

Sew ears to head.
Top of Head (Skull Flap)
With A and F-5 crochet hook, chain 2.
Rnd 1: 6 sc in 2nd ch from hook.
Rnd 2: 2 sc in ea sc around. (12)
Rnd 3: * sc, inc, rep from * 5 more times. (18)
Rnd 4: * 2 sc, inc, rep from * 5 more times. (24)
Rnd 5: * 3 sc, inc, rep from * 5 more times. (30)
Rnd 6: * 4 sc, inc, rep from * 5 more times. (36)
Rnd 7: * 5 sc, inc, rep from * 5 more times. (42)
Rnd 8: * 6 sc, inc, rep from * 5 more times. (48)
Rnd 9: * 7 sc, inc, rep from * 5 more times. (54)
Rnds 10-11: Sc in ea sc around.
Join with slst. FO. Work in ends.

Hair for Flap
Determine how long you want the hair to be. Get a book or piece of cardboard that has a width comparable to the hair length you desire. Wrap the yarn around the book several times. Cut the yarn on one end. (You’ll have to do this step several times to get enough hair to cover your doll’s head.) Use pins to mark a line down the center of the Skull Flap. Using thread that matches your doll’s hair, sew 4 pieces of hair at a time to the Skull Flap using a back stitch down the center line that you marked.
K and J Dolls Blog has a great tutorial on how to give your doll some hair
Brain
With C and G-6 crochet hook, ch 16.
Row 1: 3 sc in 2nd ch from hook and in ea st across, ch 1, and turn.
Row 2: 3 sc in ea st across, ch 1, and turn.
Row 3: 3 sc in ea st across, FO, and work in ends.
You’ll need to play with the form a bit to make it look like a brain. Just move it around and let it twist naturally until it takes a shape that appeals to you. Set aside brain for the moment.

Putting the Head Together and Attaching It to the Body
Insert female part of doll joint into bottom of Bottom Half of Head. Insert male part of joint from Body and click them together. Stuff head. (At this point, I thought my zombie’s eyes were too bug-eyed so I stuffed the head halfway and using the long tails from the back of the eyes, pulled the eyes back a little and tied these threads at the inside back of the head. Then I stuffed the rest of the head. But you could skip this if you like your zombie bug-eyed. I won’t judge.)
Using the tail on the Bottom Half of Head, sew Brain to Bottom Half of Head.


Lining up the part in your hair front to back, sew the back 2” of the Flap to the back 2” of the Bottom Half of Head, behind the Brain.

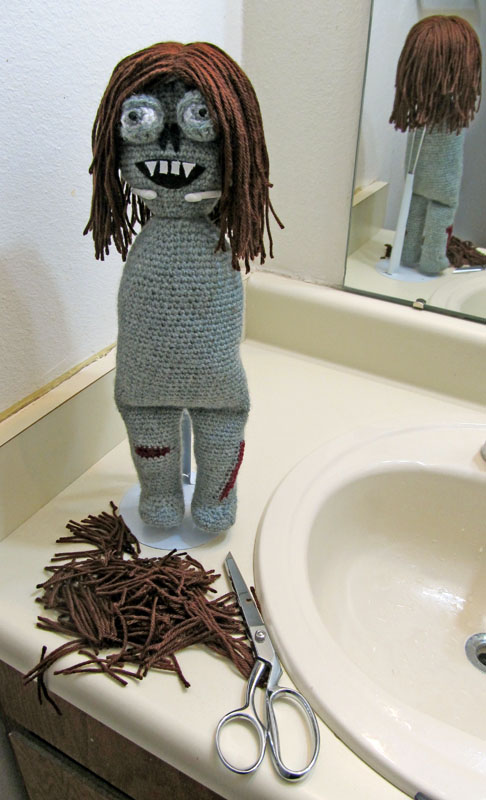
Give your zombie a haircut. I found it easiest to use a doll stand for this, but since she doesn’t have arms yet, I had to hold her up by her neck. Ouch!
Arm (Make 1)
With A and F-5 crochet hook, ch 2.
Rnd 1: 6 sc in 2nd ch from hook.
Rnd 2: 2 sc in ea sc around. (12)
Rnd 3: * Sc, inc, rep from * 5 more times. (18)
Rnds 4-8: Sc in ea sc around.
Rnd 9: 2 sc in next sc, 4 sc in next sc, 2 sc in next sc, sc in remaining sc around. (23)
Rnd 10: Sc in next 3 sc, 2 sc in next 5 sc, sc in remaining sc around. (28)
Rnd 11: Sc in next 3 sc, dec 5 times over the next 10 sc, sc in remaining sc around. (23)
Rnd 12: Dec 1 time over next 2 sc, dec 1 time over next 4 sc, dec 1 time over next 2 sc, sc in remaining sc around. (18)
Rnd 13: Sc in ea sc around.
Rnd 14: * Sc, dec, rep from * 5 more times. (12)
Stuff hand.
Rnds 15-35: Sc in ea sc around, stuffing as you go.
Leave the last ½” of the arm unstuffed.
Row 36: Pinch the upper arm flat, line up sts. Ch 1, turn, and sc the arm closed. (6)
FO, leaving long tail.
If you’d like to embroider scratches as I did, now is a good time. With D, embroider hand as you did for foot. I used three stitches, so my hand has three fingers and a thumb. Whatever, it looks cute.

Using tail, sew arm to body.

Arm with Bone (Make 1)
Leaving a tail of about 6”, with E and F-5 hook, ch 4. (Keep track of this tail as you go around, as it will be used to shape the bone later. Work in all other ends as you change colors.)
Rnd 1: 7 dc in 3rd ch from hook, join with slst. (8)
Rnd 2: Sc in ea dc around.
Rnd 3: * Sc, sk, rep from * 3 more times. (4)
Switch to B.
Rnd 4: Sc in ea sc around.
Rnd 5: 2 sc in FL only of ea sc around. (8)
Rnd 6: * Sc, inc, rep from * 3 times, slst. (12)
Switch to A.
Rnd 7: Sc in BL only of ea sc around.
Rnds 8-17: Sc in ea sc around, stuffing as you go.
Leave the last ½” of the arm unstuffed.
Pull white tail taunt so bone flattens out on the end and weave in end to secure it.
Row 16: Pinch the upper arm flat, line up sts. Ch 1, turn, and sc the arm closed. (6)
FO, leaving long tail. Use long tail to sew the arm to the body.

Finishing Touches
Just like you added jagged flesh to the skin around the brain, now’s a great time to go back and do the same to the skin around any gaping wounds you created on the arms and legs. Pull up a loop of A, ch 1, and sc in the stitches around each wound, adding a picot here and there.
Clothing
Customize your zombie with clothes that suit your style! Most 16” to 18” doll clothes patterns will fit your zombie, but do a fitting with the pattern before you start. There are a lot of free American Girl Doll clothes patterns online and from what I could tell most of them will fit your zombie with minimal tweaking. (Zombie hips are wider than American Girls… go figure.)
These are the free patterns I used for the female zombie:
Zombie Top
This Pareu Top from BeachBabyDoll is made from one piece of fabric. So easy, especially if you have a serger.
Zombie Skirt
This Sweet Little Skirt from Avery Lane Designs is super cute and easy to sew.
See a mistake or something I overlooked, please let me know in the comments or at squirrelpicnic{at}gmail{dot}com. Thanks!
Zombie Boy
 For this pattern, you will need to be familiar with simple colorwork techniques. Regarding this, I have not included a chart or written where the wounds should go in the pattern because it will look more natural if you are allowed to make these decisions on your own. It isn’t hard to do, but I wanted you to be prepared. In general, the body, arms, and legs are all pretty straightforward, but the details may require some patience.
Finished size: 15 1/2″

Links to the free doll clothes patterns I used for my zombie are listed at the end of this pattern.
Materials
(A) 240-280 yds DK-weight yarn in gray-green (Plymouth Yarn Encore® in Light Green Frost, 75% Acrylic, 25% Wool, 50 g/150 yds)
(B) 10-50 yds DK-weight yarn in red (Cascade Ultra Pima Cotton in Wine, 100% Pima Cotton, 100g/220yds) * The amount will vary depending on the quantity and size of the wounds you give your zombie.
(C) 35-50 yds worsted-weight yarn in gray-purple (Plymouth Yarn Encore® in Zinc Heather, 75% Acrylic 25% Wool, 100 g/200 yds)
(D) 3-5 yds worsted-weight yarn in gray (Caron Simply Soft in Grey Heather, 100% Acrylic, 142 g/250 yds)
(E) 3-5 yds worsted-weight yarn in white (Caron Simply Soft in White, 100% Acrylic, 142 g/250 yds)
(F) 2 yds worsted-weight yarn in black (Caron Simply Soft in Black, 100% Acrylic, 170 g/315 yds)
D-3 (3.25 mm) crochet hook
F-5 (3.75 mm) crochet hook
G-6 (4.00 mm) crochet hook
Place marker or waste yarn (PM)
35 mm doll joint set
Polyester Fiberfill
Tapestry needle
Straight pins
Sewing needle
Felt in black, white, and gray (you’ll need less than half of a 9” x 12” square of each)
Hot glue or fabric glue
¼ yd of faux fur in the hair color of your choice
Scissors
Gauge
6 sc = 1 inch
6 rows = 1 inch
Abbreviations
beg = beginning
BL = back loop
ch = chain
ch-sp = chain space
dc = double crochet
dec = decrease by single crocheting 2 together
ea = each
FL = front loop
FO = fasten off
hdc = half double crochet
inc = increase with 2 sc in next st
rep = repeat
rnd = round
sc = single crochet
sk = skip
slst = slip stitch
st(s) = stitch(es)
tr = treble crochet
Instructions
Body
With A and F-5 crochet hook, chain 2.
Rnd 1: 6 sc in 2nd ch from hook.
Rnd 2: 2 sc in ea sc around. (12)
Rnd 3: * sc, inc, rep from * 5 more times. (18)
Rnd 4: * 2 sc, inc, rep from * 5 more times. (24)
Rnd 5: * 3 sc, inc, rep from * 5 more times. (30)
Rnd 6: * 4 sc, inc, rep from * 5 more times. (36)
Rnd 7: * 5 sc, inc, rep from * 5 more times. (42)
Rnd 8: * 6 sc, inc, rep from * 5 more times. (48)
Rnd 9: * 7 sc, inc, rep from * 5 more times. (54)
Rnd 10: Sc in ea sc around.
Rep Rnd 10 until body measures 7 inches from beginning.
Place male part of doll joint through the hole at the top of the body. Stuff body.
Row 14: Flatten the last row at the bottom of the body and sc it closed with 28 scs. Ch 1 and turn. Do not FO. You will proceed to the leg next.
First Leg
(Continue using A and F-5 crochet hook.)
(Switch to B wherever you choose to add a wound as you work down the length of the leg.)
Rnd 1: Sc in FL of the next 14 scs, turn and sc in the unused loops of those 14 scs. Join with slst to 1st sc. (28)
Rnds 2-14: Sc in ea sc around. (28)
Rnd 15: * Sc 5, dec, rep from * 3 more times. (24)
Rnds 16-25: Sc in ea sc around. (24)
FO, weave in end.
Foot
With A and F-5 crochet hook, ch 5.
Rnd 1: Sc in 2nd ch from hook, sc in BL of ea of next 2 chs, sc 3 in last ch. Sc in unused loops of foundation ch, 3 sc in last ch, join with slst to first sc. (12)
Rnd 2: Ch 1, sc in next 3 sc, 2 sc in next 3 sc, sc in next 3 sc, 2 sc in next 3 sc, join with slst. (18)
Rnd 3: Ch 1, sc in next 3 sc, [2 sc in next sc, sc in next sc] 3 times, sc in next 3 sc, [2 sc in next sc, sc in next sc] 3 times, join with slst. (24)
Rnd 4: Ch 1, sc in next 3 sc, [2 sc in next sc, sc in next 2 sc] 3 times, sc in next 3 sc, [2 sc in next sc, sc in next 2 sc] 3 times, join with slst. (30)
Rnd 5: Ch 1, sc in BL only of ea sc around. (30)
Rnds 6-7: PM. Sc in ea sc around.
Rnd 8: Move PM. Sc 3, [dec, sc in next sc] 3 times, sc in next 18. (27)
Rnd 9: Move PM. Sc 2, [dec, sc in next sc] 3 times, sc in next 16. (24)
FO, leaving a long tail for sewing.
Stuff leg and foot. Pin and sew together using tail from foot.
With D, embroider foot using the Cabbage Patch method (scroll down to step 9 of her doll pattern instructions).

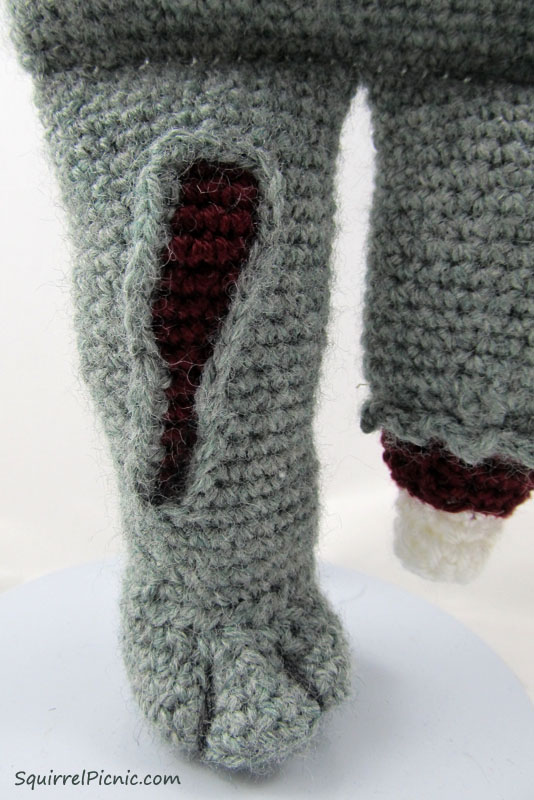
Second Leg (Bone Exposed)
(Continue using A and F-5 crochet hook.)
(Switch to B wherever you choose to add a wound as you work down the length of the leg.)
Insert hook into FL at the outer edge of the bottom of the doll.
Pull up a loop, ch 1.
Rnd 1: Sc in FL of the next 14 scs, turn and sc in the unused loops of those 14 scs. Join with slst to 1st sc. (28)
Rnds 2-14: Sc in ea sc around. (28)
Rnd 15: * Sc 5, dec, rep from * 3 more times. (24)
Rnd 16: *Sc 4, dec, rep from * 3 more times. (20)
Switch to B.
Rnd 17: Sc in ea sc around.
Rnd 18: *Sc 3, dec, rep from * 3 more times. (16)
Rnd 19: *Sc 2, dec, rep from * 3 more times. (12)
Stuff leg.
Switch to E.
Rnd 20: Sc in BL of ea sc around.
Rnd 21: * Sc, dec, rep from * 3 more times. (8)
Rnd 22: Sc, ch 3, dc in next sc and in ea sc around. Join with slst to top of Ch-3.
FO, leaving long tail.
Thread tail through ea of the dcs around, add a bit of stuffing, and pull tight to close. Thread the tail up through the center, pull tight and weave in end.

Bottom Half of Head
With A and F-5 crochet hook, ch 2.
Rnd 1: 6 sc in 2nd ch from hook.
Rnd 2: 2 sc in ea sc around. (12)
Rnd 3: * Sc, inc, rep from * 5 more times. (18)
Rnd 4: * 2 sc, inc, rep from * 5 more times. (24)
Rnd 5: * 3 sc, inc, rep from * 5 more times. (30)
Rnd 6: * 4 sc, inc, rep from * 5 more times. (36)
Rnd 7: * 5 sc, inc, rep from * 5 more times. (42)
Rnd 8: * 6 sc, inc, rep from * 5 more times. (48)
Rnd 9: * 7 sc, inc, rep from * 5 more times. (54)
Rnds 10-21: Sc in ea sc around.
Rnd 22: * 7 sc, dec, rep from * 5 more times. (48)
Rnd 23: * 6 sc, dec, rep from * 5 more times. (42)
Rnd 24: * 5 sc, dec, rep from * 5 more times. (36)
Now work the Flap at the top of the head:
Sc in next 18 scs, ch 1.
Turn, sc in ea sc across, ch 1. (18)
Turn, * sc 4, dec, rep from * 2 more times, ch 1. (15)
Turn, sc in ea sc across, ch 1.
Turn, * sc 3, dec, rep from * 2 more times, ch 1. (12)
Turn, sc in ea sc across, ch 1.
Turn, * sc 2, dec, rep from * 2 more times, ch 1. Do not turn.

Sc in the end of each row and all the way around, adding picots here and there.
Rnd 25 (Making jagged edge of skull): Sc in ea st along the edge of the Flap you just made. Sc in ea sc around while placing picots (sc, ch 1, 2, or 3, sc all in one st) of varying heights in random scs. Sc in ea st along the other edge of the Flap and across the top. Join with slst. FO, leaving a long tail.

Eyes and Eyelids (Make 2)
Unlike the girl’s eyes, these eyes are flat. Make these if you don’t want one of your eyes to “fall” out of the socket.
Eyes (Make 2)
With D and size D-3 crochet hook, ch 2.
Rnd 1: 6 sc in 2nd ch from hook, switch to E. Join with slst, ch 1. (6)
Rnd 2: 2 sc in ea sc around, join with slst, ch 1. (12)
FO, leaving a tail. Weave in other end.
With F, embroider a black pupil in the center of the eye.
Eyelids (Make 2)
With A and F-5 crochet hook, ch 7.
Row 1: Sc in 2nd ch from hook and ea ch across (BL only is ok), ch 1, turn. (6)
Row 2: Sc, hdc, dc, hdc, sc, slst.
FO, leaving long tail for sewing.
Note if your zombie will have the zombie boy hair and skull flap: Before sewing the face on, make sure you are holding your zombie boy’s Head so that the Skull Flap is on the right when facing you (in other words, his left). This will allow for proper placement of the hair later on.
Sew eyes to the head. Sew an eyelid on top of each eye with the “skinnier” end at the outer edge of each eye.
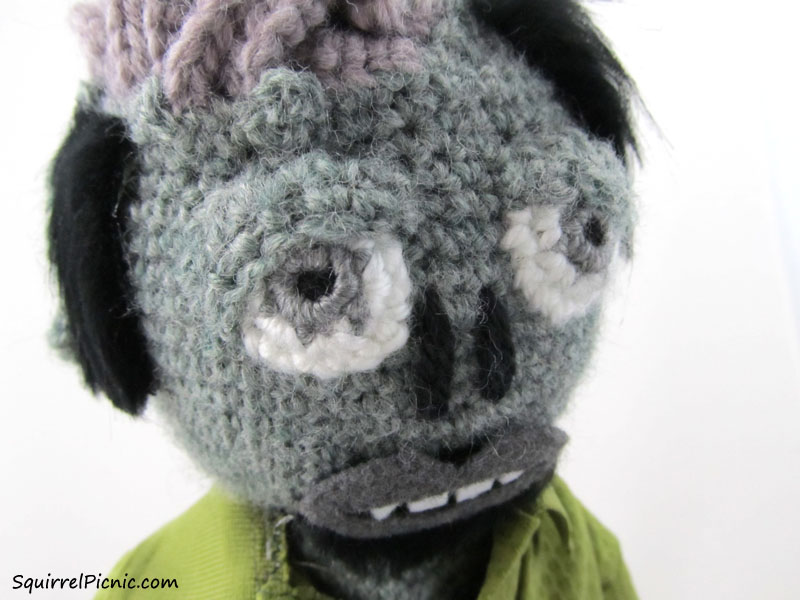
Nose
Thread a tapestry needle with F, double up the yarn and embroider two lines for the holes where the nose would normally be.

Mouth
Use the bottom half of this PDF pattern to cut out the mouth, lips, and teeth: Pattern for Zombie Parts
Glue the teeth to the mouth piece. Glue the mouth with teeth to the zombie’s head. Be sure to cut out the hole in the center of the lips. Then glue the lips onto the mouth.
Right Ear
With A and F-5 crochet hook, ch 2.
Rnd 1: 6 sc in 2nd ch from hook.
Rnd 2: 2 sc in ea sc around. (12)
Rnd 3: * Sc, inc, rep from * 5 times. (18)
Rnd 4: * 2 sc, inc, rep from * 2 more times. This will take you halfway around the circle. Ch 2, dc 3 in next sc. Slst, FO, leaving a long tail for sewing.
Left Ear
With A and F-5 crochet hook, ch 2.
Rnd 1: 6 sc in 2nd ch from hook.
Rnd 2: 2 sc in ea sc around. (12)
Rnd 3: * Sc, inc, rep from * 5 times. (18)
Rnd 4: Slst, ch 2, dc 3 in next sc, * sc 2, inc, rep from * 2 more times. Slst, FO, leaving a long tail for sewing.
Use the PDF pattern for the hair to help you place the ears correctly on the head: Pattern for Zombie Parts
Pin and then sew ears on.
Brain
With C and G-6 crochet hook, ch 16.
Row 1: 3 sc in 2nd ch from hook and in ea st across, ch 1, and turn.
Row 2: 3 sc in ea st across, ch 1, and turn.
Row 3: 3 sc in ea st across, FO, and work in ends.
You’ll need to play with the form a bit to make it look like a brain. Just move it around and let it twist naturally until it takes a shape that appeals to you. Set aside Brain for the moment.
Putting the Head Together and Attaching It to the Body
Insert female part of doll joint into bottom of Bottom Half of Head. Insert male part of joint from Body and click them together. Stuff head. Using the tail on the Bottom Half of Head, sew Brain to Bottom Half of Head.
Hair
Use the top portion of this PDF pattern to cut out the hair: Pattern for Zombie Parts
Glue the hair to the head, careful of the placement around the Brain and Ears.
Arm (Make 1)
With A and F-5 crochet hook, ch 2.
Rnd 1: 6 sc in 2nd ch from hook.
Rnd 2: 2 sc in ea sc around. (12)
Rnd 3: * Sc, inc, rep from * 5 more times. (18)
Rnds 4-8: Sc in ea sc around.
Rnd 9: 2 sc in next sc, 4 sc in next sc, 2 sc in next sc, sc in remaining scs around. (23)
Rnd 10: Sc in next 3 scs, 2 sc in next 5 scs, sc in remaining scs around. (28)
Rnd 11: Sc in next 3 scs, dec 5 times over the next 10 scs, sc in remaining scs around. (23)
Rnd 12: Dec 1 time over next 2 scs, dec 1 time over next 4 scs, dec 1 time over next 2 scs, sc in remaining scs around. (18)
Rnd 13: Sc in ea sc around.
Rnd 14: * Sc, dec, rep from * 5 more times. (12)
Stuff hand.
Rnds 15-35: Sc in ea sc around, stuffing as you go.
Leave the last ½” of the arm unstuffed.
Row 36: Pinch the upper arm flat, line up sts. Ch 1, turn, and sc the arm closed. (6)
FO, leaving long tail.
If you’d like to embroider scratches as I did, now is a good time. With D, embroider hand as you did for foot. I used three stitches, so my hand has three fingers and a thumb. Whatever, it looks cute.
Using tail, sew arm to body.
Arm with Bone (Make 1)
Leaving a tail of about 6”, with E and F-5 hook, ch 4. (Keep track of this tail as you go around, as it will be used to shape the bone later. Work in all other ends as you change colors.)
Rnd 1: 7 dc in 3rd ch from hook, join with slst. (8)
Rnd 2: Sc in ea dc around.
Rnd 3: * Sc, sk, rep from * 3 more times. (4)
Switch to B.
Rnd 4: Sc in ea sc around.
Rnd 5: 2 sc in FL only of ea sc around. (8)
Rnd 6: * Sc, inc, rep from * 3 times, slst. (12)
Switch to A.
Rnd 7: Sc in BL only of ea sc around.
Rnds 8-17: Sc in ea sc around, stuffing as you go.
Leave the last ½” of the arm unstuffed.
Pull white tail taunt so bone flattens out on the end and weave in end to secure it.
Row 16: Pinch the upper arm flat, line up sts. Ch 1, turn, and sc the arm closed. (6)
FO, leaving long tail. Use long tail to sew the arm to the body.
Finishing Touches
Just like you added jagged flesh to the skin around the brain, now’s a great time to go back and do the same to the skin around any gaping wounds you created on the arms and legs. Pull up a loop of A, ch 1, and sc in the stitches around each wound, adding a picot here and there.
Clothing
Customize your zombie with clothes that suit your style! Most 16” to 18” doll clothes patterns will fit your zombie, but do a fitting with the pattern before you start. There are a lot of free American Girl Doll clothes patterns online and from what I could tell most of them will fit your zombie with minimal tweaking. (Zombie hips are wider than American Girls… go figure.)
These are the free patterns I used for the male zombie:
Zombie Polo Shirt (Free, but you have to sign up for their mailing list.)
This Polo Shirt Pattern and Tutorial from Liberty Jane Patterns is amazing. It even includes instructions on how to sew a doll-sized polo shirt from a human-sized one, which is what I did. So neat! It’s free, but you have to sign up for their newsletter, which, if all their patterns are this good, sounds kinda worth it.
Zombie Cargo Shorts
This free pants pattern is in French, but I used Google translate and was able to get the gist. A free pattern for a hoodie is also included. I wish I had time to make it!


February 7, 2014 at 11:17 am
Wow,Jennifer,this is so….awwww……….great!This will be one of my future projects and I’ll crochet yours beauties for all my crochet skeptical friends!You’re a genious!
February 7, 2014 at 11:35 am
Tajana, you are awesome! Thanks so much for the support. I can’t wait to see your crochet creations.
February 7, 2014 at 11:40 am
thanks!I’ll try to do the best!The pattern is gorgeous!!!!And a lot of people will love them! ❤ ❤ ❤
February 7, 2014 at 11:56 am
Great! If you see anything in the pattern that I could improve, feel free to let me know. I’m always up for making things better/easier.
February 7, 2014 at 12:00 pm
Ok,but think that there will be no need for 😀 😀 😀
February 7, 2014 at 12:07 pm
🙂 And with your talent, I bet your zombie will be awesome!
February 7, 2014 at 12:12 pm
🙂
February 7, 2014 at 11:27 am
You had me at zombie. XD these are really cute though.
February 7, 2014 at 11:34 am
Yay! Gotta love zombies, especially the cute ones. 🙂
February 7, 2014 at 11:55 am
These guys are toxic cute! Love love love them!
February 7, 2014 at 11:55 am
Yay! I’m so glad you love them, Juliette!
February 7, 2014 at 11:58 am
It went like this.: Opened Pinterest and first photo I saw was your zombies. Turned the Pinterest down and hurried to see them in real. 😀 They are fantastic!!! Love them and have to make one or two!
Now am all excited and looking around to see if I have right color yarns to start working on them tonight.
Thank you so much for great, great idea and pattern.
♡
February 7, 2014 at 12:12 pm
That’s so exciting, Vanja! I can’t wait to see what zombies your expert hands create! These are the first dolls I’ve made, so it means a lot to hear that a doll-making master such as yourself approves of them. 🙂
February 8, 2014 at 4:27 am
ah…I am no doll-making master! 😀 Love to play, that’s all!
Can’t wait either, to show you the pics !
February 7, 2014 at 12:56 pm
WOW!!!
February 7, 2014 at 1:42 pm
Fabulous!
I don’t crochet but I know folks who do who are going to love this. Can’t wait to share it with them.
February 8, 2014 at 10:23 am
Thank you, and thank you for sharing it with your friends!
February 7, 2014 at 3:06 pm
Awwww, cute zombies!!! I had forgotten all about the teaser you gave us for this one, which I had guessed was brain surgery! Another fantastic project, and kudos to your husband for putting up with and supporting your hobby… which brings such great joy not only to you, obviously, but to many other people across the world who love your work!
February 8, 2014 at 10:21 am
Thank you so much, Bill! For the compliments and the encouragement. It’s people like you who make all the hard work worthwhile. It’s always such a thrill when these projects are well received. Thanks again!!
February 7, 2014 at 5:49 pm
HaHa! Mine went like this. Checking Rainbow donkey for my Evil Squirrel contribution, saw Zombies in love, thought “how did I miss that?” realized I didn’t miss it as it is new. Delightfully horrible! The expressions!! The “bathroom scene” eeek! The eye ball hanging out? Who cares? Love is blind anyway. Those we love always look beautiful. The boy will LOVE them. You are pure unadulterated awesomesauce! 😀
February 8, 2014 at 10:18 am
Yay, Sharon! I’m so excited that I was able to “surprise” you in that way. I’m really, really looking forward to your submission to Bill’s contest now. I hope I have time to submit something myself, but if not, I’ll be rooting for you of course. 🙂
February 8, 2014 at 3:25 pm
ha ha ! I always wondered how zombies should actually look , now I know 🙂 brains exposed, arms gone, teeth baring !!! you are sure lucky to have a hubby that can select the yarn for you to make these zombies …clearly this can happen only when you are in love 🙂
February 11, 2014 at 11:56 am
Haha! It is true. I don’t know what I would do without him. 🙂
February 10, 2014 at 5:29 pm
Oh, you are so clever! I just love your sense of whimsy.
February 11, 2014 at 11:56 am
Thanks, Angie! I’m so glad you enjoy it. 🙂
Pingback: Valentine’s Card | AmigurumiBB's Blog
Pingback: Zombi me… | AmigurumiBB's Blog
February 20, 2014 at 11:02 pm
hele mooie poppen, dank je wel voor het delen
February 21, 2014 at 12:45 pm
Graag gedaan!
October 14, 2014 at 5:59 pm
oh I love these. they are so awesome. iam making one for a little boy in my apartment building. my on ? is what is a female part to put on bottom of head. iam so dumb. please help. oh ya iam crocheting the cloths. thank you debi
October 15, 2014 at 8:26 am
Hi Debi! No worries. I can see your confusion. When I say female and male, I’m referring to the doll joint that holds the head to the body and allows the head to turn. Maybe it would be easier if you could see it. If you don’t mind a stationary head, you could always just sew the head to the body. 🙂 Hope that helps! Glad to hear your are enjoying your zombie so far.
Pingback: Crochet Zombie Pattern Roundup - Pops de Milk
October 26, 2014 at 4:53 pm
well iam done with my zombie. I had soooooooooooo much fun making him. I don’t know how to send you a pic. but I bought a baby shirt and made his pants. thank you for a wounderfull pattern.
October 27, 2014 at 5:25 am
Yay! That’s great news, Debi. Congratulations! I would love to see your zombie. You can send photos to squirrelpicnic@gmail.com. Your clothing for him sounds pretty cool too. Can’t wait to see!
May 29, 2016 at 7:54 am
Hahaha… they are amazing!
May 30, 2016 at 6:06 am
Thanks!