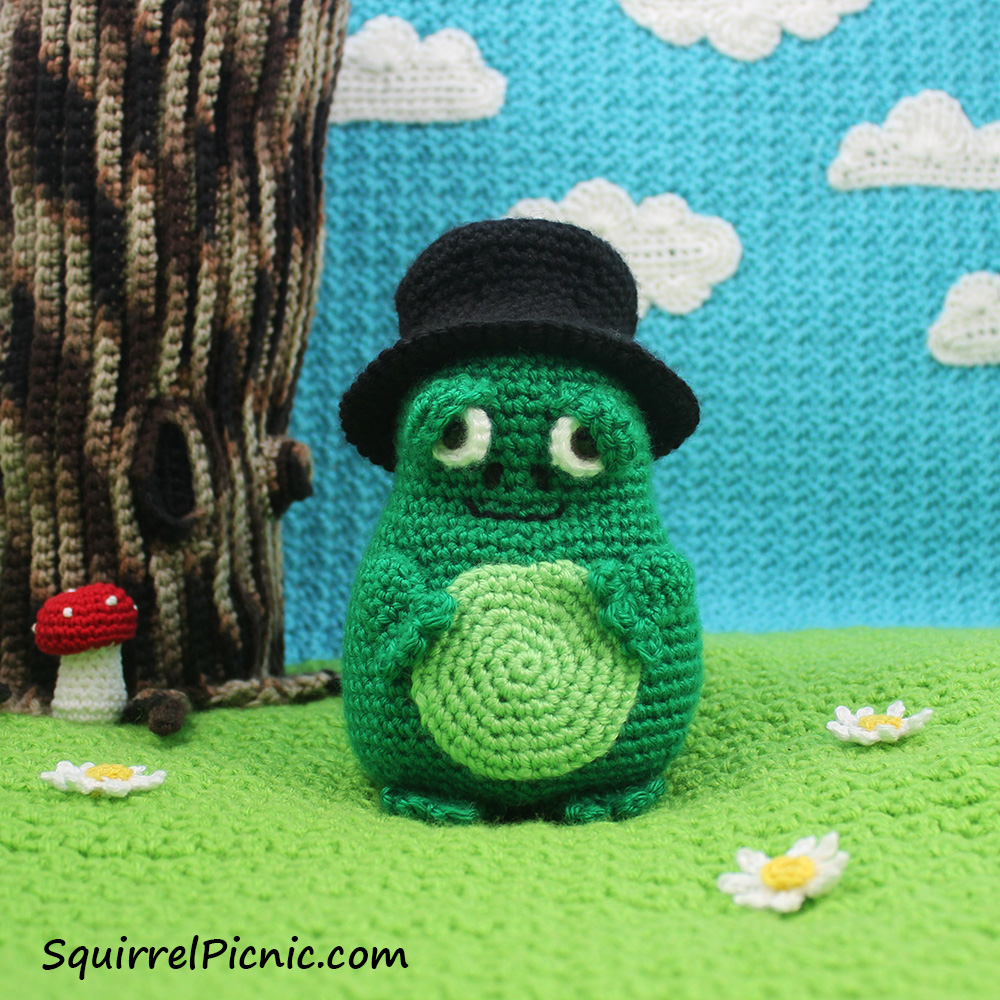
Mayor Snack Frog was the very first fatimal I ever crocheted. What’s a fatimal, you ask? A fatimal is, well, a fat animal. And at Squirrel Picnic, the fatimal clan is a bunch of fun-loving, easygoing, party animals. From their embroidered noses to their tiny little hands and feet, there’s just so much to love about them. They never consider their size to be a disadvantage. They never let anything get them down — they’re too busy having fun.
Of all the fatimals, Mayor Snack Frog could be considered the leader, but the truth is that there’s not really an organization to lead and fatimals aren’t much for being led anyway. In fact, he’s the one who gave himself the title of mayor. No one else seems to mind, so what the hoot. He has friends from all over the world who sometimes stop by to visit. He really does know how to throw a good party.
Mayor Snack Frog Crochet Pattern

Finished size without top hat: 6″ tall and 11 1/2″ around at the widest point
Finished size of top hat: 2″ tall and 12″ around the outside of the brim
Materials
(A) 85 yds worsted-weight yarn in green (Caron Simply Soft in Dark Sage, 6 oz [170 g] / 315 yds [288 m])
(B) 32 yds worsted-weight yarn in black (Caron Simply Soft in Black, 6 oz [170 g] / 315 yds [288 m])
(C) 5 yds worsted-weight yarn in light green (Caron Simply Soft in Pistachio, 6 oz [170 g] / 315 yds [288 m])
(D) small amount of worsted-weight yarn in white (Caron Simply Soft in White, 6 oz [170 g] / 315 yds [288 m])
G-6 (4.00 mm) crochet hook
Size 12 mm safety eyes
Polyester Fiberfill
Tapestry needle
Gauge
5 sts = 1″
5 rows = 1″
Instructions
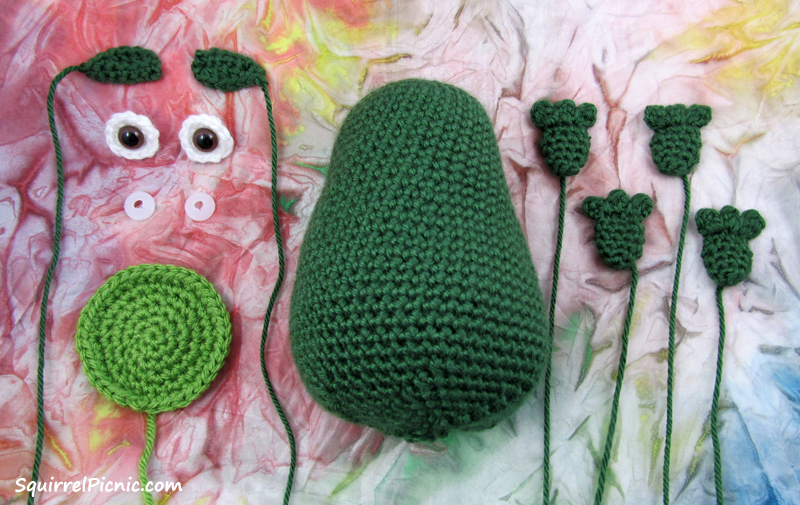
Eyes (Make 2)
With D, ch 2.
Rnd 1: 6 sc in 2nd ch from hook.
Rnd 2: 2 sc in ea sc around, join with slst. (12)
FO. Weave in ends.
Set aside for now.
Eyelids (Make 2)
With A, ch 7.
Row 1: Sc in 2nd ch from hook and ea ch across (BL only is ok), ch 1, turn. (6)
Row 2: Sc, hdc, dc, hdc, sc, slst.
FO, leaving long tail for sewing.
Set aside.
Body
With A, ch 2
Rnd 1: 6 sc in 2nd ch from hook. (6)
Rnd 2: 2 sc in ea sc around. (12)
Rnd 3: * sc, inc, rep from * 5 more times. (18)
Rnd 4: * 2 sc, inc, rep from * 5 more times. (24)
Rnd 5: * 3 sc, inc, rep from * 5 more times. (30)
Rnd 6: * 4 sc, inc, rep from * 5 more times. (36)
Rnds 7-15: Sc in ea sc around.
Rnd 16: * 5 sc, inc, rep from * 5 more times. (42)
Rnd 17: Sc in ea sc around.
Rnd 18: * 6 sc, inc, rep from * 5 more times. (48)
Rnd 19: Sc in ea sc around.
Rnd 20: * 7 sc, inc, rep from * 5 more times. (54)
Rnds 21-30: Sc in ea sc around.
Rnd 31: * 7 sc, dec, rep from * 5 more times. (48)
Rnd 32: * 6 sc, dec, rep from * 5 more times. (42)
Rnd 33: * 5 sc, dec, rep from * 5 more times. (36)
Rnd 34: * 4 sc, dec, rep from * 5 more times. (30)
Rnd 35: * 3 sc, dec, rep from * 5 more times. (24)
Insert safety eyes into the center of the white eyes and attach to head. Sew eyelids to the frog’s head so that it wraps around the white part of the eye.
Stuff frog lightly.
Rnd 36: * 2 sc, dec, rep from * 5 more times. (18)
Rnd 37: * Sc, dec, rep from * 5 more times. (12)
Rnd 38: * Sk, sc, rep from * 5 more times. (6)
Join with slst. FO, leaving a tail. Thread tail through remaining sts and pull to close. Weave in end.
Nose and Mouth
Using B, embroider two French knots for the nose and using a back stitch embroider a smile for the mouth.
Using C and back stitch, embroider an M above the nostrils and a line below the mouth to outline a snout.
Belly
With C, ch 2
Rnd 1: 6 sc in 2nd ch from hook.
Rnd 2: 2 sc in ea sc around. Slst in 1st sc to join. (12)
Rnd 3: Ch 1, * sc, inc, rep from * 5 more times. Slst in 1st sc to join. (18)
Rnd 4: Ch 1, * 2 sc, inc, rep from * 5 more times. Slst in 1st sc to join. (24)
Rnd 5: Ch 1, * 3 sc, inc, rep from * 5 more times. Slst in 1st sc to join. (30)
Rnd 6: Ch 1, * 4 sc, inc, rep from * 5 more times. Slst in 1st sc to join. (36)
FO, leaving long tail for sewing.
Sew to the middle of Mayor Snack Frog’s belly.
Feet and Hands (Make 4)
With A, ch 2.
Rnd 1: 4 sc into 2nd ch from hook. (4)
Rnd 2: 2 sc in ea sc around. (8)
Rnds 3-5: Sc in ea sc around.
Tuck in ends and press flat.
Row 6: Sc this closed with 3 scs (skipping the sts on either end where it is folded). Turn. (3)
Row 7: Ch 2, 2 dc in each of next 2 sc, (2 dc, ch 2, slst) in last sc.
FO, leaving a tail for sewing.
With the tail, thread through the 1st of the 3 sc in Row 6. Pull the thread up and over the dcs in Row 7 and back through the same space. Then thread through the 3rd sc in Row 6. Pull the thread up and over the dcs in Row 7 and back through the same space. Weave in to secure, but don’t trim just yet. (You’ll use the rest of the tail to sew the arms and legs to the frog.)
For feet, sew two of these to the bottom of the frog so that the toes stick out from under his belly. For hands, sew two of these to the sides of the frog so that the fingers reach out just in front of his belly.
 Top Hat
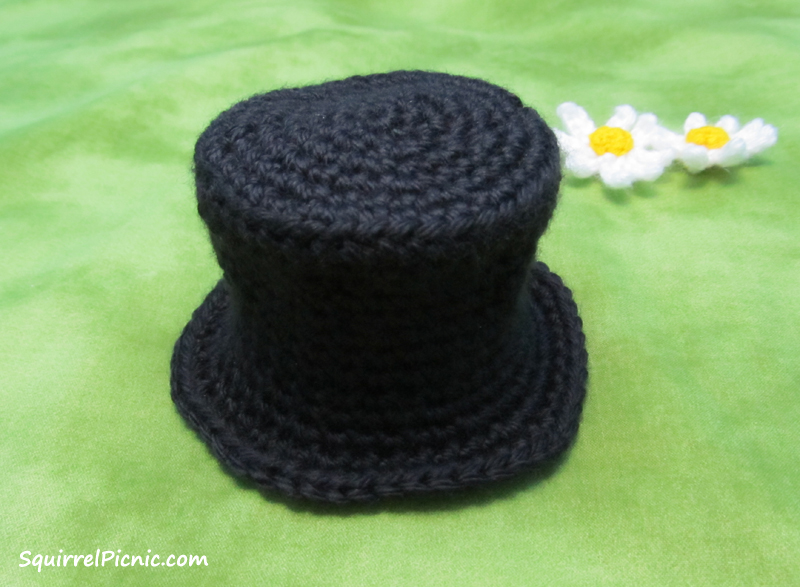
With B, ch 2.
Starting at the flat top of the hat:
Rnd 1: 6 sc in 2nd ch from hook.
Rnd 2: 2 sc in ea sc around, join with slst, ch 1. (12)
Rnd 3: * sc, inc, rep from * 5 more times, join with slst, ch 1. (18)
Rnd 4: * 2 sc, inc, rep from * 5 more times, join with slst, ch 1. (24)
Rnd 5: * 3 sc, inc, rep from * 5 more times, join with slst, ch 1. (30)
Rnd 6: * 4 sc, inc, rep from * 5 more times, join with slst, ch 1. (36)
Rnd 7: * 5 sc, inc, rep from * 5 more times, join with slst, ch 1. (42)
Moving on to the sides of the hat:
Rnd 8: Sc in BL only of ea sc around.
Rnd 9: Sc in ea sc around.
Rnd 10: * 5 sc, dec, rep from * 5 more times. (36)
Rnd 11: Sc in ea sc around.
Rnd 12: * 4 sc, dec, rep from * 5 more times. (30)
Rnds 13-15: Sc in ea sc around, join with slst, ch 1.
To create the brim:
Rnd 16: Sc in FL only of ea sc around, slst, ch 1.
Rnd 17: * 4 sc, inc, rep from * 5 more times, join with slst, ch 1. (36)
Rnd 18: * 5 sc, inc, rep from * 5 more times, join with slst, ch 1. (42)
Rnd 19: * 6 sc, inc, rep from * 5 more times, join with slst, ch 1. (48)
Rnd 20: * 7 sc, inc, rep from * 5 more times, join with slst, ch 1. (54)
FO, weave in ends.


You must be logged in to post a comment.